
Fotor Review
Detailed Reviews
Click here and click there! With so many forms of websites, be it social media or portfolio sites, we are accustomed of seeing and clicking hundreds of photos every second. All these photos are clicked by many people, be it professionals, teens, artists, or amateurs.
Many times, it happens that we have visited an exquisite location and were able to click only a couple of photos. Come home, and you see that those aren’t what you wanted them to be!
In such situations, we seek refuge to tools like photo editors to help us correct or improve those images.
Pros
- Beginner friendly
- Lots of amazing templates.
- Multiple platform
- Tons of varied graphics, photo effects, and other editing features.
- A good image editor that can make worse images look decent.
- Up to 10000x10000 size custom template.
- Lots of customization in collages.
- Great mobile interface for photo freaks to charm their audience.
Cons
- Desktop version has become useless and hasn’t been updated since long.
- Lacks external integration to enhance the working of the services.
- No team management and group collaboration feature for organizational work.
- No raw camera files support and users need to convert it in JPG/PNG format first.
- Less than average customer support. Needs more support options like chat, tickets, etc.
- Beautify features to enhance the face dynamics is not up to the mark.
- Tutorials are not properly maintained and lack many details, along with multiple screenshots.
Overview
Anyone who has been uploading or using social media for some time is aware of needs of the people to look cool and amazing in their profile pics. People are using tons of such tools to edit their photos every minute and get a perfect photo as desired.
Amongst such online photo editing tools comes a big fish, Fotor. Coming from the land of dragons, Chengdu, China; this product has recently swept the market with its amazing features. Founded in 2012 as a private company, it has grown exponentially in international market and now supports over 14 languages.
Fotor is sired by Everimaging, which has armed it with classic editing options that can leave even big desktop apps ashamed. This editor has spread its wing across multiple platforms like mobile, desktop, and web interface.
It is mostly used for editing personal photos, but it can also be used to make amazing printables like resumes, tickets, mobile wallpapers, social media covers, cards, etc.
Even though it is a top product, we will dissect every detail of this application in this review, over every platform and then pass our conclusion on the product.
Let us Begin!
First of all, users need to get a Fotor account to start editing the photos. One thing that pinged us at the beginning itself is that they do not offer a free trial version. A big bummer to be honest!
Being such an excellent product in this market, we would expect Fotor to include at least a 14-day free trial of the pro edition, and if they want, they can restrict some features in it.
One more thing that annoyed us was that free version was absolute bonkers. Surprised? Try using other products like Canva, PicMonkey, Pixlr, etc. and you will see how decent their free version is.
Contrary to them, Fotor’s free version is highly restrictive, and users cannot do any kind of manual editing in it. They cannot edit colors, background, font types, and many such regular detailing. Nevertheless, there should be a trial version for free.
We purchased a subscription for Pro version of product and started using its editing function. The main panel of editor is not like other photo editors. The users will see only home page of website and three main options to begin editing, i.e. Edit photos, Make collage, and Create design.
Based on your target, choose between any of the three and then begin with whatever photo or template that you want to make. The entire editor works on HTML5 and so it will be compatible with most of the browsers.
In our testing, we encountered some editing issues while using it in chrome like script not loading properly sometimes. Switching to Firefox made life easier. There may be many reasons for bad loading, but overall, non-chromium browsers were much smoother with the interface.
There is no walkthrough or guide in initial panel. This will only pop up after you have entered the editor. But do not worry, the UI is very sleek, and we believe even a noob can master it in a couple of days.
Templates
Driving on to next critical zone and steering our way to create some amazing photos, we stop to look at the Templates!
As we have listened to this word many times while using many editing products, be it website editing, photo editing, etc. Templates are basic design pallets, on which we can create a desired image.
Fotor, like other online editors, has tons of templates to be chosen from. The templates are properly distributed in distinct categories.

The main categories users can see here are Social media templates, posters, cards, leaderboards, ads, labels, letterheads, gifts, resumes, flyers, tickets, etc.
All these items are very common amongst most editor tools. There are over 1000+ templates to choose from. But still, are you not satisfied by any of these templates? Well, you can choose the custom size option to create a new template.
The max pixel size supported by Fotor is 10,000x10,000. This is too much even for advanced photographers. However, this allows us to flex high-resolution photos and raw camera files.
Talking of raw camera files, Fotor only supports importing general file types like JPG, PNG, and SVG. This was absent in many other photo editors too. If not, Fotor can have their own raw file converter to convert major camera files like from Nikon, Kodak, Canon, etc.
However, files up to 50 MB with supported extension were uploaded smoothly on our connection. Although we were on a 60 Mbps connection, but we also checked it on our phones using normal data, and it worked fine.
Looking forward to templates, users can see a list of entire templates via a search template function. The new window contains every template along with their category. There are very rich templates in this section, as we discussed earlier.

Users just need to select any template they find close to their idea. This opens a new tab with template’s view. On this window, users can bookmark any template as favorite. All these favorite marked templates can be later accessed in My Favorites section.
One more amazing thing added to this section is tags. Users can also add tags to these templates. These are very useful if you want a similar type of templates. There is also a report button to point out any graphic content or copyright infringement.
There is one more section for templates, and that is collage section. The collage section has four main themes viz. classic collage, artistic collage, funky collage, and photo stitching. All have similar features to other sections in terms of editing.
Overall, Fotor has not disappointed in terms of template stocks and also their accessibility. Many of them are premium only. And so, free users are better off to another service as it lacks proper editing features in free plan.
We felt that there was some lack of infographics templates and also that template’s size was locked. If we are allowing customization, it must be complete.
And so, choosing colors, fonts, resize the template, etc. must be available. Regardless of it, they certainly delivered as per their reputation in this section.
Image Editor
This is one of the most crucial limbs of online editing software, i.e., image editing functions. Let us see what variety Fotor has to offer compared to other equivalent products.
Fotor comes over several platforms like mobile apps, desktop app, and web interface. For now, we will see the most popular function used for editing, i.e. web interface.
As we have gone through earlier, once you have selected a collage or a template, you will be redirected to the editor menu. In this editor window, users will find quite a similarity with the photo editor apps they have used earlier.

The interface is very sleek and mere hovering around using a mouse will teach them a lot. Users can see some familiar options on top navigation bar. Here, you can see open, undo/redo, sync, share, and save buttons.
The central field is an editing area. This area is designed with some amazing UI perks. Users can zoom in/out using mouse scroll. One more impressive thing is that users can zoom to a particular area they want rather than whole image and then drag to that desired location.
There is a floating widget in bottom of this field. It contains name of the project, resize tools, zoom functions like fit to width, 1:1, percentage zoom, etc. There is also a preview button for users to see how their design will look before they publish it.
While editing single elements on fields, users will see a dashed line around every element. Clicking on those rectangle fields will allow them to edit that item. When it comes to editing these single items, they are basically under two categories, i.e., image editing and font editing.
Both of them are primary in most editor and need to have a sound setup. The users can click on any of the text fields and then some options like font colors, font styles, size, justification, formatting like bold, italics, underline, word spacing, and background color for the text fields are available.
Similar customization is given for shapes and images. However, image editing is a whole new section than mere template editing. To start editing these images, there are whole new functions given for images.

We will discuss these functions in detail in upcoming sections. Similar to editing for template section, the top navigation bar has two unique options viz. revert changes and snapshot.
Both snapshot and revert changes work hand to hand when we use multiple layers of editing. This is useful to compare changes you have made in the images and helps you to choose the correct images.
The right-side navigation bar consists of a list of all the photos that you’ve imported recently. Users can directly drag and drop them into the mainframe.
The spacing tool is a decent one, but it still lacks many significant improvements. One of them is having proper distance adjustment methods to maintain desired space between multiple elements. Many editors have this feature to give equal spacing across the work.
There are some more options given to alter additional shapes and images. The users can change colors of these shapes, their layers, and boundaries accordingly. Other things like cloning, shadows, transparency, layer list, locking, and delete items are some useful options.
Users can directly use move, rotate, or expand on these elements using a selection tool.
The layers section needs both visual and functional improvements. Currently, you can select an element and then use layer button to move it accordingly. You can see the position of these layers in a pop-up bar.
Ideally, layers must have a separate floating window. This window should list all layers, with their names, positions, must be draggable up/down. Also, they should allow naming these layers. The layers section was better implemented in PicMonkey, Visme, and Canva.
One more improvement that is needed is to rotate alignment. Although they do show angle measurements while rotating items, they can also give inbuilt rotation wheel to ease the function.
Another thing we felt that was better in other products was having a floating window of editing functions. Although the editing bar is just above the central field, a floating and draggable window with all editing option will add significant value to the UI.
Other than this, there are no more significant options for image editing. Most of the features will be seen in widgets section. The ease of using these functions is remarkable. They should look for adding some more items in editor fields like having a coordinate pointer, editable dimension details for selected item, and more such QOL features.
Let’s Explore different Tools
Since Fotor has given options to create or edit photos, collages, or general designs, we will now look into these functions and tools to help us accomplish our task.
All three of the categories have some differences in their editing options, and so we have to divide them accordingly. There are some common items like text, background, etc., which we will discuss later on.
Editing Images
You may have edited your photos many times. Be it to look better on social media, or just to get kicks, most of us are somewhat familiar with these tools.
Image editing contains some of the most used items in entire application, and so these are to be reviewed first.
Basic Editing
The first tab in image editing is a basic editing tab. As the name goes, this function has most commonly used items in its baggage and delivers some great editing.
The first option is one tap enhance button. This is used to do some auto correction on a selected image like auto color, contrast, and other such stuff adjustment.
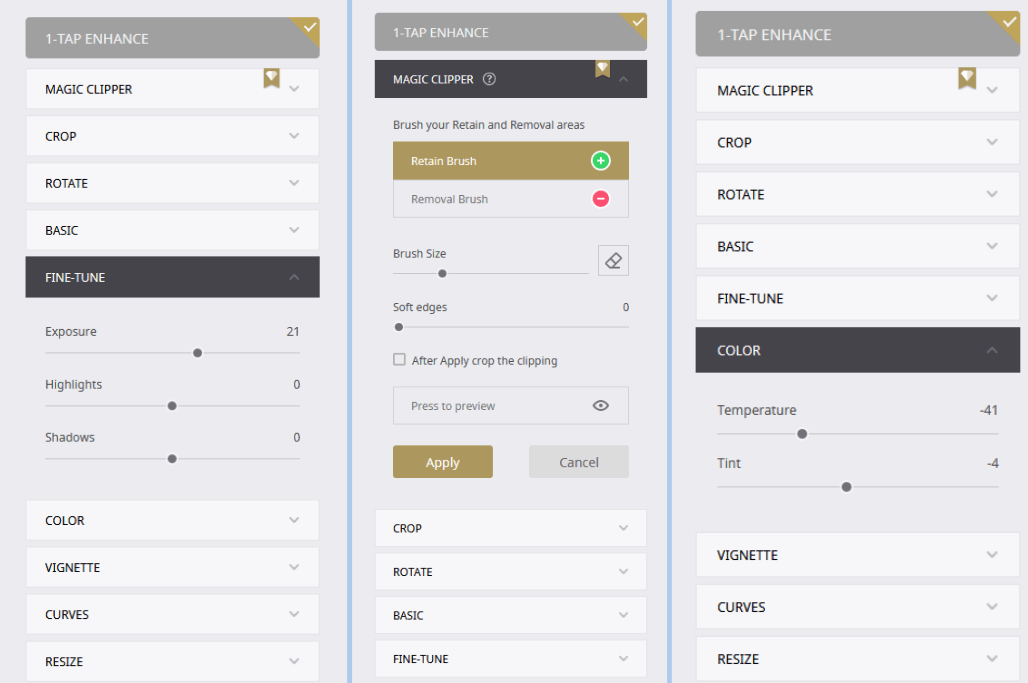
There is a magic clipper button to remove the background images or vice versa. In our testing, the clipper was mediocre at best. For some images, it was unable to remove selected part properly. There are two brush, one to select wanted area and another to remove the unwanted area.
Other than this, there were some more general options to edit the photos like crop, rotate, RGB strength, vignettes, curves, etc. Users can use resize button to change percentage proportion of the photos.
The rotate function lacked a rotate wheel, to directly use it for rotating images, rather than relying on separate horizontal and vertical buttons. The fine tune option had some more items like exposures, highlights, and shadows to improve image output.
Overall, editing functionalities in this section did not offer an extraordinary output like some dedicated apps viz. Adobe Photoshop, Lightroom, etc. Some of the items like clipper needs to more precise and user-friendly.
Do some effects On Your Photos
Now comes one of the unique editing functions in every editor. Most photo editing software have their effect stock to add glow on your pics.
Going through initial set of these functions, you will notice that most of them are almost same but with just a tint or two behind a color you choose. The initial effects only change surroundings of face in a similar style to vignette.

The users can see some effect for certain popular vignette styles like artistic, black and white, Xmas, mono, vintage, retro, oil painted, with latest additions being color splash, pixelate, and TIL shift-brush.
One more very interesting feature user can find here is a GoART feature by Fotor. It is used to different styled paintings type effect to your photos. Regardless, this effects section gave us some unique effects, but most of them were average and even though quantity was good, their variety was just ok.
Beautify
Now comes the part that makes most photo maniacs turn blue. This feature is likely to be used by almost every reader that has appeared here.
As we can see from the name of feature itself, this function will allow users to improve quality of their faces in photos and also deals with that pesky acne and scars.
The first section to beautify faces is the base editing. This section is armed with blemish fix, smoothing tools, wrinkle removers, blush fix, etc.

The blemish fix was ok at best. Unlike apps like Photoshop and other desktop apps, it did not provide any good fixes. First, the removal of blemishes needs a more intelligent algorithm. The fix applied looked like paint brush marks and were not smooth.
The second annoying thing here was to keep clicking on every spot to remove it. We thought we were doing some kind of life cycle test for mouse clicks. This needs to be replaced by long press. Most top end products allow long press to reduce clicks and work your way smoothly across the face.
Thankfully, we were not disappointed in next part. The smoothing part worked much better than above one, and it had the long press feature too. It worked a hundred times better than blemish removal and marks went almost invisible with its use.

There is a brush size and intensity adjustment given in every one of these tools. Users can easily lower brush size, zoom pictures, and then do much accurate editing. There is also an eraser given to remove any fixes you applied.
The wrinkle remover also worked fine. It removed some big wrinkle and made them smooth. This is kind of implementation we hope from a top product in market.
The subsequent options blush, and weight adjustment also did their job fine. The weight adjustment needs to be sleeker since it looked like we just shrunk the photo horizontally. The blush section had some good color choice which did a decent execution of the function.
There was reshape and clone functions too. Reshape button, as we know, is used to drag pixels accordingly and adjust various shapes on your face. Clone function is used to clone a pixel on an image with another area of the same image.

Both of these functions were much similar to other photo editing apps we tested, and we didn’t find anything new or extraordinary in it.
There are some more features for our Instagram divas to improve their perfect photos. There are options to correct/add eye makeups like shadows, liners, mascara, pencil, tint, and red eye remover.
Most of them were working nice, but they have given a single-color scheme for all changes on screen. This means that you cannot use distinct colors on both eyes, be it for shades and to change eye colors. This should not be done, at least for changing eye color.
The last options in beautify are lip tints and teeth whitening. Both of them were ok to use, and most people will get their work done from them.
Borders
Unlike simple frames around a picture, Fotor has given Borders. The mechanism automatically detects the photo and uses borders across it accordingly.
Unlike other editors, users need not to select a square section of photo they want to be bordered. In one thought, this is a good step to add borders using the AI abilities directly.
There are several types of border given here. From some standard themes like floral, vintage, Xmas, old school, shadows, gallery, etc., these frames have some interesting visual looks.

One thing we found a bit repulsive, was that in many photos, the AI would not properly surround photos with frames. Unlike most typical frames, these frames appear somewhat inside original picture’s borders.
This makes the photo look bad with many frames and maybe hide some details inside photo. To avoid this, they must add a selection tool to select borders properly. This section must have more user control than in current form.
Users cannot expand, contract, or rotate borders. There is no option to use custom colors in these borders. Compared to other products like Canva, PicMonkey, etc. they must have allowed better personalization for borders section.
Let us now see through some of the common widgets in all sections. They are the text and stickers section.
Text Editor
Now we will be testing a most commonly available item in online photo editing apps. This feature is a Text Editor.
As we have already used them numerous times, text editors are one of the most basic items provided in most editing applications. This feature is simplest to use and configure.
The text editor given in Fotor is very similar to ones you’ve used before. There are three main text adding tools, i.e., headings, sub-headings, and body text.

You can use any of these text fields for your task as required. Now, we should check out the editing options for these text fields.
The text editor is equipped with some basic editing options like changing size of fonts, their colors, justification, formatting options like capitalization, underlines, bold, italics, etc.
User can also have some more functions like change text background, duplicate, revert, shadows, locking, and delete option. You can also change character spacing here.
Talking of the fonts and missing out on their types is a big no. Users can simply click font type button to look for many font types given in this editor. However, we felt that the number of font types were limited.
When compared to other products like Canva, Visme, PicMonkey, etc., we felt that the font type, although unique, should have had more choices.

One more thing is that users cannot upload their custom fonts into it. This is a big flaw in a text editor. Most advanced users have their own font database, and so this feature is a must.
However, there is a catch here. They have said in their tutorials section that default fonts are only restricted to design section. In collage and edit section, users can add their own fonts. This felt little confusing as to why they’ve blocked custom fonts for design.
On the contrary to this claim, we could not find an option to add custom fonts in web editor. This may be untrue for a desktop interface which we will see later on.
Overall, all features in text editor were good. They have provided all amenities needed to do good text editing. We still need to see if they will add custom fonts in design section or not.
They can add some features like mirror effects, curve effect, text wrapping, etc. to increase the value of text editor and make it unique than other editor applications.
Stickers and Shapes
Let us now head to one more useful feature. This feature too is very common amongst every other image editing app.
Fotor has a Stickers and Shapes tool. Using this tool, users can add many shapes and different goofy stickers to their images. The main thing we would like to review here is the editability of these shapes.
As we know, shapes section has numerous stickers, and searching one of them is a nightmare. There are many stickers from stocks of 1000+, which users were unable to find.
For this, Fotor has given a search button to find their favorite stickers. The search function is mediocre, and since they have not added unique tabs for each shape, it can be like finding a needle in hay.
This is similar to many other image editors we have used. Searching for a particular shape is difficult if it has a very uncommon tag/no tag at all. The best suggestion is to assign a code for each shape. When users select a shape, they can mark it favorite or see that code and copy it.

The main categories in sticker shop are image shapes, image grids, basic shapes, lines, illustrations, icons, and patterns. You can also see a favorites button, recent button, and customize option for stickers.
The Image Shape tab has limited resources. Users can see dozens of such unique shapes in different cut shapes of image frames. Similar to this is image grids tab. This tab makes multiple color image spaces as you can see in a Microsoft logo.
Next tab is for adding Basic Shapes. They contain some usual sticker shapes like rectangles, circles, some 3D shapes like a cone, cube, occult geometries, etc. Overall, this section too felt a bit underwhelming.
The Lines tab also has a mediocre database. There were very basic shapes, and we did not find any extraordinary lines here. Comparatively, Fotor needs to increase its stock in both basic shapes and line section.
Now let’s see an interesting section, i.e., Illustrations. What exactly is this tab for? Well, unlike its name, this tab has all the stickers in it. Different from above shapes, this section contains those handmade goofy internet sticker arts, the ones we usually see on social media chats.

There are literally thousands of stickers to choose from, and many of them are fully customizable. This shows that they have worked their best in this section. After this comes the Icons section.
The icons section as the name suggests is used to input various icon files on your images. They are usually shaped in wire form. Once again, they have shown such baggage of random icons and shapes.
The last category in stickers section is Patterns. As we know, these patterns are sometimes useful to camouflage certain things on your images or to just make them much better. They have given limited stock for patterns too.
Overall, if you are a casual user of online photo editors, it will be more than enough for you to make some well-edited images. For advanced users, they have to rely more on custom fonts and shapes if they want more perfection in their work.
Most of the shapes, stickers, image editing and beautifying features were amazing. But, some of them needed a touch up to improve and extend their features.
These features for editing are common in both edit and design section. Some of the features are different in collage section, which we will discuss now.
Concluding to general design and photo editing, we would say that Fotor has done great work by not only allowing huge number of shapes and such items but also putting great personalization features in them.
Collage Editor
Anyone who has used a photo editor app of any kind may also be familiar with term Collage. They are usually a collection of many images together in some funky or artistic way.
Fotor has provided a different interface to manage and edit photo collages. To access collage function, use the top navigation bars create new button.
Once you have opened collage manger, you can see they have given four distinct types of collage making, i.e., classic collage, artistic, funky and photo stitching.

To use these collage functions, select any one from the categories. Let us review classic collage sets first. Under this category, users can make collages in many ways with four grids, five grids, etc.
There is support for types of collage for either vertical or horizontal types. All you need to do is to select the images and drag them to the empty space and adjust accordingly.
There is a zoom in function given for each image in collage fields but no zoom out button, which is a bit weird. We hope they add zoom out feature for images in the collage too.
They have given option to fill in images, resize them, add borders, and adjust their colors. The image fill is redundant since we can always drag and drop image in a field from right-sidebar.
The resize button has many preset sizes in it, from small profile pics to big resolutions up to 5000x5000. The resized templates adjust accordingly with collage elements. For background of collage, users can either choose from a given list of themes or upload their own images for it.
Let us see next collage theme called Artistic. Artistic collages have preset themes with great shapes and designs. Just like before, you need to select a theme and then upload your images in it.
Contrary to simple collages, these collages have very limited items that can be edited. For instance, there is no option to resize them. The only option is to use three ratio-based sizes given viz. 4:3, 9:16, and 1:1.
To add images using drag and drop, we had to bring image field layers on top. This is annoying, and novice users may not be able to use it efficiently. Also, unlike previous mode, you cannot move images placed inside the fields, which is one more con in our view.

Nevertheless, users can still change some background colors using colors and texture menu. Overall, it gave us many interesting themes to look for.
The subsequent section we tested was Funky Collages. As the name suggests, funky collages have a bit different and unconventional themes. Currently, there are around 20+ themes in this section.
There are much more layers in both artistic and funky themes. Many of these layers are editable, and that paves the way for good customization. However, selecting layers is still a mess.
As we have said earlier, a dedicated floating window for layers, where you can hover to their names and select them accordingly or something similar must be done.
This section also hosts a fill-in button which will auto-fill images from the right-side upload bar.
The last section for collage is Photo Stitching. On a simpler term, it is used to only put together several photos under one form, either horizontally or vertically. Fotor can stitch as many as possible photos in this manner.
But, users can only select vertical or horizontal stitching. You cannot switch in between, e.g. stitch some images horizontally and them vertically. Only single way stitching is supported currently.
Finally, we have concluded all the editing feature of Fotor. They have indeed given their full effort to improve and add as many as possible features in it.
There were several mishaps we encountered as we have mentioned above, but overall, they did a fantastic job to include every minor detail in it.
User Interface
For user interface, Fotor comes on three major platforms, as Web interface, Desktop interface, and Mobile application. Most of the features are very similar in all three interfaces, and so we will only do a brief review of them here.
Web Interface
As we discussed very well and in full detail about the features of this interface, we will now see if there are any extra features other than editing incorporated in web interface.
The web UI is beginner friendly, and any user with little knowledge about photo editing can do his work. There are tutorials also available for every section.
However, we felt that these video tutorials are not enough. They need to start adding detailed tutorials for every feature and aspect along with good screenshots. Currently, the tutorials were mediocre and certainly needed a good renovation.

The main panel of Fotor can be accessed by going to My Work section. This section will as usual display all editing jobs you have conducted. Be mindful that only those work on which you have used the Sync button while editing will be saved. There is no autosave feature in it.
On the same page, you will see My Public Portfolio tab. This section has a separate window where all your shared content will be visible. From this section, users can share their page on social media like Facebook, Instagram, Twitter, Pinterest, etc.
Unfortunately, there is no email sharing available. This is one more flaw in sharing system. Photo editors like PicMonkey, Canva, Pixlr, etc. allow sharing via Emails, or through protected links. Fotor can also use similar concept and make sharing links with password protection.
The general settings in accounts tab also offer very basic options. Users can just change some account info, billing info and also see notification messages here.
The editor UI for image enhancing, collages, and general designs is almost same as we have discussed before. As we pointed out earlier, they still need to add a separate layer window with better usability.
The spacing tool was also mediocre. It did not perform as expected. Many editors like PicMonkey, Canva, Visme, etc. have way better spacing tool. The dashed lines around each element were hardly visible in case you used darker colors in your design.
The spacing tool did not give proper suggestion to place elements. We suggest implementing proper visual representations for UI like arrow lines, darker colors of dashed lines, etc.
Other than that, Fotor passed with flying colors in our testing. This concludes the web UI, which is most commonly used by users.
Desktop Interface
The desktop interface by Fotor is quite out of the way for quite a time. It was updated in January 2018 lastly and hadn’t got any update since version 3.4.1. This clearly indicates that they have possibly given up on the desktop version.

However, we did manage to install a given update, and we installed it anyway. The desktop version is very basic and is nowhere close to giants like Adobe Photoshop, Illustrator, etc.
The desktop UI has simple options like scene changer, crop tool, adjust tool, effects, borders, tilt-shift, and text. The desktop UI has all these options in the right-side pane.
The scene changer has filters to change tint and add effects to pictures. These options are like filters in your phone camera as in sports filters, movie filters, shade filters, etc.

The next option is crop function. In this, users can crop photos in random or some preset size. They have also given crop function in ratios like square, golden mean, DVD, postcard, and 16x9 format.
The Adjust tool is used to adjust details like red eye tool, tone adjustments, white balance, vignette, shadows, etc. The next adjustment is Effects Tool. Users can use this tool to have some amazing effects like classic, Lomo, B&W, arts, and texture.
They have also given Border Tool. From simple, edgy, movie style to stamps, users can add some decent borders to their photos. These options are also given in an online version. The Tilt-Shift is used to practice the focus mode like in cameras.

The text editor is mediocre in this interface. Users can change size, color, justification, and font styles. Other than that, there are no additional perks given in text editor.
The edited picture can be saved in formats like PNG, JPG, BMP, and TIFF. You can also edit resolution here. There is also an exif button to look for details of photo. The lower tab has a rotate button, zoom in/out, compare and reset button.
The collage function is also mediocre in the desktop UI. The collage templates are all the same as web UI. The collage creation in this interface also has a randomize button to get a random collage of photos.
Lastly, users can do a batch transformation in form of batch resize, renaming, convert format, add batch scenes, effects, and border. Users can export all photos from that folder and convert them all together.
All in all, Fotor’s desktop UI fared ok in our test. Since it is not updated for a long time, we do hope Fotor improves and updates this UI. They can add synchronization with cloud interface for online and offline editing.
Mobile Interface
The mobile interface is probably the second most used interface. Fotor has at least not left behind this interface, thanks to the growth of smartphones.
The mobile app can be easily downloaded from Android or iOS store. The app is very minimal in size but has many features in it.
Unlike the web UI, you will not be directed to editing screen up front. The mobile UI has several distinct tabs. There is a home button on center which will show the options for camera, edit, and collage.
All three sections have a similar feature to web UI. There is a section for personal work collection, shared collections, public collections, badges, etc.

Unlike web interface, there are not much-advanced options to deal here. The daily inspiration tab lets users view top photos by Fotor users. Many of them have price tags too.
While you are taking a photo or editing one, Fotor prompts to input exif details if it does not have one. This helps them keep track of the pictures and handle any copyright issues.
The editing functions given in mobile app are exactly same as web UI. The procedure to edit photos has options like effect additions, adjust the color depths, enhance the facial features, text, frames, etc.
The detailed features to enhance face images like in beautify settings are not given in mobile app. This is another downer in mobile app. Given that most people nowadays click most photos over smartphones, these advanced editing are given in tons of mobile photo apps.
This may give Fotor a great disadvantage in mobile market. Photo editor with beautify features are being sold like hot cakes in smartphone app market.

Other than this, mobile app has shape and sticker section too. Both of them have limited stock here compared to cloud interface on PC. They also have stock for paid stickers.
Honestly, before dumping monetization in stickers, they should have done something about extra features for face enhancing. Sticker apps are abundant in android market, and so rarely people will go with paid options. Pro account users on cloud interface also need to pay for them, which was a bit too much extra costs.
The collage section was similar to PC cloud interface. Rather than displaying multiple ratio sizes and its list, they have given set of fixed collages to be chosen from.
There is also magazine tab in it which will list some cool magazine style collages. There are many collages in market with themes ranging from Valentine, work life, seasons, etc. to horror and spooky themes of Halloween.

Once again, they have not lost an opportunity to monetize on this too. With many collages ranging from $ 0.5-1, it can be a headache even for pro users to continuously pay for services again and again.
Let us also see what all things are given in market section. Fotor has put on sale many items which are almost free in many other editors. There are paywalled items like effects, collages, fonts, frames, and stickers.
The text editor is also limited in mobile version, and that too has only a handful of fonts. This may be done to discourage abuse of service by free users, but pro account users must have most of items accessible without extra payment.
Lastly, they have given an Events function to encourage photographers all around the world. In this event, users can upload photos as per the assigned theme, and best photos win prizes. It is also a good program like the affiliate one they do.
All in all, Fotor has done a decent job in its mobile application, but it is still behind many prominent photo editors on android like Snapseed, Pixlr, Adobe Lightroom, YouCam, etc. There are many features still to be put into this app, and so Fotor’s mobile app was average compared to the above products.
Final Verdict
It was quite an effort to test and review all those features in this application. Fotor has certainly not disappointed in giving us some unique and traditional editing functions, along with tons of templates at our disposal.
But, there are some big problems that currently need to be resolved. One of the biggest is paid packs in mobile edition. Technically, it is not for us to advice Fotor on how they want to do business, but as developers ourselves, this microtransaction thing must go, especially for premium customers.
Another thing we found was that there is no dedication for the product except on cloud service. The cloud service is the best to use currently, and anyone will choose it above other interfaces. The desktop product hasn’t been updated for so long, and Fotor can sweep the market if they update it fast.
Few more issues we think that must be highlighted are related to their cloud features. There is absolutely no team management features. You heard it right! There is also no support to give password protection on shared links. Both of these are latest crucial features and are equipped in every online editing service.

There is no print vendor support, there are no external integrations, and so it is strictly restricted to individual usage. Fotor currently does not have organizational capabilities, and so we cannot recommend its usage for team projects. There are alternatives like PicMonkey, Visme, Canva, etc. with team management and collaborated editing alongside many excellent team features.
Presently, users can only export edited images in three formats, i.e. JPG, PNG, and PDF. Unlike a desktop app, there is no provision to adjust resolution/dimensions while exporting images. Many top-class editors have given dedicated vendors to publish and deliver projects to customers, which Fotor must also adopt.
Other than this, Fotor still has better editing features on its cloud service than any other products. The subscription plans have decent pricing. However, at same pricing, other editor software are providing team management and vendor publishing, and so this devalues Fotor’s plans.
Apart from all this, there are very limited customer support options. There is only email support currently. This also needs to be improvised if they want users to have great service. The tutorials also need better content.
At last, if you are a single creator or want to use it to make some decent graphics, Fotor will work for you. We cannot recommend Fotor for big organizations that usually work in multiple teams. Small firms and individuals can always take benefit of their features.