
Lucidpress Review
Detailed Reviews
Every day we come across stuff like business cards, wedding cards, portfolios, newsletters, and other such small information pieces of advertisements by different companies and people.
All these pieces of information in form of small templates is often used to convey some messages in short and appealing form. These forms of data, unlike the audiovisual kind, is more reader-friendly and sometimes has more accessibility then them.
Among such templates, we can remember times when we used to run to a local computer shop to make business cards or wedding cards or get our magazine printed. Times have changed now, as we people can make our own cards and posters either on the Internet or using offline photo design software.
Amongst these, an online photo editor has gained much more popular due to their ease of use and their accessibility at any part of the world. Also, users do not have to worry about saving data and finding it since most of them offer a secure cloud backup.
Pros
- Plain as well as sophisticated UI.
- Lots of editing features.
- One of the top eBooks creator.
- Good number of templates to choose from.
- Unique and useful integrations.
- Brand management along with custom fonts and logos.
- Top class team management and collaboration features.
- Automatic form filling via Data Automation.
- Lots of learning resources for novice users.
Cons
- Limited printing vendors.
- Bit expensive business plan.
- Lacks much diverse publishing frames and materials.
- No document binding currently.
- Too little storage space in free version.
- Still lacks embedded videos.
- Texts and images warp in some cases, which is mostly correctable.
- Needs more external support like importing from publisher files, Photoshop, and such popular editors.
- Limited to PC devices with no application for mobile devices.
Overview
Lucidpress is an online photo editing and publishing service. Started in October 2013, by company Lucid, USA, this service has gained its name in its base products viz. Lucidchart and Lucidpress.
Lucidpress is one of many such online photo editing and printing service that allow users to create their own business cards, wedding cards, brochures, flyers, posters, magazines, newsletters, and presentation slides.
We have seen quite a name of this company in both products, and so we will be doing a thorough review of it and see if this service delivers as per their name.
Let’s hit the road
As we are aware of our goal of using the application by now, we should be heading to try out the basics of the app first. To begin, users need a trial account on the Lucidpress website.
The users will be shown a pop up after first sign up asking if they want to make a template for personal or business use. Select the desired plan, and then you will be placed in the designer section.

In this section, users can select from multiple templates. There are many premium templates available only for pro-users. Lucidpress also allows a 7-day trial version for enthusiastic users.
Once you select the template, next item shown will be an editor. Use every feature of the editor and try making a good business card or whatever you have picked.
There is also a download button which lets you save files in different formats and sizes. The users need to see here is that this entire process is straightforward and novice friendly.
Now without any further delay, let us peek into several features and unique functionalities of this application. We will compare and evaluate the working and features of Lucidpress as we move forward.
Templates
What exactly are these templates? To answer, we will discuss them in the context of online photo editing software.
As we know, this template is a base for creating any photo or design on cards, magazines, sites, etc. There are several templates given in this online photo editor.

To access templates, users need to jump to create new dashboard of an editor. Select the new project icon, and then a few exclusive collections will come.
The templates selection is very nicely categorized and contains almost all known formats for such products. These templates are mainly divided as Print, Mobile devices, Smart templates, Social Media, and Personal/Custom.
Currently, during our review, there are more than 550 unique templates out of which some are premium, but most of them are accessible by free users. To be honest, the database for templates is quite impressive.
The first section in templates is For Print. Under this section, templates assigned are mostly used for general printing and distribution stuff. This category encompasses templates for banners, brochures, business cards, calendars, holidays, magazines, menus, posters, resumes, and many such commonly used printable items.
The next section is for mobile and PC devices. These are some modern form of templates, where most types of advertisements and invitations are over the Internet.
The users can find most common sets of samples for Flyers, infographics, logos, magazines, newsletters, media presentations, eBooks, whitepapers, and invitations. Most of these items are seen in real life, all over the web.
The third section here is Smart Templates. What is so smart about these templates? Not so smart, but these are some unique templates given by Lucidpress.
They have some unique templates for brokers, craftsmen, cafes, Facebook and Instagram posts, and smart postcards. These templates have bit more graphic elements and editability than other ones above.
The subsequent section is what this modern world is most crazy about. The Social Media section is most sought for by new and young users. This section includes social media-ads template, promotions, and banners across various sites.
The major platforms for which they have designed their own templates are Facebook, Instagram, LinkedIn, Pinterest, Tumblr, Twitter, and YouTube. The chief template for these sites are brokers, market listings, craftsmen, promotions, job or resume profiles, cover and profile photos, etc.
The last section is used to make custom templates. The users can use preset items from widgets and create a new template as they like.
As we can see from above, there are plenty of templates given in Lucidpress stock, and most of them are unique. And if users do not vibe with these preset templates, they can also create and save their own template formats.
Let’s check out the Editor
The lifeline for any editing software is obviously its editing features and flexibility. For most editors, editing is limited to use of preset functions and just changing the image, text fields, moving some items, and so on.
The users must not expect any high-level editing like photoshop apps. To check editing functions, we used our account to create new templates. Under these Templates, the design editor can be accessed by simply selecting an edit template from the main dashboard.

The editor looks like a standard application of your desktop with diverse options. It has similar choices like on other editing apps. The main choices on top navigation bar are Files, Editing, Pages, and View, insert, and Save.
Under top navigation bar, users can see a list of items that can change looks on your designed templates. The bar’s options have to redo/undo, share, download, and print.
The users can see a similar option on two panels. There is also a panel on right side that appears when you click on an individual element. Both have same options, and it seemed entirely unnecessary to repeat them across two panels.
The top navigation bar is supposed to have exotic options and right bar to edit those selected elements. There are some extended editing choices given in right-side panel, viz. changing borders, shadows, opacity, slideshow, and adding links.

The right-panel shows changes in options as per selected elements. When users select an image element, they will see the image and layout buttons in editing menu.
The next section will show text, shape, and layout tabs in editing menu. The text field has good editing features similar to a decent text editor. The users can see font type, font size, justify, paragraphs, bullets, spacing, columns, links, etc.
The shape tab will allow users to edit features of the selected shape from widget. Last tab here is the Layouts one. As the name suggests, this tab is used to alter the positioning of elements and their size, rotation, arrangements, and locking on page.
Apart from minor editing of elements, it was interesting to see a drag and move feature in editor. The users can freely drag an element on page and place it at any position of the page. This is quite relieving since many website editors do not have this function.
With the choice to manipulate position and size of elements, users are free to design templates, and it is honestly less annoying, especially when background images are all covered by these fixed elements.
Huff! The level of customization in editing function is amazing here. The users have on restriction here. The free version of application has limited font set and cannot create custom or brand fonts. Similarly, most of branding and custom stuff in editor is premium only.
Overall, editing section has enough option to make decent printable forms and cards. The restriction on custom items seems a bit harsh, but then free users have enough good choices to settle for. And so, editing options are good to go from our side.
Widgets
Time to wander to one of the most common items possessed by most of the site editors and such similar products. To add new items or elements on a page, we need a dedicated vault to pick these items.
Yes! You might have guessed it by now, this section is called as Widgets. Many of novice users may wonder what exactly this widgets section is? Well, for starters, it is simply the collection of various elements that you see on the page like text fields, images, slideshows, buttons, forms, maps, or any such stuff.
Since we are talking about online photo editors, they have a similar setup to traditional website builders. In both of them, we have to input items on blank pages via the widgets section.
The widgets in Lucidpress are limited to common items like banners and cards. The main elements that can be added to blank pages in Lucidpress are text, shapes, images, tables, pages and misc.

The first tab here is add page section. As the name suggests, page section allows users to modify current pages or add new ones. Right click on any of page banner on left sidebar, users can alter page names, edit page template, copy, lock, duplicate or delete it. Seems like a website builder, isn’t it?
The second tab is all about the text fields on page. This has some usual items viz. headings field, sub-headings, body texts, or any custom elements. It can also add Smart Fields. The smart fields contain general user info texts like name, last name, company details, address, website, profile pic, and the logo.

All items here are drag and drop type, so it becomes very easy just to drag them and place them on the desired location. The third tab has a similar feature except that it has option to add shapes on the page.
Currently, there are only 13 shapes given in the Lucidpress stock, viz. line, circle, square, arrow, star, etc. For 3D shapes, users can also input text inside them. The text editing has same options as we discussed earlier.

The shapes have same editing options in form of outlines and layout as before. Honestly, this feature seemed quite dull and maybe Lucidpress should try to add more shapes and interesting elements to it and make it worth the trouble.
The subsequent tab is Images Tab. Most of the images that you are going to upload on a blank page are to be uploaded in this area. The images do not have a high amount of editing option except usual size changing, brightness control, and contrast play.

This is a bit of disappointment given that we are using an online editor and lack proper image editing is a serious downfall in our view. We can understand that high-level editing is not possible to incorporate, but even decent and basic editing functions like that of Google’s Picasa would be enough.
The last section in widgets is misc as we know that this contains multiple types of uncategorized elements. There are only three special items in this section.
The buttons tab adds various shapes of button elements on the page like for social media links, Email support, links button, maps, carts, home button, etc. The buttons have a fixed geometry and alterations for the same style.

There is also a video section to input links from YouTube or Vimeo. The last option here is one unique item we have seen in this category. It is Scroll Area button.
What exactly does a scroll area feature accomplish? The main aim of this area is to auto adjust content passing through it and cover it for that area. Simply speaking, it controls designed area while scrolling and adjusts content size, shapes as per that area.
As we have seen through entire widgets section, system was very smooth, and we had no difficulty using the service. Although some of the features like shape elements were inadequate, we think that Lucidpress has done some justice to the product and free users by not putting them behind a paywall.
They can add more options on top navigation bar for widgets and add separators too. Thus, this section is decent enough compared to other similar products like Fotor, Picmonkey, etc., along with some unique interface.
User Interface
The first thing that comes to our minds while using various applications is the availability of an application across various platforms. This is because of more platforms, the more usability of its services.
There is no mobile or tablet app for Lucidpress. However, another product by Lucid, viz. Lucidchart has a mobile application, and so they should definitely make one for Lucidpress.
Let us now check out the only worthy interface we have currently, i.e. a browser interface on the desktop.
The browser interface can be accessed simply by logging into your Lucid account. The users can enter their card details to get a free trial version for seven days and test higher features of application.
As you go to main panel of account, Lucid will prompt to choose for a new template and initiate the editing process. Users can skip these initial steps, and first, check out all function given in interface.
The initial screen consists of mainly three parts, a middle screen with a list of all projects, the left sidebar in which various options like recent items, shared items, image manager, data automation, backup, and publication are given.
The top navigation bar consists of document, accounts, cart, and help section. The UI, as seen here, is actually easy to understand and navigate. The inner editor does require some learning curve but is not so complicated.
On central panel, users get buttons to add a new document, folder, or InDesign Imports. When users click on a new document, they can see a list of selectable templates, out of which they can work their way out.
The new folder option is to add new groups for different projects. Another interesting feature is an InDesign import.
Many of the designers reading this may be familiar with the Adobe’s InDesign, a tool for desktop publishing, is useable in Lucidpress via import function. This function is in beta phase but works ok for now.

The Image manager tab on the left is a place to access images stored by users in Lucidpress. This is like a normal image manager in most site builders. The users can upload new images, add folders to group them, create Brand images, recover deleted ones from the trash, and add integrations to it.
A useful feature given by Lucidpress is image search button. Unlike most online editing services, which require users to have their own images for uploading, users can try the search function linked with the Bing search engine.
The Bing image search tab is similar to the one that we use in browser interface. The users can select images based on filters like size, color, copyright status, and based on types like photographs, clip arts, line drawing or transparent ones. The users can also add tags to any image.
This function worked very smoothly and is better than most internal image searching function provided by many such builders. The next interesting tab is integration tab. Using this tab, users can add some additional services from third parties.
Overall, image manager was in many instances better than many site builders and photo editor apps. One thing we felt that could have been added was a few more search engines. Also, storage space for free users is only 25 MB, and that is pretty cruel, especially when modern images are of very high quality and size.
Now comes internal UI of editor. As we have discussed most of UI functions of editor before, we won’t be elaborating those points again. The UI in this editor is very novice-friendly, and so with a little practice, any new user can learn the products. However, knowing the working of a product is one thing while using your imagination to make a superior product are very different.
At last, regarding the UI, Lucidpress has done a good job keeping it simple and sober. Most features of the UI were working correctly; and response speed of the application was also excellent.
Integrations
When we are talking about online editing software, be it of any kind, we need to add certain items and features that are not possible to incorporate inside the default services. For this reason, we outsource certain task by installing external integrations to our application and get our job done.
Similarly, Lucidpress also has many external plugins. These plugins are used in the editing zone or either storage or team management area to get the most out of these plugins.
Starting with the general integrations, initial one will be in the image manager. Under this image manager tab, users can access the list of them.

The image manager basically has two integrations viz. storages integrations and search integrations. Under storage integration, users can link storages to Google drive, Facebook, Dropbox, and Flickr. There are also search engine integrations.
For search management, there are only two integrations, Bing and Icon finder. The linking with storage and drives allows users to do a backup on these drives, exchange data with them, and update it regularly. However, google drive, and registered email id has to be the same else linking process will not be possible.
Same can be done using other storage integrations. The Icon Finder search function was working as expected to find icons over the web. It had similar filtering options like the Bing search button.
There is one more interesting integration done by Lucidpress. This is integration with Canvas Course. Canvas Course is an online course management website providing educational videos and content.
What an image editing application has to do with an online educational course website? As we know that learning cannot be done in mere written form. Too many words and numbers can make head of even a witty person roll. It supports students and learners with a visual program.
The small catch here is that this integration works from another side, i.e., users need to access Lucidpress integration in Canvas account settings and add it from there. The users need to generate API keys first in the Lucidpress, and then input them in Canvas.
The teachers can give an assignment to students, and they can complete it via the same app. From image and graphics submission to sheets and docs, everything can be done by Canvas Integration.
Next comes the Google Analytics plugin. As most of readers may be familiar with it, Google Analytics is used to analyze entire website data like several visitors, page views, clicks, etc. Only task users need to do is link their new or existing Google Analytics account to Lucidpress.
Slack, an online Proprietary team management app is also an integration of Lucidpress. The users can add their Slack account in Lucidpress and manage to share and create several documents.
Another useful integration for educational purpose is Schoology integration. As many of you may be familiar with, this online learning and organizing application helps students and teachers to collaborate via Lucidpress. One more similar addon is the Google Classroom.
Other notable integrations are ADFS, SAML, and G Suite. As we can see here, the amount of external integration and support is creative and in unique places. We tested most of them, and they worked fine. This shows that they have not made any half-baked efforts here.
However, one suggestion to be added here is that all these integrations are a bit scattered across different option in Lucidpress and so it will be good QOL update if we can see entire list of these plugins on main panel and then change our settings for one of them from there, without searching for it.
Team Management
Since this is an online editing website, unlike site builders, document editors, etc., this app also may need team management and collaboration to organize a group of people to complete their tasks.

To start along with team management system, the first step is to form teams. Once you, as a head have formed a group, assigned different roles to people, then you can begin assigning tasks to each individual and keep track of their activities.
The Team Button on top navigation bar will redirect owners to an admin panel. Under this admin panel, users can find certain options like user list, brand management, identity management, app integrations, collaborations, and licensing.
User management
The first tab here is user list and management. Under this section, admins can add or remove users, alter their permissions, etc. The admins can add users either via Email, domains, CSV, or by manually inputting their data.

The user’s section also has some access control settings. Lucidpress has given three access control settings viz. billing role, team admin, and template admin. The billing role access is restricted to viewing the account subscription details and invoice downloads.
The team admin has all privileges from add/edit/remove users, to accessing all part of the editor except the billing part. The template admins can only work on editing stuff in those templates. We think that these permissions are still limited and so they need to add more detailed options to it.
The admins can also create groups in users’ section. Like we form groups in real life, people working on same task or assignments can be allocated to one group. The groups are free to interact with each other and share data amongst them.

Lastly, user management feature has included support for two user status, i.e., licensed users and View-only users. The former can edit or share documents while the latter can only view those documents.
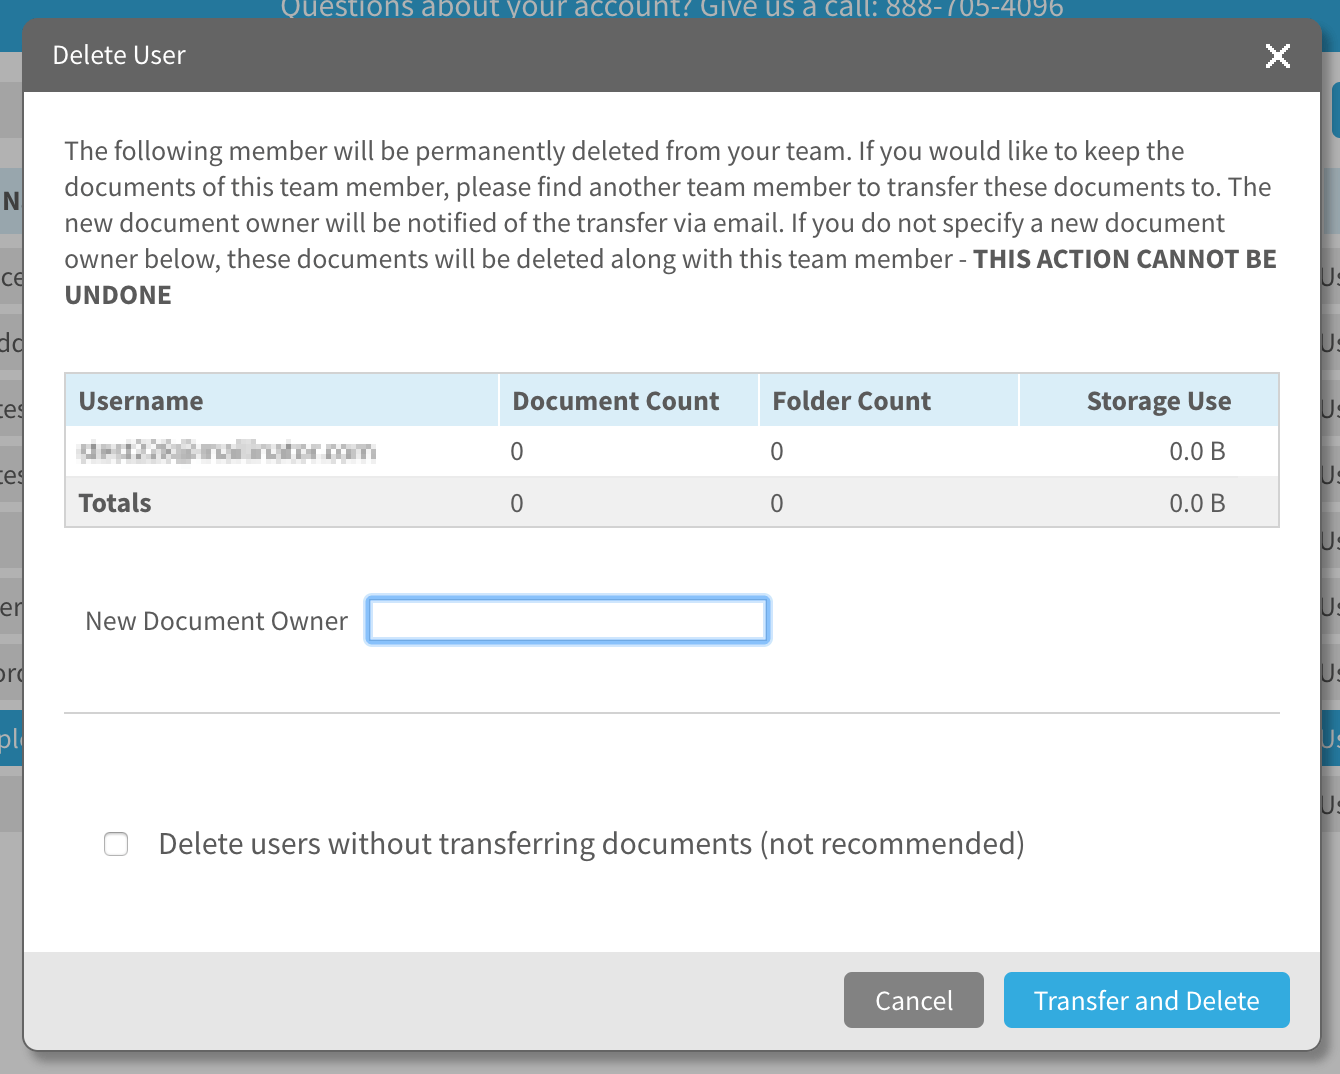
The user account deletion is also thorough here. The admins can delete a user account and transfer all of his data to another person in team. Some readers may be impressed by depth of this system, but we have seen better user management in many other systems.
Overall, users can easily utilize functionalities of this system without any hassle. Even novice users can do good work here if trained about this feature in brief.
Brand Management
As the name suggests, brand management feature is going to be used for managing the brand icons and templates. Since this is a photo editing software, various items like the business cards, wedding cards, etc. have a brand logo on them.
To design logos and templates for your brand, users need to go to the Brand Management option given in team management system. The brand management feature allows users to create logos in several ways.

The users can choose brand color, images, fonts, styles, and smart fields. The users can choose from any of RGB color codes, or create their own font style and upload it.
The smart field section can add some smart field to areas where we want scroll to be constant. You may wonder how to save all these changes in brand logos? They are all auto-saved when you add them as a new style.
Once a brand management interface is closed, users can go to editor and check if edited items for their brand are updated or not. The users can manually click on any term brand in text field, images, style, etc. and choose the created files.
One downflow of this feature is that it is only given to the business plan users. Given that the business plan is quite costly, it may be difficult for some to justify the pricing if they want this feature only as an addition to the base plan.
Identity Management
This section of Lucid is used to customize identity and security settings of users as per their organization norms. These settings are important to identify certain access level for team members, so it is easier to control and monitor them.
There are several methods given by Lucidpress in this section. The most prominent ones are SSO, Default SO, IP whitelisting, password policy, forced reset, and domain lockdown.
As many readers here might be familiar with the SSO method, Lucidpress uses same methods and allows integration with Google SSO, Office 365. Salesforce and SAML. The admins can assign multiple sign-in methods for users in case any of them has trouble logging in.
By default, identity management has assigned Google SSO as the identification method. This is the easiest SSO platform currently, and so novice users can also grasp it easily.
Another feature is to restrict users’ IP addresses. This can be used to restrict access to services through a specified location only. The CIDR notation can be used to restrict a range of IP addresses.
The admins can set password policies too. In this, they can either put a forced reset of all passwords or set password criteria and other such settings.
To restrict users from creating groups outside the organization’s domain, they have given domain lockdown feature. Users attempting to login via external domains or any such activities will be locked, and they will be redirected to the designated location, thereby preventing unauthorized access.
This shows amazing features given by Lucidpress. Most of them are easy to configure if you have worked previously as the team manager. We would like to see biometrics addition too for user authentication system to ease and secure login procedure.
Sharing and Collaboration
One of the most general section we see in most team management systems is the sharing and collaborations. While working in a team, or in partnerships with other companies, data exchange is quite frequent.
In such cases, it is needed that the sharing/exchange process is very secure and also easier to grasp.
Both sharing and collaboration are given as separate feature in Lucidpress. Let us see the sharing section first.
Under the document section, users need to create a new folder as a sharing folder. Now users need to add documents and other templates they want to share in this folder.

Go to the share icon on that folder and input Email ID of a person. The users can edit certain access to shared person like edit and share rights, only view rights, edit and comment rights, etc.
The users can share items directly with other teams. In the input field of Email ID, users can also input name of the team and share their documents.
The admins can also use same function to share their documents directly from the editor menu. The share button is on top navigation bar as we discussed before. In this sharing menu, users can either give the access link or editing link based on the roles.
Now you may wonder what is so special about the collaboration section. The feature is very similar to the share option but differs in a form that it is more of real-time editing and reviewing by both parties.
The share option also has a collaboration button. This is an amazing feature provided by Lucidpress here.
In collaboration, the two people using system on two sides are able to edit same document at same time with real-time page response. This means that the changes by any parties will be visible to the other party live.

Not only this, but they have also given a chat feature in this section. In case there is some discussion regarding current editing or tasks, the live chat among two collaborators is handy.
Overall, we can see how amazing work Lucidpress has done in making team management feature as best among the online photo editor applications. There was not a single point where we experienced any lag or trouble using these features.
Auto Licensing
Licensing here is similar to driver’s license we take in real life. For a big organization, it is difficult to manage several users and adding them in teams and work shifts.
The licensing of a user is done in three steps. The admins can set up licensing at the beginning of new user registration; user requested license, or no license without admin invites.

The first one grants a license to users automatically once they login into their account. The second option is used when a user requests access and licensing. The last one either allows or forbids any licensing without admin consent and invitations.
The admins can also set custom licensing in which custom message, button label, button URL, and admin name and mail can be set up in license dialog box for the users. For a very large company setup, admins can select the weekly only notification button.
Data Automation
In case of a big company with tons of project pending for the approval and design, it can take a very long time in just making the design of certain photo items and linking entire documents for various events, tasks, etc. may suffer.
To counter this matter of vast data filling and doing dreadful corrections, Lucidpress has given Data Automation feature.
The main use of data automation is to link several types of data or document to Lucidpress docs and use it to create certain forms and cards. The linking process is quite easy but will need some practice for new users who want to master it.

To begin with, users first need the entire data of users or items that they want to automate with. The main examples of its usage are a product specs sheet, real estate flyer, and employee data.
The users now need to select a data set from here. The above three are examples of few data sets. After users have selected a required data set from the given property, employee, and product spec layout, it is time to link the data.
The users now need to use the sync button using which they can connect data sets to google docs or other manual sheets. The one thing in this process that was cumbersome was data set editing.
Apart from this, users can change data set icons, connect data sources like MLS, Google Sheets, XML feeds, Zillow, etc. The users can add images to their data set too.

Another important step to complete data automation is a smart field function. This function is similar to the smart fields in excel, where the cells are auto-filled with a given formula or linked sheet.
The smart fields allow the data submitted by you to be linked with templates and auto fills the connected fields. Once the users have defined smart fields, half of the work is done.

The smart fields can directly be assigned to documents using the double braces }}. Now you may wonder how do we use this feature to organize events or campaigns?
It is very easy here too. The users only need to assign the smart fields in their documents. Link that campaign or event document to Lucidpress. Assign data set, format, and images to your data.
Generate a required template and use smart field function to input fields. Apply the given data and object to these fields and voila! All the linked data, images will be filed automatically in all forms.
Concluding to this section, it needs easier and more guided UI. Since we have used it many times, even we were not able to keep up properly. The guides section of these features is also bit messy and needs more detailed steps along with full video tutorial for the novice as well as advanced users. Other than this, we think this is really an amazing functionality in Lucidpress.
Let us publish our work
With all these features and editing, it will be a bummer if you do not publish your work online or through the printed form.

Limited vendors support printing in Lucidpress. Unlike many publishing sites, Lucidpress has given a facility to connect your nearby print vendors. This is actually better since the customers are free to choose their nearby vendors and need not to worry about damaged products.
Publishing function is very relaxed here. Once you have created document; all you need to do is select the Publish button on top menu bar. This will redirect you to the print page. Their main vendor currently is the Alexanders, a Utah based printing company.
Since you have already assigned the size for publishing a document, a new tab will ask you to select the print area. Select a print area, size, number of copies, and then order your product. Lucidpress offers a list of full estimation for each type and size of prints on their site.

Lucidpress has incorporated appropriate standards in the printing, giving good quality and material of the prints. One of the provision is for UV coatings and the CMYK color model. The paperweight and other minor details can be added from the support section.
However, they still lack a document binding option and only offer loose-leaf templates. But it is good to know that they are open to any suggestion and additional features support in printing items.
However, if we compare it with other photo editing and printing services, support for more inbuilt vendors needs to be increased. Let us hope that in future, both printing zones and more print types are added in it.
Final Verdict
Going through almost every feature and perks provided by Lucidpress, we would say the product is worth it. The plans are quite cheaper compared to other similar applications. One disappointment we had was a bit costly business plan.
Not only that, we felt that for a diverse and in-depth application like this, only seven-day trial period for full product was not good. Other comparable services have 15 to 30 days trial period for full version.
The editor was quite sleek and only lacked a proper image filtering tool. The UI was very responsive and smooth. The widget section may need more adjustments and additions. The team management feature was one of the most detailed and on par with top products.
The printing and publishing services were quite detailed. More vendors are definitely needed along with worldwide distribution support. Also, they should increase the number of formats edited templates can be exported to.
We also felt the lack of proper customer support options, which currently is only via ticket submission. Concluding to our review, we say that Lucidpress has impressed us with its simple yet so detailed application and we would certainly recommend trying out this product.