Xero Review
Designed specifically for small businesses and sole traders, this accounting software offers powerful tools for...
Detailed Reviews
Pros
- Intelligible Navigation System: One doesn’t require to pay much effort to explore the features. They are distributed in a user-friendly way so that no feature remains hidden from the user.
- Xero’s Marketplace: With Xero, you can use various applications that are available on its marketplace. You can integrate them with your Xero’s account by separately signing up for it and clicking on the “connect” button provided in the application.
- Built-in Currency Converter: In the settings, you can choose the currencies which you accept. The exchange rates for the day will be provided, or else you can set your own exchange rate for different currencies.
- Find and Recode Option: Xero gives the provision to make the changes to the previous data inputs. Find out the wrong input and edit all of them at once with the help of this tool.
- Fixed asset Depreciation: With advanced features, you can identify the value of a fixed asset at a particular time. The user itself sets the depreciation type.
- Smart List Feature: You can group your customers with the various filters available. That helps to analyze customer behavior towards your business. You can also send promotions and offer discounts to certain customers according to the grouping.
Cons
- Limited Inventory Management: For handling more than four thousand products, you need third party inventory management applications. There are some more inventory-related limitations which we have discussed in the review.
- Exact Profit or Loss figure isn’t Available on Dashboard: Graphs related to cash flow are added on the dashboard, but of knowing the exact profit, you need to explore the graph by clicking it.
- Limited invoice customization features: There is only one predefined template for invoice, and for adding more, you need to upload them in “.docx” format.
Introduction
Initially, accounting and bookkeeping may look like manageable tasks, but as the company grows, various transactions take place, and the human resource alone can’t keep track of every transaction.
These cloud-based accounting software which are nowadays used worldwide act as helping hands to various businesses.

The benefits are tremendous as they help to provide business insight by the details about every credit and debit that betides through your business accounts.
These applications have the capability to directly import the data from the banks, and match it with the manually added data.
With such features, that deliver ease to a life of numerous people working at millions of small businesses, Xero was born, in year Two-Xero-Xero-Six.
With the help of Xero, 1.58 million subscribers have upgraded their way of doing business. Previously, many of these businesses were reliant on spreadsheets and manual data entry techniques.
Xero has its main office in New Zealand and has expanded its handling by setting up offices globally. Now, it is one of the leading accounting software companies, which has users from 184 countries.
As the users choose to move to the web-based software, Xero keeps striving to make the users feel that they have made the right choice.
So, how they do that? You will know about that part in the upcoming sections.
Generate an Account Within a Few Minutes
It is always necessary to share information about yourself and about your business with your accounting software. Using the information, it may deliver a customized interface.
After you sign up for the first time, the first window that appears asks for the data related to your organization. Filling it up won’t even take a minute, and it is mandatory. This software is making your business easier, so you can at least let it know this much.

Just click on the “Start Trial,” and the thirty-day countdown will start after which you need to provide them the card details not to track your transactions, but for purchasing Xero.
Users who are already impressed with Xero, even before start using it can choose the other option available in the same window which will redirect you to the payment window. However, we suggest that you should use the trial first.
The next window that appears on the screen is the Xero’s main screen. Congratulations! Your business’ account has been created successfully.
In comparison to the other accounting software such as FreshBooks, it is easier to set the account in Xero. In FreshBooks’ case, it may feel like experiencing an interrogation when you keep filling the forms one after another.
Well, even Xero requires details, but it is your choice that when you wish to add them.
The best thing about Xero: from the first click, you will know “what to find where.” While we were using Xero, we never had any navigation related issues, and thus, it is best for the people who like simplistic designs.
The name of your organization will be displayed on the upper-left corner of the cloud window. Click it to discover the settings option which is divided under two headings: General and Features.
We will discuss the features’ flexibility in the future, and first, let’s check the “General Settings” before that.
Initially, you won’t find much information on this tab. Do you know the reason for that? Because you haven’t provided any (duh!).
Ok, now, some serious business:
Adding Information
There are four different sections in which the “General Settings” is classified. As soon as you open the “Organization details,” you will find a one-mile long form. However, it is not necessary to fill all the information, and you can choose not to add something that you find irrelevant to your business. Check the form in the below image.

Under this section, only the basic information about the organization, and the contact details are asked, which can be considered as sensitive data by some of the business individuals.
Now, everything is set for your business, but you can do a lot more. There could be multiple users whom you need to give access to your business records.
Is there any such option available on Xero? We will check that soon.
Bank Accounts Synchronization
Through Xero, you can link multiple bank accounts and import their data.
Associating bank accounts is like shooting fish in a barrel. Just click on “Add Bank Account” and select the bank. Provide a name to your account, assign a type, and the account number. And you are all set.
For importing the data, you need to visit the bank’s website, log in and download the statements, and upload them to Xero.
Ease of Use
These accounting software could be complicated as there are multiple tasks that they need to perform. These tasks are requried to be kept separate otherwise they may confuse the accountant, and cause failure of proper management.
Xero has kept the tasks separate by placing them under separate tabs.
Information related to transactions such as invoices and bills are placed under distinguished windows, but under the same section, “Business.” In the same section, you will also find the details about the inventory.
However, for accessing the major settings related to these options, you need to visit “Feature Settings” which is available in the “Settings” menu under “Demo company” option.
The next section is for Reports and Advanced options. When your business requires regular checking of Reports, you can go through the report section where there you will come across diversified reports. And the settings related to it are under the same section.
The advanced features and their settings are placed next to each other. So, use the feature, make the additions, use the settings, and make the changes.
While walking on Xero’s easy street, whenever you face trouble finding a path, you can also go through the videos that the company has added to the advantage of their users.
Xero has provided a tough competition to its competitors by delivering an uncomplicated mapping of its software. But ease of use may decrease when you connect it with multiple applications about which we are going to discuss in a later section.
Let the Employees Handle Your Accounts
Xero gives you the power to share business details with multiple users. Besides you, anyone else can also take care of the transactions directly from Xero with your permission.
This option directly reduces your burden as another user can keep his eyes on the records by viewing your business account through any other device.
However, you may not want to provide access to all the data. Here you can choose what you wish to share. Primary details such as the first name and the last name are required to be added along with the email address of the user for permitting him.
Xero gets brownie points for the option, “what” other users can access, and to “which” level. You can choose to share only the details about the banking and accounting or/and the information related to a specific project.

For project three standards can are set: Limit, Standard, and Admin. These options will become visible when you expand the “Business and accounting” option shown in above image.
For business and accounting, instead of Admin, Advisor option is present. You can also select the “Read-only” level which lets the invited user see all the data but doesn’t allow to edit it. Flexible, isn’t it?
But be careful that to whom you provide the access to Xero, for there is no undo option in certain cases.
You can unknowingly provide the invited user, the capacity to add more users which can be harmful. Also, we suggest that users should use this feature for a limited purpose.
Xero must implement additional security measures by which no user can cause to corrupt the data or at least there must be a way to restore the data.
Login history which delivers the information that when someone has logged in along with the information of time and date can be helpful to find out about the activities of other users.
Manage Multiple Currencies
The purchasers may make the payment in multiple currencies apart from USD. For some of the businesses, it may be necessary to approve of other currencies if they have clients other than domestic clients.
But the concern emanates when you need to place different currencies under one account. Keeping a record of all the transactions becomes more exhausting when you try to convert all of them into one chief currency.

That’s why Xero do that for you. In the settings tab, you can add currencies in which you do the business. The window shows the real time exchange.
This gives the idea of how much the consumer needs to pay. You can also set an exchange rate on your own.
With Xero, you can deal with customers in 160 different currencies without any risk of mismanagement.
Do you like to try out new things? Because now we are going to do roam around Xero’s Marketplace. Let’s see what we are all the all products that we can shop!
Xero’s Marketplace: May Make the Business Easy
Xero’s ‘easy to navigate’ system is the result of correct selection of tools in the primary application. Only the tools which are required for basic accounting are available, and for other purposes such as time tracking, payroll, etc. extensions can be implemented.
When you open the marketplace, you will find that it is divided under various sections. That makes it easier for the user to identify the required extension.

However, for purchasing these extensions/applications from the Xero’s Marketplace, you need to pay extra. The price for every application differs. Initially, you get a free trial for most of them for identifying whether the application is useful or not.
The application directly gets connected to Xero. Any change made in them will be directly visible in the Xero’s application. That’s how multiple features can be added without complicating the interface.
There are some extensions which are available as features in QuickBooks. Even though Xero is an inexpensive tool, after one purchases extensions, its cost may go higher than the other accounting software programs.
Creating, Editing and Customizing Invoices
Recording invoices is a necessity as it provides all the data about the income and its source. You can match these invoices with your bank credit details to ensure that the customers have made their payments.
In case you haven’t received the payment, then also this record is helpful to remind them about the due payment.
Click on the “Business” tab and select “Invoices.” It is this much simple to reach to the data regarding the business done with the customers.
The list shown below contains all the information related to the payment details. You can easily go through the payment activities of different customers and identify the ones whose payments are overdue and by what date.
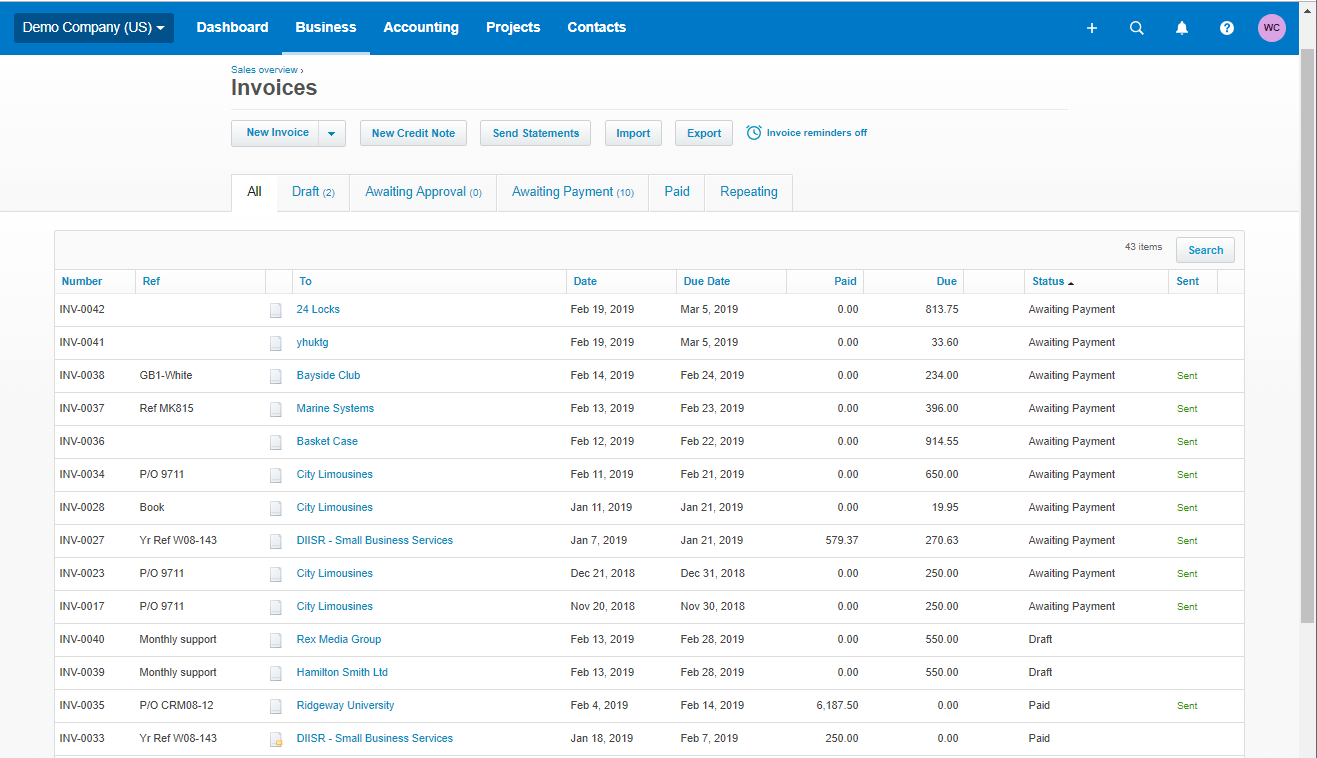
For detailed information, simply click on the invoice and information about the items, quantity, tax information, etc. which appear on the screen.
If you wish to edit the created invoice, open classic invoice option where you will find a scroll bar on the top, select edit from the scroll bar to make changes to the invoice. Other options which make the tasks facile can also be found here such as copying it directly to the bills, quotes, or purchase order.
If you wish to generate a recurring invoice, you can directly do it through “Invoice Options” rather from a separate section.
Invoice Settings
Let us take you back to settings options where specific choices to make changes in the invoices are available.
There is a “Standard” template available which is the predefined template. For editing the invoice layout, you can utilize the “Edit” function which you can find in the Options menu.

Unlike Quickbooks, there are no multiple templates in Xero. Also, if you like changing invoice colors, unavailability of that feature may disappoint you.
If you wish to improve the consumer’s accessibility to your business, adding multiple payment methods works as a great tool, for this, just go to the “Payment Services” which comes under invoice settings.
The next feature which we are going to review is an essential one; it saves businesses from heavy losses and extensively used by every business. Traditionally, this feature was in the form of verbal notice, but now the strict formal format is available.
We are talking about the “Invoice Reminder.” For reminding your customers about the due payment, you can do it through email. However, Xero may add the option to send reminders through messages also.

In total, you can set five reminders for the dates selected by your own choice. The selected date could be before or after the due date.
Elements such as editing the email content, automatically adding the customer’s name and amount, and attaching invoices in the email gives more power to this function.
You can also add the business logo in the invoice. But, even after adding the logo and changing the font, and content, invoice design looks very simplistic. That’s why we suggest you employ custom made templates.
If you locally create a template, you need to do that in Microsoft Word document as Xero only allows .docx files as templates. In the same way, after downloading the predefined templates, they can only be opened using Microsoft Word.
That’s a limitation that business owners may face. Word has limited options to create templates, and so, Xero must expand its selection choice when it comes to templates.
Sales Overview
The invoices created are converted into graphical representation providing a summary to the businesses about the sales.
Under the overview section, you can directly find whatever much payment is overdue, and how much you have already received.

The list of customers who have not made the payment is shown on the right side. That way, you can keep track of such customers and use invoice reminder feature to remind them about the payment.
In “Money Coming In” graph, you get the information about the total earning of the business. But this graph has a major limitation which is the selection of period.
You can’t check the earning for a particular week or day. It only shows the data for the current month and previous months.
You can also print “Activity and Outstanding Statements” from this section. At the same time, you can send these statements to the customers also.
Settling Irking Bills and Expenses
You may not like this section, but the actual profit can only be known when you keep track of your expenses. There is no business which comes without outlays. Contradictorily, the expenses are the major factor which takes a business forward when they are done correctly
That’s why accounting software are embedded with expense trackers. In the previous section, we reviewed how Xero allows us to perform operations to manage the “inflow” of money. Now, we will find about the efficiency maintained for “outflow” management or not.
Similar to the invoice section, in the “Bills” section, records are generated for the money that we have spent. So, it clears the confusion that which payment should be made first, sort it according to the due date, and your confusion will get clear. That’s how you do it:

The one with the earliest due date can be taken into consideration first. For settling all, sort them by the status and overdue payments will appear on the top.
The ones with the “Awaiting payment” status are the remaining bills that business needs to pay. The same sorting option available for expenses is present for invoices too, and thus, we can take its benefit there also.
But unlike invoices, you don’t have custom templates for bills that the company needs to pay. Even using an appealing layout with alluring colors and enticing font will never make the bills look good.
If there is any expense claim, it can directly be added to the bills section, but to avoid confusion, they have provided a separate section: “Expense Claims.”
There you can add the payment made by you or any other employee for the company. It will be directly added to the bills section, and payment could be made from the company’s account for reimbursement.
Xero has added a few more features related to expenses which can be really helpful for delivering ease of use. For that let’s again expand the settings option.
Expenses Related Settings
There could be a possibility that a business requires to keep a record of lot many expenses. That may require an additional human resource for data entry purpose.
To avoid that, “Receipt Analysis” feature has been added. All you need to do is to click the image of the receipt from Xero’s mobile application, and it will automatically be added to the bills table.
You can also view account charts by expanding the “Account” tab provided under expenses settings. By clicking “Full Open Chart of Accounts,” you can explore different accounts distinguished by different titles (inventory, office equipment, etc.) and edit the details.
Is It Tough to Manage Inventory?
Inventory is the heart of a business. Product based businesses needs to store a lot many items, so maintaining the data about their inflow and outflow is highly important. While reviewing Xero, we got the answer to the question mentioned in the title; managing inventory won’t be a tough task when you use Xero along with its extensions.

In Xero’s user interface, the information about the inventory is placed in “Products and Services.” By expanding this option, you may only find limited fields: item name, cost price, selling price, and its quantity.
However, it is connected to the expenses and invoices sections. So, whenever you purchase and add an expense in “Inventory Asset” category, Xero itself records the addition of the product.
When someone purchases it, it will be visible in the invoice, and hence, Xero will automatically reduce the quantity from the inventory.
That way it will be managed automatically as you can easily cross-check them with the bills and invoices.
There are multiple inventory management applications which are available in Xero’s Marketplace. But why are they required if Xero is efficient enough to manage it by its own?
Xero’s inventory management is somewhat limited. Businesses having more than four thousand products can’t manage all the products through one account.
There are cases, where a business needs to track various components used to produce an item, and also needs to track the final items’ moment. Sometimes, a business may need to deal with products having different units for weight, length, etc. In those cases, adding numerical quantity isn’t sufficient.
Visiting Marketplace will lead you to many third-party applications such as “Dear Inventory” and “Vend” which you can use along with Xero for inventory management. But by paying extra!
Managing Money and Reconciliation
Moving money from one account to another could not be any simpler. Just take the mouse pointer to the “Accounting” tab and open “Bank Accounts” window.

Click on transfer money, add the bank details and the amount with the date & reference, and as soon as you click on “Transfer,” transaction will take place.
The clarity that Xero delivers is groundbreaking as it takes you to the easiest of all ways which you can use for managing the money.
If you visit the “Checking Accounts” window, you will encounter with a superb way of bank reconciliation. The bank transaction and the Xero transactions are placed alongside with the required information.
By clicking on “Find and Match” window, a detailed window opens to make sure that you are matching the correct transaction. After that, click on the reconcile button to add the match.
As soon as you reconcile, it will appear on the Account transaction table. Wasn’t that easy? This is one extraordinary specialty of Xero that the toughest tasks are done with the easiest hand.
Dashboard: Business at a Glance
Now after going through all the features, it is the time to inspect whether Xero’s dashboard is as user-friendly as its other components or not.
The dashboard must provide insight into the business in an uncomplicated way. With Xero, if you expect to get such a dashboard, you are in the right place.
Graphical representation on the dashboard explains that what must be your initial task. In case, there are transactions which need to be reconciled, you can fix them first.
If you move towards the right side, you will find Account Watchlist which reflects information about the current and Year-to-Date sales.
With the help of the dashboard, you will easily know how much payment your business is going to receive, and how much you need to pay. That helps to prepare the business to act according to the upcoming expenses.
The most important section under the dashboard to which everything sums up: “Total cash in and out.” Just by looking at the bar graph, you will know about the profit and loss.
However, the exact value of the profit or loss is not provided on the dashboard. For that, you manually need to check the inflow and outflow. That’s one major part missing on the Dashboard.
Get In-depth Knowledge of Your Business

If you are not satisfied with the specifics that dashboard has provided, you can explore the report section where you will find reports related to different aspects. This includes Financial, Sales, Tax, Purchase, Accounting, Inventory, Payrun, and Fixed Assets.
From here, you can also get the information about the summaries of different activities that you or the other users of your business account have performed.
You can also generate custom reports such as ‘report for the sale of a particular product,’ save them as drafts or publish it so that other users can have a look at it. When you wish to view the sheet locally, you can export it to Microsoft Excel, Google Docs, or PDF.
A limited number of report settings are also added such as if you want to compare certain report with a previous period. You can also choose to generate a report for a particular region or to eliminate any of them.
For instance, for generating exclusive report for the cusomters of particular area, you can uncheck the others area, and you wish to exclude an area, you can uncheck it. As simple as any other feature of Xero.
How Can These Advanced Options Make Accounting Trouble-free?

Besides these traditional accounting features, Xero also has some advanced options which are exclusive ones. This widens the functionality of the Xero, and here, you may find a reason to use Xero above other accounting software.
Find and Recode
Everyone makes mistakes, and while using these clouds software also, it is natural to make errors.
However, these errors may disturb a business because of incorrect accounting. That’s why they must be removed or corrected. One needs to find it manually, but all the errors can be fixed at once if they are related in any way.
For example, if you have added the multiple expenses in the wrong category, you can click “Find and Record” option which will allow you to perform a new search.
As you click on the search, you will come across different conditions, i.e., the data type that you need to change.
Let’s say that your accountant has added 1st January’s all the fixed asset expenses to office expenses, then he needs to input the date and account to which he has wrongly added the data.
Search results will appear based on these two selections. In case all the additions were wrong, you can select them all in one go and click recode. Now, you can select the account to which you wish to change the record.
If you want, you can also change the Tax Rate and Region under this section.
Fixed Asset options
The heavy machinery used for manufacturing or a desk where you or your employees work for business’ growth, everything comes under fixed asset.
Fixed assets are an integration part of a business, and hence, their management must be done with no compromise.
With Xero, you can list your fixed assets along with depreciation details. That can be done by choosing the depreciation method, averaging method, and entering the effective life of the item.
To keep it simple, Xero asks the user to add the Asset Type and Asset Account separately. Asset Type is the equipment that you have paid for, and the asset account is its category. Then you need to set the Accumulated Depreciation Account which is pre-structured by Xero.
Then set the Depreciation Expense Account by selecting the Expense category. In case you feel confused about the selection, you can always visit Xero’s help center by clicking on “?” symbol available on the menu bar. Convenient, isn’t it?
There are multiple depreciation methods from which you need to select one. We always suggest selecting the straight-line method as it is the best one for long term assets and has a simple calculation methodology.
After selecting the averaging method, you need to provide a depreciation rate. Or else, it would be better if you provide the effective life of the purchased asset. The Xero will calculate the rate itself.
Now all you need to do is to provide a start date, i.e., the date for which you wish to run the depreciation. Now just click on run depreciation and you will get the amount by which the value of the asset has reduced for the selected date.
It is helpful at the end of the financial year when you are calculating the value of all assets before selling them and buying new ones.
Chart of Accounts
Chart of accounts opens a predefined table having separate rows categorized by Xero itself. All the business transactions which have already been proceeded till now or which are going to happen would surely come under any of these categories.
You can edit the type, name, and code for each row. If you wish to add it to the watch list, go ahead and checkmark “Show on the Dashboard Watchlist.”
Out of all these types, Xero doesn’t allow you to delete the ones which are unavoidable expenses such as sales tax, historical adjustments which have been already made, and fixed assets.
Handle Multiple Projects & Track Estimates
If admiring Xero is a path, it is an endless one. With Xero, tracking multiple projects is an effortless task. There is a separate project dashboard where you can analyze the projects and probability to reach the target.
This helps business’ owners to identify that in which projects more effort is required.
If you expand a project by clicking on it, you will be able to visit the details about estimate, invoices, time and expenses, and deadline as shown in the image.

You can assign estimated time to different tasks and check whether the employees have worked on it accordingly or not. Time entries of the employee along with the task name are available for separate weeks.
If you feel that the project is not generating profit, accounting for it can be closed just by clicking on the close button. You will have till the date information related to the project, but after you close it, no time entries and invoices could be added until you reopen it.
Group Your Customers Using Smart List

The company has made tremendous efforts to add new ideas about how a business can be taken forward. Here you can find all the people who have done business with you.
The contacts are categorized as customers and suppliers. Details about the current and the past employees are also available in this section.
Xero has taken this to the next level by which you can generate a custom list using the Smart List section. But this list can only be generated for the customers and not for the suppliers.
Here, you can filter the customers who have purchased a particular item, purchased any item in a particular period, bought items more or less than a specific quantity, or combination of these options.
But we haven’t checked the feature for every combination. You can also add more conditions such as location, total payment made, and a number of invoices.
With the help of these advanced filters, you can target a specific group. Provide them a discount, send them offers, etc. and that may help to enhance your business.
Conclusion
Overall it is a flawless and smooth user interface that houses elements which are all well-positioned under various sections. One can state that this user interface is designed to let users find every feature with few clicks.
You don’t need to dig much as there is nothing hidden unlike QuickBooks. All the attributes remain on the surface, and thus, they are easily reachable.
They are able to offer such a simple user interface as most of the features are provided as integrations, and not as the main element of the interface. As we have already mentioned, Xero has a vast number of products in its marketplace.
For enabling various features, you need to integrate your account to the applications. That’s a limitation as well as benefit. The benefit, we have already observed; the simplified user interface. Limitation: you may need to pay additionally for those integrations.
However, Xero is comparatively inexpensive when we look at the prices of other accounting software. That’s why even if you need to purchase extensions, the overall price would not be that high.
And, anyway, even the alternative software would need you to purchase add-ons in many cases. It is better to buy an inexpensive product, and pay only for the elements which you would require rather than buying an expensive one.
Hence, Xero is a cost-effective & user-friendly software. What else may the user wish to have?
Well, we never forget to mention the limitations in the end so that when the reader needs to make the purchase, he would not forget these points.
The functionality of Xero is lower than its competitors. Such as, you cannot manage inventory with its help.
Certain businesses require generating estimates which aren’t possible with Xero’s use. However, if you choose to create quotes at the place of estimates, you cannot edit its layout but only the content.
There could be the possibility that add-ons won’t solve all your issues. Before purchasing Xero, you must take a test drive to conclude whether the product or its add-ons have all the required features or not.
Like, we have mentioned that inventory management is limited, but yes there is an add-on to remove this limitation. Similarly, you can add the payroll service on the application. For estimates, Kickserv can be integrated which is a software available on the Marketpalce.
You are the only one who knows your business requirement. So, just create a Xero account, explore the application, visit the Marketplace, and conclude if the add-ons are enough for your business.
Even if they are enough, make sure that the final price (Xero + add-ons) doesn’t go higher than your budget. It is the perfect way to find out how many Zeros, Xero will add to your earning.