
AVS Video Editor Review
AVS Video Editor is a user-friendly video editing software designed for Windows users. It enables...
Detailed Reviews
It is quite captivating to be part of the current world with loads of entertaining paraphernalia roaming around. Be it on TV or the Internet; it is hard to imagine a single day without consuming any media content. This is more true for urban folks, whose lives dwell on such content consumption.
One of the most consumed media is online memes/images and videos. Among them, videos are pretty much the holy grail. Be it laughing kids, rolling cats, or those Instagram filters; they surround us. Especially since the era of sophisticated editing has arrived, even novices do not shy away from using them.
Video Editors have become so much popular nowadays. With their complex filters and editing features, any average video can be turned into studio-quality. The ease of operating them and requiring less experience has justly increased their reach.
Pros
- Complex yet straightforward video editing functions. It has lots of transitions effects and video scenes.
- The number of formats and save customization is impressive.
- It has a clear timeline and storyboard editing.
- It comes with support for creating innovative disc menus, voiceovers, and we can add animated texts in the videos.
- It is packed with significant video editing functions like trim, crop, color enhancement, etc.
- The content offered in the price range is optimum. The free version has only one restriction, i.e., company watermark.
Cons
- It does lack some essential video editing effects like other top products. Features like screen capture, voice recorder, and video stabilization require more enhancement.
- Rendering speed is average Sometimes, the player hangs while rendering and crashes, even with decent hardware.
- The UI, although simple, looks cluttered and needs a rearranged interface.
- The voiceover doesn’t support direct sound attachment
Introduction
In this review, our target is AVS Video Editor, from the company AVS4YOU. The product laid its foundation in September 2003, with merely basic filters and editing stuff.
This London based company specializes in media editing tools, be it for images or videos, and even offers disc and audio tools. AVS Video Editor is one of their top-selling products and works like a charm for most beginners as well as in mid-range editing.
This video editor offers an uncomplicated rework interface with features like video/audio effects, transitions, camera captures, and many more video editing features.
The UI is so meek that novices can effortlessly have mastery over it in a week. With proper practice and creativity, it can edit simple videos into advanced studio-quality material. Their another product, AVS Video Converter, can effectively convert these videos into your desired format and quality.
Now is the phase to explore every editing feature of AVS Video Editor.
Initial Setup and the Program’s Interface
Its installation requires no efforts. Just download the latest video editor version and then install it. However, there is no trial version here. There are some limitations to the video editor itself for free users. We will still evaluate it from head to toe.
The editor has only a single panel with the default one showing a list of projects done so far. They have given a free sample project so that new users can understand how to set up effects and utilize other features.
Check out this sample project first, unless you have already used this software before. The sample consists of each type of editing at different timestamps in the video.

You can explore each timestamp from the timeline view and learn to use them. Nothing too tough, to be honest.
The entire interface of AVS Video Editor is apportioned with a Top Menu, Media File/Affect’s Area, Preview Window, Feature Buttons, and lastly, Timeline/Storyboard Area.
As we said, the entire interface is bound to one zone. So, there is no need for swapping from tab to tab. All the effects are accessible from a single tab.
Now, each distinct button has editing features in it. Using them one by one will add a designated effect to the video. So, let us begin the video editing with AVS Video Editor.
Starting with the New Project
Once you have explored a sample project, get ready to edit your own videos. The opening tab is to add the projects and manage their timeline.
For a new project, select a video file. Import it into this interface, and then start exploring these options. Hit the button Blank Project to start things from new.
The blank project panel asks to import files for editing. You can import a full video, or parts of it. It can be later merged regardless.
The new project also has the choice to either capture a camera stream or the current computer screen. It allows the streamers and other users to capture and edit videos in a single interface. AVS Video Recorder is used for camera capture and is a separate product.
It is integrated into this arrangement via installation itself. Thus, the project manager is to create a new project or manage the current ones.
The main features start with the Media Manager. Now, as for the UI of this interface, you can view the timeline below it. The preview screen has some essential play buttons to control and view the videos while editing. It will also preview effects in the future section.
This area is known as the Storyboard/Timeline Area. In this area, we can observe a segregated timeline and editing elements. Based on the components you add like video effects, sound effects, text, etc., we can view all of them assembled here.

Similarly, the storyboard view lets the users view a sequence and transition effect added in the video, just like a book, page by page. Each page can be directly added with a video sample.
Both these areas have their own control buttons like split videos, trim, change speed, colors, audio, and many such video balancing effects. From here, the primary purpose is only to edit the existing video without any internal effects. It works only for external modifications.
There is a folder tree on the top menu, to create folders, like in the OS file system, and keep the files into that particular location. This is called the Media Library of AVS Video Editor.
So, how to use these videos after importing them. Well, that is a bit tricky. The problem is that there aren’t any straight UI submissions like other products. Users need to explore and decide themselves how it will work.
From the library, add a video project to the main project. Once added, select the location for editing. This is very crucial before you begin editing videos.
Timeline and Storyboard Editing
If you have no idea what you want to do to the video, sit and decide first. Random hopping around won’t help anyone. The effects can be anything, like color transitions, water effects, adding an anime battle OST in a catfight, etc.
Head to the timeline and mark the timestamps that you have decided to modify. Marking the videos at specific points helps in remembering the points to attach effects much efficiently.
We’ve already revealed the popular options here. Other than that, we can split, trim, change play speed, color corrections, audio addition, and add video stabilization too. Users can disable an effect track to prevent the addition of any effects in that timestamp.

Overall, the timeline feature itself supports unrestricted and stress-free editing. With these options, we can merge multiple funny videos, make wedding slideshows, and much more.
The Trim Feature acts like a regular video trimmer and will ask for start/end-points for trimming. The UI has an option to mark the endpoints from the trim preview directly.
The next one is to adjust the Playback Speed. They offer to flatten the audio or mute it. The speeding process is varied from 0.05x to 12x, and we can even add our own numbers to slow down or fasten playback speed accordingly.
Color Correction lets you adjust things like saturation, gamma, hue, etc. There is also a Split-Preview to monitor these changes comparing it to the original one.
The Audio Correction options are very conventional. Almost the same set is seen in their video converter setup too. Regardless, we can alter audio with amplify, noise removal, equalize, normalize, compress, and shift pitch.

The last option in this section is the Video Stabilization. This is to remove the shaky-effect of the recorded videos and stabilize them.
Based on the amount of shaky-effect in the video, adjust the slider. It didn’t adjust a very shaky video we had. But for something like following a local train with a camera was stabilized decently.
These effects were for a single video you added in the storyboard. All these can be applied distinctly to other videos you have added in the storyboard.
This is how the basic editing works in AVS Video Editor. Compared to products like Cyberlink PowerDirector, Pinnacle Studio, Corel VideoStudio, etc., this interface is timid. It even hanged the system for a while, but that was only once.
So overall, AVS Video Editor has adequate tools and limited product features at this price range. Keep in mind that you need to save the project after adding each effect.
Transition and Video Effects in AVS Video Editor
We are very much familiar with the transition effect in MS PowerPoint or any other slideshows maker. Akin to that, we can add some special transition effects to a video too.
There are 80+ transitions effects to choose from. Applying them to these videos is also untroublesome. The trick about transition is the same as we know do in the slideshows.
The foremost step for that is to add multiple videos first. We can even insert images here. Once done, there is a blank 2D arrow on the storyboard between each slide. This is where all the transition effects can be added.

Click on the Transitions Tab. From there, pick a special effect, select this arrow, and then click add a transition. This will record the effect at that point.
Sadly, you won’t see any prompt to add the time limit for this effect. Instead, select the duration options from there and input the time the transition will take. These are the only thing possible with the transition effects.
Now, as you’ve added the transition effects, so is the procedure for attaching special effects in the video slides. For each video slide added, we can pick from about 70+ effects and add the duration for which we want them to be active.

As you compare it with a complex setup of other video editors, AVS Video Editor is aimed for quick and simple effects. And they have specifically altered the entire UI for that. We can preview each effect and the time-lapse.
Each effect added can be viewed in the timeline console below. Overall, they have implemented these things very effectively. The only feature that can further ease it, is to enable marking time in the main video. That can enable users to cherry-pick these effect location more quickly.
Adding Text and Voice Effects
Want to add credits, a story in timeline, subtitle, and any form text to the video? Well, you can use this feature to add text to individual time stamps.
There are lots of text effects given by them to satisfy most people’s needs. The method of adding text is a bit distinct here.

Instead of selecting a video or image first, we need to pick a text animation and then drag it to the text field in the timeline view.
Once that is done, we can edit the settings for text from the timeline itself. If you play with it, you will find a very detailed setup for text effects. Even in the interior portion, we have options to select the font effects, upload our own fonts, preset effects, and many more.
Only thing that knocked us was that this interior configuration was very erratic. It may even confuse the pro users, and so AVS Video Editor needs to simplify this setup.
Other than that, it is a thumbs up from our side to their text-based effects. Maybe add some more spooky effects, and it’ll be perfect.

The Voice Effect is used to add your commentary to a video. It can be quite an interesting feature, especially to add a dubbed voiceover. This feature is only accessible in a connected mic. We can even manually add audio to it.
Once connected, we can pick the source, format, and other stats for the voiceovers. Add the voice accordingly on different timestamps. From there, we can fine-tune these voiceovers effortlessly.
Creating Optical Disc Menu
This may sound old to some of you, but this feature is still in use. For DVDs and Blu-rays, it is essential to make an excellent DVD. Especially for sound occasions like marriages, ceremonies, graduation, etc., it looks more convincing with special effects in the disk drives.
Nowadays, in the age of USB, optical drives like DVDs and even Blu-Rays are becoming obsolete. But for peeps who like to preserve it, they can use AVS Video Editor’s Disk Editor to modify the current disk menu or create a new DVD from scratch.
This disc editor is discreet, even for novice users. This menu is parted in three main tabs, viz., Styles, Chapters, and Content. The first tab Styles, is used to pick the menu style for discs.
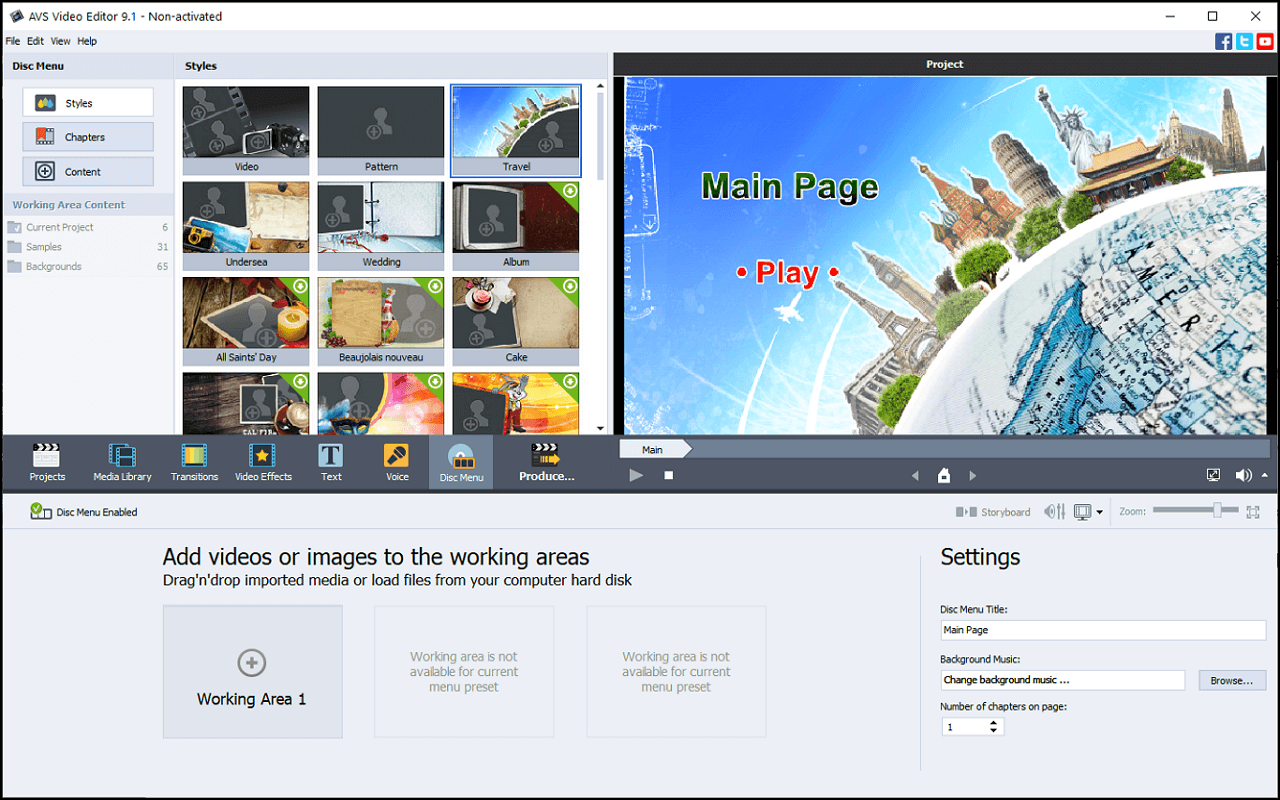
It has many themes to pick from. You may need to download a theme separately too. After that, the lower region is the working area where we can put the selected items to be added into the disc menu.
The working area depends on the theme selected. Currently, only three working areas are supported for disc menus, which is sufficient. In these areas, one can add media files like audio, images, or videos too.
However, it is recommended to make it as humble as possible. It may not load properly in some players, and even slag the menu, making the DVD unplayable. The settings button on the side permits you to modify the text shown in this menu.
There is a Title Text for the disc and a play button. After that, we need to add chapters to our disc. Adding chapters makes movie navigation easier. We can jump from one movie arc to another.
To do that, switch to the chapter selection. The first option you can try using is the auto-set button. It will set the chapters at the beginning of each clip or a set duration.

As you can observe, if your project has multiple videos or media, it will set a separate chapter at each of them.
If there is a single video, you can set chapters at designated time intervals in the equal division. Unless you have done a project with multiple media files, it is better to go with manual chapter addition.
To manually add chapters, use the bottom timeline panel. Move the pointer to the beginning points of each chapter and click add chapters. This will add a new chapter points. We can rename these chapters and update their images.
As you work on, it won’t be long before you master it. Lastly, the context menu allows you to edit the menu title, background music, and the number of chapters shown on it.
This is all that can be done using the Disc Menu Editor. In our view, for a much-detailed menu, there are other products with a more complicated setup. For ordinary users, this disc menu editor is enough.
Saving the Video Projects in AVS Video Editor
After all these bountiful efforts, it can be an infuriating nuisance if you aren’t able to create the projects properly or convert them into the desired format. The saving process must also be established to get a superior output.
The save feature can be accessed after you are finished with the editing stuff. There is a button at the end called Produce. Once you hit it, it will ask you to input the desired output of a project.

There are four options here, viz. local file, disc, device-specific, and direct online sharing. It is quite evident that they’ll give different formats for every type above.
The local file saving has formats like MP4, AVI, MOV, MPEG, etc. The save-to-disc option lets you burn a standard DVD or Blu-ray disc with a menu.
The device option lets the users save the file specifically to devices like consoles, iPods, PSPs, and BlackBerry devices.
Then, the online mode will just save the file in Flash or WebM format. However, MP4 is supported on every streaming platform, and flash player is going to be redundant anyway.

Once done, you are redirected to add further settings of a file. It will include the format of the saved files, device configuration, i.e., video codecs, frame resolution, channels, bitrate, etc.
After that, add the name of the file, and get a final preview before publishing it. The rendering time is good, and the quality of the video is excellent too.
Overall, we are now done examining all the possible tools in AVS Video Editor.
Conclusion
Some may find the average Joe look of AVS Video Editor docile and may think of it as an average product. But from our testing, it has all the core features of a video editor. Although the UI has a classic look, it still encompasses most things.
Above all, we can learn this software thoroughly in less than 3 weeks with proper dedication. It won’t spoon feed you like other software, and so, it provides a decent learning curve. The processing is lag-free and won’t stagger other applications.
Compared to other video editors like Corel VideoStudio, Pinnacle Studio, Adobe Premiere, Lightworks, etc., it still has some room for improvement in terms of UI.
They can add more effects in the video transitions and even add a detailed marking system. Also, more recent 3D camera effects features are to be revamped.
Overall, the AVS Video Editor is still a fulfilling product at this price range. There are lots of cool video editing features for you to try on. The best part is that it can be used as a forever free version.