
Movavi Video Editor Review
Movavi Video Editor is used to edit and enhance videos, add background music to movies,...
Detailed Reviews
Video Editing is one of the top in-fashion things in the current market. From a roadside Romeo to the geek working in Marvel Studios, both are familiar with the concept of video editing. As simple as its name, video editing requires a user to add some subtle effects/elements into a video.
This is usually done with the help of video editing software. Video Editors come in many forms, with a cloud-based, offline, or mobile app setup. Among them, offline desktop apps of video editors possess most features and can handle high-grade editing with dedicated resources.
These video editors use complex programming and manipulation of the video files in order to input something in them or edit its properties. Unlike everyone, an Offline Video Editor usually comes with a better suite of special effects and editing facets.
Pros
- It is best as a pick & place video editor. One can rework their video within 15 minutes and full of spectacular effects.
- The UI of Movavi Video Editor has less learning curve that can be grasped within a few days.
- It has an amazing set of filters, transitions, and stickers to be used as special effects. They require the least editing and are easily usable in any video or media files.
- The text editor offers many animated text effects. The fonts can be personalized
- MVP also comes with extra video editing tools like color correction, stabilization, chroma-key, slow motion, etc.
- Individual objects, text, and stickers can be given animation effects, along with the basic keying process.
- The final output rendering covers all parameters of proper file conversion. Free users will have their videos watermarked.
Cons
- No dedicated Subtitle Editor and no provision to import subtitle files into the movie.
- Heavily lacks in keying feature in most sections. Maybe, less customization and quick editing is the actual intended goal of developers.
- The Audio editing options need a complete overhaul.
- Color gradings lack vectorscope, LUTs, etc. Effects cannot be copied onto other video segments directly.
Introduction
Movavi Video Editor Plus is among one of the best user-friendly video editors. Being a part of Movavi, a digital media company, it has many efficient features compared to other products.
This video editor comes in a variety of suites as per customer needs. It has different versions like Movavi Video Editor Basic, Editor Plus, and Suite. Among them, Video Editor Suite has combined functions of Movavi screen recorder and video converter too.
For the current review, we will use the Movavi Video Editor Plus for testing purposes. Like its other products, Movavi offers a 7-day free trial setup. It has only two small restrictions, viz., watermark on the final output, and audio conversion is limited to half of its runtime.
These restrictions won’t be affecting the editor’s feature, and so we shall now move forward to review it. If you compare it to the market’s current offline video editors, Movavi Video Editor has millions of users and is quite popular due to its fast interface.
Quick Walkthrough of MVP
Once you have installed the product, you are greeted with a tutorial interface that will guide the users with various panels of video editor. In the video editor, users have access to various panels and tools attached to each interface.
The core panels are Preview Panel, Media Manager Pane, Timeline Pane, Video Editing Pane, and the usual Edit Tools. The interface is fixed, and only timeline pane and preview pane are adjustable. It even follows a dark theme.
We personally prefer to allow custom themes in UI with the addition of light color themes. The dark interface can be disturbing for many people.

Nonetheless, the interface is super light as per novice standards. The first step to do here is importing a video file for editing or an image file in case you want to make a presentation.
Then, most videos will have to be trimmed, cropped, or you will need to add separate video effects in each section. Due to this, the initial step for new users is to go through the tutorials and then begin playing with it seriously.
Now, Movavi Video Editor supports most video formats, and so it mustn’t be troublesome to explore various video formats and their editing process.
The Timeline Panel, Quick Edit Toolbar, and the Media Manager
In many video editors, these two sections are the ones that are mostly enriched with the best UI perks in the product. This is to make it easy for users to control the media files and then manipulate their segments easily.
The Timeline Panel in Movavi Video Editor is quite recognizable. It has access to various tracks, playback timers, visibility, track locking, and so. Basically, three types of tracks can be added in the Timeline Panel, viz., Video, Audio, and Title track.
As you realize, these 3 are the ones that are needed the most. The Quick Edit Toolbar is just above the timeline panel on the left. It has got the most unique and fast editing tools. Unlike traditional video editor effects, these are used to just sculpt the video files with tools like clipping videos, marking chapters, transitions, etc.
For using them, simply pull the video or image file from the media manager to the timeline panel. Users can add this media file to any part of the timeline.
Timeline Panel and Editing Toolbar
As said before, the timeline panel needs to have its own UI perks and tools to make things faster for video editing. In MVP, users can split the audio and video in the timeline.
One of the quick requirements while using the timeline panel is the marker and the split video tool. Since we may want to add different effects at different instances in a video, we need to split it into sections.
Have they given the tools for that? Well, the answer is yes! Users can split a video as well as add markers at a specified location in the video. The video and audio are generally split into the video track itself. However, you can also wholly split them from the timeline panel.

There are several options when you right-click a media in the timeline panel. These include markers, effects, split video, insert freeze frames, cut/copy segment, and so on.
Overall, this is an ideal feature list for the timeline panel. The interface is made with drag and drop features. Users can simply move the videos, audios, markers, split sections, etc. freely in the tracks. You can even change the storyline of a movie by moving the story sections in the track.
However, there was an issue moving the video track on the top of the default title track. The three default tracks cannot be deleted, and this shouldn’t be the case. We haven’t checked the layering part yet. There is no composting or option to pick the intensity/transparency of the track.
Both of these must be present for any video editor, which Movavi Video Editor must include too. All in all, the Timeline Panel is decent enough. It can be further upgraded too.
As for the quick edit toolbar, they have included minor features like cropping, clipping, color adjustment, transition features, and a marker tool. As for some comparison, many video editors come with more advanced features like slip tool, resize tool, ripple edit, etc.
We hope that they improve the timeline, and this quick edit toolbar by adding some more editing tools in it. So far, there isn’t anything missing if you have a basic or mid-level video editing needs.
Media Manager
In MVP, it is quite hassle-free to add media files into the interface. The media manager has various columns like file import, media bin, sounds, music, sample video, and backgrounds.
Out of these, the file import button will bring in a media file from the local storage. It auto-detects the supported file formats. It also offers us to record a video, capture screen, or record audio.

Files added or recorded from here are then placed in the media bin. We can directly browse the required files from here. Users can separate folders too in the media bin.
To access some default media files, access the rest of the tabs in this media manager. Movavi Video Editor has given a robust stock of some amazing media files in the form of sounds, music, photos, and videos. We can download all of them. Most of them are very usable in varied video editing needs.
Another important thing is that Movavi Video Editor has an online store to download premium stock images, videos, and audio files. They have also included many premium special effects in this store. There are combined packages for particular themes like Christmas, summer, birthdays, etc.

Overall, the media manager is detailed enough to include most of the features in it. In case you lack any media file, feel free to download from this fantastic set of templates.
Now, we must move on to see the incredible video editing effects that Movavi Video Editor has to offer.
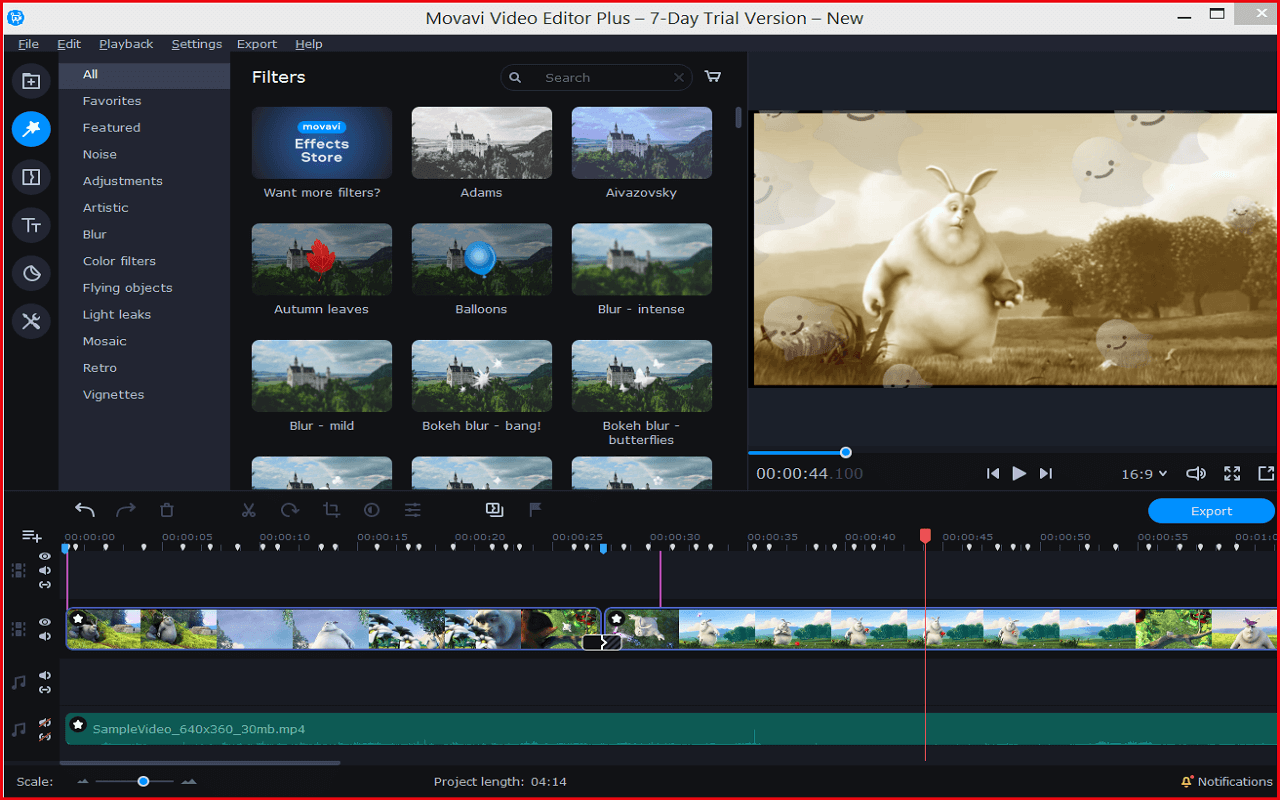
Using Various Filters in Movavi Video Editor
Filters are the life for many video editors who rely on putting effects directly, without any complex editing. Most filters are designed to be copy/paste type, for easy video editing. Filters are used to input specific effects into the videos without changing their core graphics.
Famous examples are color filters. The video content remains the same, but we can add a color layer on the top like RGB, negative, sepia, etc. However, with a sophisticated setup, we can use animated filters rather than simple color filters.
To check this stock in MVP, head to the Filter Tab from the top-left panel. In the Filter Menu, we can see many categories of filters like noise, adjustment, blur, lights, colors, etc. Each section here holds an exceptional variety of effects.

We can get color filters, filters with added animation like falling stars, snowflakes, hearts, etc. Then there are several filters using blur, fisheye effect, mosaics, etc.
But, are they customizable? Can we alter their intensity or change their playback speeds? To see that, we need first to add a filter effect in a video.
To do so, simply pick a filter effect, and drop it in the timeline’s media segment. Well, as for most filters, there are some relevant settings for customization present.
For example, in the case of falling-object filters like flowers, hearts, raindrops, etc., we can manipulate their intensity. There is no method to change the color of these objects or their numbers.
But sadly, even in the case of other filters, like colors, lights, mosaics, etc., only change in the filter intensity was possible. Movavi Video Editor must add appropriate options in each filter category to allow a decent level of personalization.
Regardless of this, Movavi Video Editor has done a great job with these fantastic preset filters. We believe that since the target audience is from a novice to mid-level user, there won’t be any need for such an advanced level of alterations for each filter.
We can even add more than a single filter to a media segment, change its intensity, and then create a custom effect ourselves. At least an option to save such a custom effect must be added by MVP.
MVP has a decent stock of these effects on its online store too. The ones in the offline version are great too. Another great thing was that these filters took very less load on the system. This made the preview of filters quick.
Hands down, this is by far the fastest and lag-free filter feature among most video editors. Even with an average system, the performance of Movavi Video Editor was excellent. Now, Transition effects are the next cup of tea we’re going to sip.
Using Transition Effects
An editing effect that many of us have played with is the Transition Effect. This effect is prevalent for PPT presentations in schools or colleges, for smooth conversion from one slide to another.
Transition effects are put amidst two successive slides. A good transition effect gives smooth channeling between changing frames. Also, if you can create a transition based on the context or current graphics on the screen, it can become an enjoyable experience.

When it comes to videos, we mostly use transitions in presentations, marriage videos, farewells, party bash, etc. The transition feature in video editors can also be used to make an amazing video presentation. Move to the Transitions tab from the side menu bar.
In the Transition Menu, we can pick any one of the animated transitions and place it between any two segments in the timeline menu. There are more than 100 distinct transition effects present in the Movavi Video Editor setup.
All of them are divided into multiple categories. We can even bookmark these transitions and then pick them up from the favorites tab. More of them can be added via the online store.
MVP has the essential customization for transitions. It only offers an option to change the transition time and the overlapping method. Users can input the time duration they want the effect to run.
This may sound a bit new to many users, but this overlap option decides the filling of these transitions. The options include the choices to trim content, freeze frame, and slow motion.

If you had trimmed a video, the first choice would show small segments of the trimmed portion in the transition. The second choice shows a static frame. The third one allows a video to be stretched in the transition duration to create a slow-motion effect.
This is how Movavi Video Editor offers some of the conventional transition methods in it. Other than this, it is quite a mediocre setup provided by them. Top video editors provide way more detailed transition customization, along with keying features.
Regardless, the best thing about Movavi Video Editor is that it has much better stock for preset transitions than other video editors. It is best for users who do not want much customization. This truly makes it as best pick and place slideshow and video maker.
Text and Title Editing
For any video or movie, you are making, most of the time, adding texts to it is crucial. This text can be of any form from simple subtitles or intro titles to movie-styled animated texts, timers, speech bubbles, etc.
Text insertion in Movavi Video Editor is similar to its other interfaces. The Title and Text Tab is on the top right corner, and it includes some of the best stylish titles, subtitles, and many other text types.
The text editor offers various categories for it, like titles, basic text, opening credits, speech bubbles, etc. So, text editing is possible even for novice users.

Most of these text elements are preset, i.e., there is no need to add animation to them manually. These animations are one of the best stocks amongst many video editors we’ve tested so far.
Simply choose a text format and drag it to the text row in the timeline panel. The next question that arises is that what can be edited in these text sections. For that, you first need to insert a text box from this menu. Once done, you can double-click and select the edit menu.
In the Edit menu, we can see some typical options like before to edit these texts. We can change font size/type/colors, etc. As related to the animated text clip, we can alter the playback time and animation speed. The shapes in the animated text can also be given separate color.
We can save every custom made preset. The new custom preset can directly be checked form the favorites tab in the right menu bar. Next, you can change the position of these elements too, by merely dragging them across the screen.

Overall, this is the customization limit in the text fields. Unlike some video editors, where we need to use the keying feature to handle an animation’s timings, Movavi Video Editor does it automatically once you set the timer for text animation. This means no need for learning complicated keying for some fancy texts in your videos.
Now, where to input the subtitles? Well, obviously in a video. And how? Using the subtitle text editor. There is no distinct subtitle editor present in it as of now.
Users have no alternative to import subtitles from outside, and this appears to be a problem. Imagine adding subtitles for every 3 seconds, writing in each text box separately. Movavi Video Editor needs to patch it soon.
Adding a dedicated subtitle editor is more crucial, along with a simple text box feature. Nowadays, most videos are embedded with them. This should be the next target for MVP, i.e., an in-depth subtitle editor.
All in all, this section is totally worth your time and effort. Even with the lack of appropriate options for keying or advanced options in text editing, Movavi Video Editor thrives with one of the most flawless text editors.
Playing with Stickers and Emojis in MVP
In today’s social media age, it is one of the biggest trends to use emojis and stickers online. We keep finding new memes, stickers, and emojis to convey different emotions on social media.
Something similar across those lines is also possible here. Most cloud-based video editors have a dedicated section for emojis, stickers, and such gag items, that can be inserted directly into the videos. Movavi Video Editor hasn’t strayed far from that.
The Sticker Tab is present in the same special effects toolbar. From there, we can keep adding some remarkable stickers and gag stuff in the videos. The effects can generally be added in the text row of the timeline panel itself.

From the Sticker’s Tab, we can see a variety of stickers from comics, emojis, love shapes, arrows, and many such distinct objects. The trouble with this section is that it is too ordinary. This means that users aren’t able to edit much of it, except the runtime of that emoji.
We can’t customize many properties like their colors, opacity, and shape. We can add some transition animation to it, which can give it some life.
With this, the Sticker section in Movavi Video Editor is concluded. So far, we hope to see better customization options in the future. Their online store has a decent stock of such emojis.
Now, the final section left is the Other Effects Section.
Checking Some Complementary Tools of Video Editing
Many times, some of the editing effects are difficult to be added as a separate category. For these reasons, the developers mask them under an alternative section or stuff them up together. As for MVP, they have also combined many effects into one section.
It is named as All Tools. In this section, the tools are divided into audio and video editing. We can review the features in both one by one.
Video Editing Tools
The video editing tools include some of the popular items like color adjustments, crop & rotate, animations, pan & zoom, stabilization, highlight-conceal, chroma-key, slow motion, and scene detection.
As seen above, many of these effects are usually added in the video effects sections. Like always, some of them are very basic. Color Adjustment includes four auto-correction modes like contrast, saturation, white balance, and colors.

The customization in it wasn’t too good either. The White Balance offers a pick tool for picking a white color in the video interface itself. Users have access to all advanced options like gamma, saturation, hue, shadows, etc. to modify the videos.
The Crop & Rotate did what it does! It can crop the videos and rotate them at the desired angle. Nothing new! The next section is a bit more interesting.
The Animation Section packs animated effects for the text, objects, or any other element in the timeline panel. This is the section to add some of the advanced stuff into the videos.

Choose the object of animation and then drop a selected animation effect on it. This will animate that object accordingly. However, there is one more thing we previously missed and even highlighted before.
This is the Keying Feature. Movavi Video Editor has added it so late in the game. Nevertheless, the keying here is pretty novice-friendly. The users need to pick an animation and then decide the motion they’ll add to the object.
For any animation, pick the Time Scrubber and hit add a keyframe in the advanced menu. After that, change the location, rotation, colors, etc. for that object and keep adding keyframes for every animation frame.
Hit play, and you can see the keying animation and change an object’s position, as you had inputted while keying. Overall, it was a steady and straightforward keyframe based animation effect.
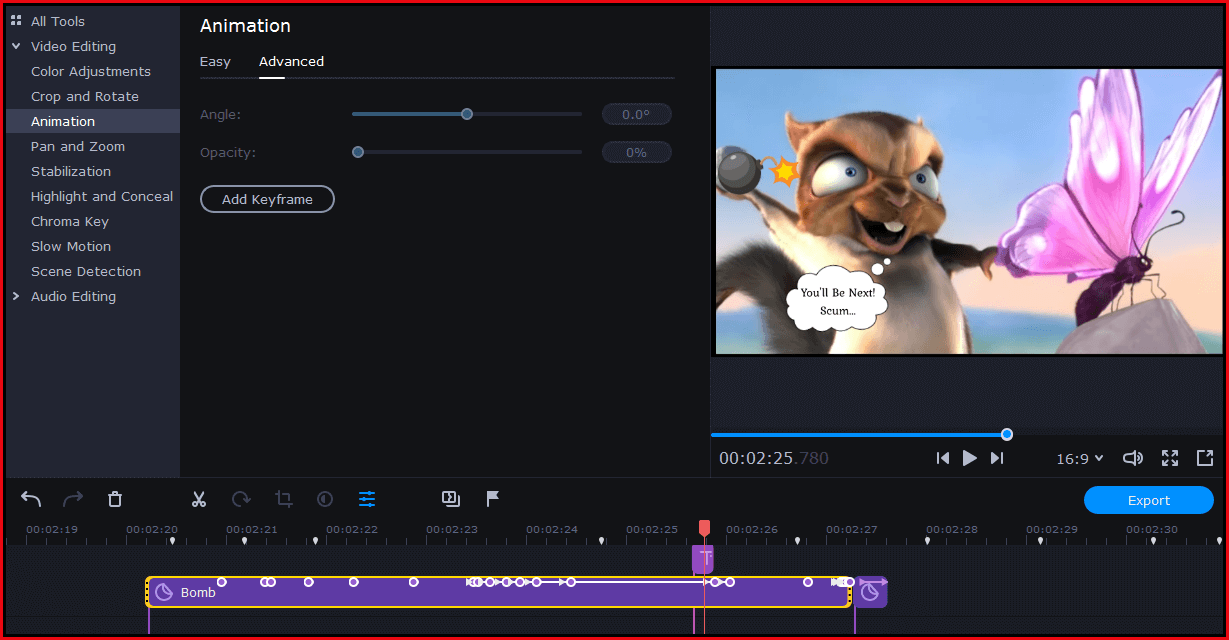
The UI indicator for this is in the timeline section, where we see keyframes in round buttons. Honestly, there must have been a separate menu for these operations. Although easy, it can create confusion in users, thanks to the way it is implemented in the videos. We hope Movavi Video Editor eases it a bit.
Another thing we noticed here was that the keying became a bit difficult due to the timeline panel UI. The timeline zoom IN/OUT button was slider-based, and that created some trouble in putting the animation in the correct position. This can be rectified to use +/- signs for intricate work.

Next was Pan & Zoom, which again doesn’t need any test or explanation. Then came the Stabilization feature. Quite popular for sports videos, stabilization helps in removing the shake effect from a video.
Just pick a video in the timeline and strike the stabilize button. If you need to change more stuff, alter things with advanced settings. Based on this testing, Movavi Video Editor did a wonderful job of stabilizing a video. It did a better job than many top video editors in this part.
The Highlight & Conceal Feature helped in creating a focus/blur effect in a video. Simply select an area for highlighting, and then pick an effect from backgrounds like blur or matte.

However, you need to split a video to chain this effect since it doesn’t have a keying feature. Next comes the element of Chroma Keys.
Most people are familiar with Chroma Key effects. The green screen effect is mostly used for CGI graphics in many movies, like those Marvel and Jurassic Park movies. We can use the power of this particular effect here.
Users simply need to include a video in the overlay row of the timeline panel. Pick a green screenshot and place it in the overlay section and apply some standard settings of the green screen.
Overall, the chroma key effect worked quite amazingly. Then comes the slow-motion effect. Unlike other video editors, the slow-motion effect here doesn’t have anything significant.
It can only slow down the playback speed of the selected video frame. Once again, keying is absent.

Other than that, many video editors also include motion tracking along with slow-motion effects. All in all, it was decent for local use.
The next tool, i.e., Scene Detector, is mostly used to separate frames from a video. The idea is to set a time period for segmenting the video, which then is separated by a scene detector.
The scene detector finds the changes in the background, colors, or scenes in a video and then splits it accordingly. This is great if you have a very long movie and want to engage with multiple scenes. It can support in finding each of these scenes individually.
This concludes the video editing tools in the last section.
Audio Editing
Once again, audio enhancement or alteration is a core part of creating a good movie with significant sound effects. For that, we need to use a decent audio editor that can work with multiple editing aspects for audio in movies.
In MVP, the audio editing is on the basic level and includes an equalizer, noise removal, special effects, and beat detection. The Equalizer will add effects from audio equalizer like noise removal, high/low pitch, treble, bass levels, etc.
It has some sliders that can be changed to incorporate a desired audio output. Overall, it is mediocre. The next one is Noise Removal. Like other apps, it will remove the extra chatter/noise from the background.

No customization here too, except a slider that can change the filter quality. Then comes the Audio Effects. This section again includes preset audio themes like echo, telephone or headphone effect, robot, radio effect, etc.
Lastly, the Beat Detection will simply scan the changes in the beat for a selected audio file and put it in the form of green markers on the timeline pane.
As seen from the above four sections, audio editing is not that great in MVP. Comparatively, it needs to do much better to have a real studio-level audio editing feature. We expect that in future updates, they improve audio editing to include much rich editing features in it.
Exporting Final Projects to The Playable Sources
Whenever we compose videos in the video editor, one of the crucial needs is that it must support converting the final projects into a desired format. Most video editors support limited media files for editing, and the same goes for final conversion after editing.
To access the export feature, hit the export button on the top menu bar. From there, it shows options to publish a file, either as video, audio, or online sources like YouTube, Google Drive, or Vimeo.
The formats for exporting in the video formats are based on the device type. The export wizard can directly convert files into videos, audios, device-specific, or TV formats.
In the video formats, MP4, AVI, MKV, MPEG-2, etc. are all supported. Now, select an ideal configuration and convert the project.

The audio formats are typically MP3, WMV, AAC, etc. It supports direct conversion for devices like iPhones, Androids, Galaxy phones, Xbox, PS4, etc., and even TVs like Samsung TV, Philips, Sony, LG, Apple TV, etc.
The only thing missing here was stereoscopic 3D formats, which many modern video editors offer. Movavi Video Editor must implement it into this setup too.
It took about 12 minutes for the conversion of a 4 min video at 4k resolution and MP4 format. It was among the standard time that most video editors take for file conversion.
Overall, the export section was excellent. It can include the 3D conversion too. The final output of the video file was terrific; and so, Movavi Video Editor has done a great work here.
Conclusion
The final closing words for Movavi Video Editor are that it is one of the fastest video editors as long as you do not want extreme level of editing and customization parameters. It can work for most average users and even suitable for some high-end tasks.
But still, it lacks some of the critical aspects of editing, like in-depth effect editing, precise keying, proper audio editing features, and so. The pricing seems ok for the current features, but it can still be improved. The UI of Movavi Video Editor is one of the easiest in most video editors. The preset effects, stickers, animations, transitions, etc. are top-notch.
Overall, Movavi Video Editor is a perfect workaround for quick video editing, without slogging too much time on exhaustive editing.