
Pinnacle Studio Review
Pinnacle Studio is an advanced video editing software designed to elevate creative projects to cinematic...
Detailed Reviews
In this tech-driven world, we are very close to linking almost everything to computers. In such time, digital entertainment is also at a peak. Such digital entertainment comes in various forms like movies, videos, images, GIFs, audios, etc.
Among these, movies and videos are now staple food for many people, and it doesn’t matter if they are tech-savvy or not. In these movies and videos, we see many special effects, high quality and stunning graphics.
Many of these effects are done manually using sophisticated software. Well, what are these tools? How can I use them to add effects, and make my videos thrilling?
To answer this, we’d say they’re called Video Editing Software. Known in the market for a long time, these tools are capable of adding stupendous effects, stunning objects, etc. The demand for them is at peak nowadays since their accessibility has increased.
The changing factor is that they can completely overhaul a video from trash to a superb level. For that reason alone, we advise readers to try such video editors.
Pretty sure you’ve come to read the review of one such top product! Well, let’s go then.
Pros
- One of the aces when it comes to customized video editing features.
- Tons of feature for media inclusion like local folders, camera import, camera and screen recorder, etc. We can even create stop motion animations directly here.
- The templates in the editor are quite ok. It can though benefit with more unique preset templates.
- The title and subtitle editor are up to the mark.
- Export options are very in-depth.
Cons
- Quite pricy for ordinary folks.
- There were frequent crashes, and the preview was slow
- The UI is basic yet detailed. This may pose learning issues for novice users.
- The motion tracker and split-screen functions are average at best.
Introduction and Initial Walkthrough
Among many of these video editors, we proceed with one of the top class video editor named Pinnacle Studio. It was stared as a separate division by Avid Inc. in 2005, which continued to release these versions till Pinnacle Studio 15.
Later in 2012, Corel acquired consumer products of Avid Inc., after which they released Pinnacle Studio 16. There were some minor changes performed in the final setup, but most of the UI was similar to previous versions.
Pinnacle Studio is among very few video editors who also extend their support on other OS like iOS, apart from Windows. The current version of Pinnacle Studio is a highly evolved one.
It is one of the most sophisticated video editors in the current market. From plain video editing to photography effects, it can do some serious editing tasks like time-lapse, motion tracking, 3D videos, advanced color gradings, masking, chroma key effect, etc.
Since it is already acquired by Corel, there isn’t much to compete between Corel VideoStudio and Pinnacle Studio. Both of them have similar setup and installation process.
The initial impression of Pinnacle Studio may seem a bit average. The UI is not that flashy, and by default, a sample project is already loaded the first time you start the product.
You can view this sample product and see various effects added to the video. You can learn a few things from this sample itself. For more details, it is better to learn from scratch.
The entire UI is very identical to VideoStudio. Now, we can’t be sure who copied whom, but if you use either of the product, the other becomes a cakewalk.
Being Corel’s editor, it comprises of three primary workspaces. Before these workspaces, you can see the Home Tab. Here, you can view the remaining time period of trial or subscription.
Yes, you’ve heard it right! Pinnacle Studio too, gives a month of cost-free trial subscription of their video editor. Unlike its sister product, they have created a separate trial version with some restrictions on it.

The bad part was that the trial page isn’t offered directly. Users need to search through various pages or use the direct link from search results. This has to be redacted by Pinnacle Sys. New users may not even find the route to the trial setup, and they might lose one customer, thanks to this confusing test product URL.
Regardless, the trial version of Pinnacle Studio offers all the core functions of the video editor with some restrictions overhead. The setup installation was smooth.
Once it is installed, add the registration info and your 30-day trial is now active. Now, back to the UI. The workspace areas are Import, Edit, and Export.
At this point, we are nodding our heads! This is because almost everything will look the same as others. All these workspaces do the same work as in sister products.
The import tab helps to bring all the media files into the editor library, edit tab has all the crucial editing tools, and an export tab is for final publishing of the edited video.
The best part is that Pinnacle Sys has given a very exhaustive tutorial guide and videos on their site. Using them, it won’t be much trouble learning the software.
Let’s ride through these workspaces and review the video editor. Since Pinnacle Studio is amongst top editors, we won’t shy from being too critical of it.
Importing Media files for making Video Editing Projects
One of the parts where to begin the video editing is to create a proper workspace, consisting of the materials or say media files that are needed for editing the videos.
This setup involves doing multiple preparatory steps like importing media files from the capturing devices, or the local hard drive. So, what are the sources we can import the project media from?
The main methods for this procedure are via DVD/Blu-ray, my computer, scanning assets, stop motion, and snapshots. Each one of them has a unique interface.

In the Blu-ray/DVD mode, we can insert those disks into the device and then directly copy media files from them. This feature isn’t given in the trial edition, though.
After that, we can try the location file explorer. In this mode, we can guide the software to the location where we have saved the media files in the local system.
After that, it will auto-scan that folder, and then you can import them. You can even delete the original files after the import and ignore the duplicate ones.
Similar to this is the asset scanner tool. The assets here as per Pinnacle Studio are all the supported media files like images, videos, etc. It will also auto-detect stereoscopic 3D content and import it with this scan.
It can also import the data from analog sources like TV, and other devices like DV, HDV cameras, etc. The interesting part after this scan is the Stop Motion importing.
Stop Motion Capture
We have seen the stop motion feature in top editors too. In Pinnacle Studio, users can create a beautiful stop motion video, and then edit it accordingly.
For that, users need to have a DSLR camera first. Once the camera shows up in the device list, use the settings button to optimize the camera capture criteria as per need.
Stop motions are mostly used for frame by frame videos or say animation videos. We can create simple clay animations with this feature and make our own animated movie.
For that, use the button Capture Frame after you’ve set up the object. Move the object as required. Now, we can even use the grid feature to guide the animation movements.

This is done by use of either a dotted line, full-screen grids, or concentric circles. For any motion, input the time frame duration in seconds, which is the time an animation/movement must be completed.
The dots on these grids are divided as per this time duration. The lowest time duration being 0.3 seconds and highest at 10 seconds. Overall, this setup is again the same as in other popular editors.
But compared to other products, it does stand out with this feature. You can even import files into this section. As you are done adjusting these frames, directly import them to the editor window.
It was an exhilarating experience using these features of stop motion. It performs on par with the best video editors.
The last button here was the Snapshot tab. As we said earlier, this section manages the click by clock recordings. The snapshot feature too, needs a proper camera set up for it to work smoothly.
Concluding to the import section, we’d say that Pinnacle Studio hasn’t disappointed us, even a bit. The functions are more than detailed enough for any user. Similarly, 360-degree editing is also amazing.

Some import features, especially the ones that need camera setup, may need some professional settings to get good results. But with time, you can learn it.
Now that we have imported the relevant media files into the Pinnacle Studio setup, we can move on to test the video editor. All the files imported here can be directly sent to the editor interface.
So, without much fooling around, let us shift the gears to the main editing.
Accessing the Video Editor Interface in Pinnacle Studio
Heading to the core editor, one thing is pretty sure; we need to gauge this section from the perspective of both mid-level and advanced users.
This is because novice users will learn eventually with practice, and we need a setup neither too clustered nor too dull and devoid of complex features.
As you go to the setup of the video editor, you can notice that it is split into multiple workspaces. Each zone has its own functions. Mainly, the UI has three key zones.
As usual, there is a media manager, preview window, and timeline pane. It is pretty standard in almost every other video converter. From the media manager, we are able to access the files from the imported folder and even open a file directly from other sources.
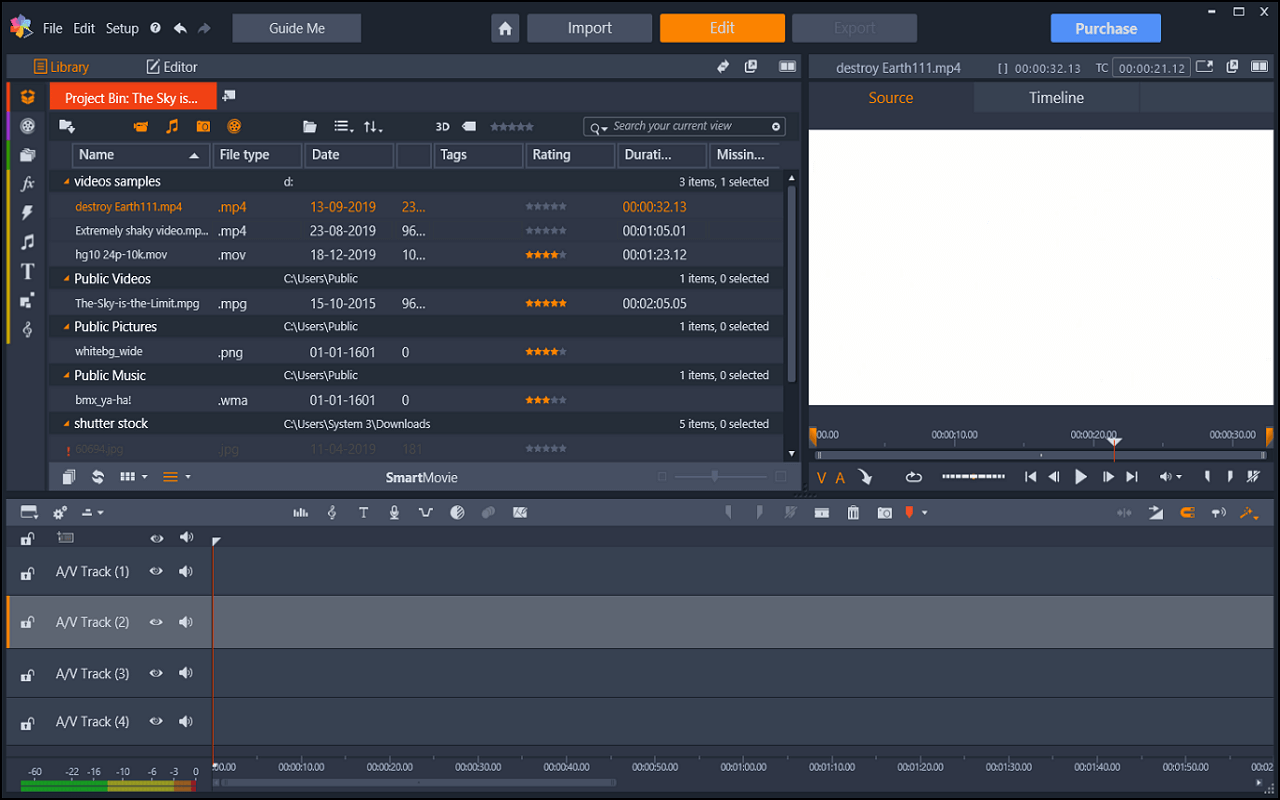
The quick import feature allows the users to add files to the current system directly. The public libraries are shown here. With the new tab button over the top, which can open multiple workspaces into the media manager itself.
This allows us to quickly switch to several different folders quickly. Interestingly, we can even hide a particular file type here like hide photos, videos, etc. It works as a filter button.
We can do other file system operations for finding 3D media, tagged media files, and Camera specific imports too. All in all, this media manager is perfect for bulk editing. There won’t be any need for always opening and closing a media file for editing multiple videos combined.
Next comes the Preview Panel. Without this, no video converter is moving ahead. Whatever changes we make into the timeline section can be previewed here.
The preview pane has two sections to look for. One is the source preview, and the other is a timeline preview. As you have guessed, the source preview has the original copy of the imported video, whereas the timeline preview is to see live changes made in the video.
When you click on any supported media asset, you can play the video in the source preview pane. The media player has universal play buttons.

Specifically, there is a button assigned for the creation of video markers. These markers are used to aid the users in clipping the video, trimming the extra video sections, etc.
There is also a round slider button to reverse or rewind the video. Honestly, Pinnacle Studio has done a great job with this overarching setup.
Lastly, we have the Timeline Panel. This is the final workspace in Pinnacle Studio’s editing interface. In this section, users can see the row-system for adding different media files.
In each row, we can add different assets like overlay videos, images, sound-tracks, etc. With each section, one can add multiple files into these rows. After that, all a user can do is arrange them as per the video timings.
The timeline too has some tools for editing, which will be assessed on. To zoom in and out of the timeline helps to do more precise work here.
There is also a navigation menu on the which offers all the core functions needed for video editing. These are crop, color corrections, subtitles, time remapping, etc.
This ends the rough exploration of video editor. For complex functions, we will head on to the next zone.
Media Management using the Navigation bar on Top
Unlike the import feature, Pinnacle Studio has also given a separate media management tool in the navigation bar. In the navigation bar, three main tabs deal with the media files.
These are the project bin, project manager, and collections tab. To be honest, these three can be combined into one space itself.
The project bin is like a real-life bin, not the dustbin, though. Just like we create separate folders in our PC for various types of files, the project bin is also used to store different media for several projects.

The Projects tab listed out every project made by the users until now. Pick the new button from here to start a new project. The 3rd one is the Collection tab.
Unlike media managers, the collection isn’t used to pick only media files. It is mainly used to create space where we can store our own edited work, templates, effects, etc.
As observed from the above three examples, we can say that there wasn’t much need for really separating them so much. They can simply put a single save zone and add these sections as filters.
It can put some confusion among many users with so many storage spaces. It is overwhelming to be honest. Only two sections, ones for imported media, and others for created projects, effects, etc. must be used.
Nonetheless, let us steep towards the leading video editing effects.
Exploring the Video Editing Effects
As pointed before, the video editing effects can be accessed on the top menu. From here, be attentive to capture every type of effect that can be added into a video.
The effects section comprises several sections, each one having a distinct category of effect type. A few familiar names for these effects are 360 view, color filters, stereoscopic 3D, etc.
We can explore all of them quite easily. There is a favorites section too here to bookmark an effect. Starting with the top one, there is a tab called New Effects.

It had basically canvas effects like cartoon, paint job, pencil sketch, etc. To add any of these effects, just drag and drop them into the timeline pane over the targeted video.
Each of these can be edited based on some preset values. Let us see how. Since we picked the option detail enhance from above, we got the options where we can sharpen the edges, borders, and change the colors accordingly.
The interface for effect editor has a save button specifically for this. Any changes made by you can be saved here. After this, we can also see a window on the top that again contains the list of other effects.
What we really liked about this setup was that it was very much optimized. Only in a few instances lag was produced. Also, the effect editor has all the effect lists, making it easier to alter any of them from a single interface.

Even while exploring the effect preview, things were smooth. We can add markers in several locations to track the effects added in those positions.
Users can apply these effects more efficiently with the help of markers. There is one more interesting thing to be noted here. In any effect, the order of effect is fixed in many video editors.
In the case of Pinnacle Studio, you can change the order of these successions in any effect. This gives Pinnacle Studio an edge over other editors. This is truly a high level of video personalization we are witnessing.
Lastly, if we evaluate them with other products, we can clearly see the difference in individual editing options.

Pinnacle Studio aces when it comes to smoothness and applicability, plus the personalization is also high. But when it comes to preset templates, CyberLink PowerDirector leaves them behind, due to the template store.
Pinnacle could really benefit more from such custom templates. Overall, you will surely find the effects section amusing.
Transitions Effects for Smoothly Switching from one Frame to another
When we add multiple videos or photos in a video, abrupt switching has an adverse effect on the video. To improve this, switching from one medium to another, we can use the transition effect in Pinnacle Studio.
We are pretty confident that many of you use might have used transitions effect in-office presentations. Similar to that, we can use transitions in here.
Typical transition affects many are familiar with like fade in/out, roll, bounce, etc. are very common and are even offered by Pinnacle Studio.
Pinnacle Studio offers a vast variety of these transitions, and it is very easier to navigate through them. Pick a transition and simply drag it between the media files.
After this, we can use the preview window to see if the switching is smooth or not. If not satisfied, pick another one. There isn’t too much stuff to be edited in the transition menu.

Users can only manage the type of transition, its speed, and its duration. The only advanced transition option given is the Morph transition, which is used to give a metamorphosis effect.
Think of it as a superimposing effect. To do so, search morph transition in the transition bar. Pick the layout, and it will ask you to input two videos to morph.
The interface has three preview fields, two for source videos, and one for the final preview. In the morph transition edit menu, we need to fix the part we want to superimpose.
There are many pointers given in to adjust the area for metamorphosis. Decide this area in both videos. Look in the preview window now. The video will jump to another video, slowing fading in the selected region.
There are many unique transition themes given by them here. There are some stupendous studio-level transition effects too. With these effects, one can create a flawless streak of multiple videos.

Now, when it comes to transition customization, once you head to the transition edit menu, your head will explode. Most probably, Pinnacle Studio is the only one to give such an immense level of personalized transition editing.
It might not be for the newbies, but for advanced users, it is a boon. We thoroughly enjoyed this detailed editing. From our experience, once you are familiar with the terms in the editor, you can create a much better transition effect than any presentation creator tool.
Overall, the transition section is very in-depth and also with friendly UI. Like its sister product, Pinnacle Studio’s transition effect feature is more advanced.
Adding Music and other Sound FX
One of the crucial parts to make a fully optimized video is using the best sound effects. Without good audio and sound FX, the video can become quite dull. Without screams and crackling doors, who would feel frightened in a horror movie?
There are two sections in the navigation bar to adjust the sound or audio related activities. The first one is Sound FX, and the second one is the Sound Stage.
Both are used to tweak the audio settings of the video to make it a complete multimedia package. The Sound FX is used to add simple audio effects into the video or image slides.

There are many unique sound FX given by Pinnacle Studio. These range into multiple categories as in sounds of animals, bells, cartoons, humans, and many other typical objects.
These are short sounds, and so if you need to add a much bigger version, you will have to either extract these audio or stretch it. Or else, you can manually download relevant audio from the internet and then add it to the project.
Once you double click any of the sound FX here, it will redirect to the sound mixer page. In this section, this audio can be optimized in much more detail.
Various optimization items into this section are equalized, adjustments, compressor/expander, de-esser, and noise reduction. As seen from this list, almost all audio manipulation tools are included in it. This again proves how deep featured setup Pinnacle Studio provides.
Exploring them will teach you many new terminologies which can be helpful for future references. Form here, we can manually give many types of sound FX without any issues.
But, be careful while adjusting audio parameters from here. Do not apply too many things in a large amount. The audio preview can be shifted from line waveform to bar graphs too.

Currently, there was no direct provision to save this edited file. For that, Pinnacle Studio must work properly. To add this edited audio., simply drag it from the preview pane to the timeline’s audio track row.
The next part for more audio related tweaking is the SoundStage. As it projects sound stage is utilized for longer sounds, especially relevant for classy videos.
The procedure to add and even to edit them is similar to above. There are more variety of songs given in each category, which can be accessed by double-clicking the audio there.
For quick modification of audio element, switch to edit more from the top media manager panel. In this editor, one can access channel mixer, corrections, effects, and time remapping features.
Channel mixer is a familiar tool for many readers here. It can convert or mix the audio as per several audio channels like 2.0, 5.0, etc., and change the play order too. Next, the correction settings are already discussed above.

The effects section has some of the preset effects to be added into these preset audio. From here, one can save the final edited audio for future use.
Audio Time Remapping is utilized for adjusting the playback speed for various audio files. Anchors are given to change the sound speed accordingly. One can do time remapping on either one part of the audio or the entire audio.
So finally, we conclude audio addition and editing features in Pinnacle Studio. It became pretty evident here that they have paid close attention to this section, allowing users to create a perfect audio track for their videos.
Using Title Text and Subtitle-Editor
Seeing texts like kaboom, chomp, poof, etc. in comics, the reading becomes very interesting. Similarly, we can add such catchy titles into a video and make it more thrilling.
Generally speaking, title texts are used for a variety of video purposes like wedding, receptions, convergence invitations, business presentations, and many such fields.
Even in movies, we see the use of such titles to introduce the movie name or anything in its playtime. To add such text into our videos, let us use Pinnacle Studio.
The title editor can be accessed by clicking the T icon in the navigation bar. In the title editor panel, we can see several areas to optimize the added texts.
The first part is picking a title text to add. For that, we need to pick a theme. There are three preset templates given for the titles, i.e., Favorites, standards, and unique themes.
For that, right, a selected title text theme and go to the title editor. In the title editor panel, we can review many useful items for managing the title text and its other attributes.

The text editor has all the basic things to be considered for a standard text editor. In this section, we can see the text field, text formatting options like bold, italics, font type/size, etc.
There are more advanced settings like text animations, look settings, background color, and then stereoscopic effect too. All in all, it is through as well as quite easy to engage with such a text editor.
In the top section, there are many antique text animation effects to pick from. The stock of font type, its customization is what makes this a perfect title editor.
We can add as many as title into the page. All you need to do is specify the timeframe first using markers. Texts can be added as simple as double-clicking on this area.
Going back to the main editor, simply drag & drop this new title from the New Titles menu. From here, the new effect is applied automatically.
Now that you are done with titles, we can move to check the subtitle feature. Like in its counterpart products, Pinnacle Studio’s title editor is exhaustive.
Now, when it comes to adding subtitles, we are profoundly disappointed. It doesn’t offer any dedicated subtitle editor, while its equivalent has a very extensive subtitle editor with very in-depth features.
Pinnacle Studio must take note of this and add such a subtitle editor on hand. Currently, we can only add subtitles using the title editor, and we have to reposition the text and other stuff manually.
Overall, except for the subtitle part, the text editor was indeed up to the mark in Pinnacle Studio. We really hope they work on and add an in-depth subtitle editor quickly.
Montage and Split-Screen Templates
One of the most common themes or templates used in many modern photography videos is the montage and split-screen editor. Both of them are very much popular in movie making.
Let us check them out. The montage editor is accessible from the navigation bar. Here, you can view many templates and pick any theme that suits your needs.

We can individually edit these templates with the montage editor. These animated montages can be added either at the start or end of the video. We can add them anywhere in the video too, but generally, it is used in the endpoints.
We picked an ending template, added it to the timeline, and then moved to the editor window. Remember that every montage has different settings to tweak from. You can adjust the only text in some montage, whereas more things like animation, transitions, etc. can be personalized in others.
Overall, these parameters are offered in most video editors with montage features. So, nothing new by Pinnacle Studio here. Just drag and drop media items from the library into the numbered section. Add the required texts and voila, your montage is done.
In the same section, we can access a split-screen editor too. As the name implies, split-screen editors are utilized to add multiple videos, images, etc. into a single frame.
The split-screen editor allows the users to edit even the prefixed templates in the editor. There are various shapes given by Pinnacle Studio to add different cut angles for the split-screen.
There is one troublesome thing, though. The thing is that items inside these split sections are fixed once you add them. They cannot be adjusted to put a desired frame into the view zone.

This can create issues with various shapes, and now you have to adjust shapes according to the videos and not vice versa. This needs to be adjusted by Pinnacle Studio soon. It is a significant drawback in our view.
Nonetheless, if you cannot adjust with the manual split-screen frames, you can pick the regular ones with a squared template instead.
Overall, the montage creator was average at best. There was nothing too overwhelming to be found in it, however. Regardless, Pinnacle Studio has made it worthy enough to be part of the top 5 video montage creators.
Exporting Final Projects into completed Movies
Since we have gone through all significant tools of Pinnacle Studio, we can safely move to the final export feature. The export feature is crucial since it will formulate the final video, render it, and convert it into the desired format.
Without a proper conversion, there is no point in putting high quality and unique video editing effects. The final workspace in the Pinnacle interface is the Export tab.
It won’t be visible unless you save the current project. Moving to the export workspace, they have created a sleek and workable UI, along with crucial publishing parameters.
The preview window is on the top right. On the top left, we can see the options to pick a format and other settings for final publishing.

Pinnacle Studio allows us to pick from either a format, device, extension, or web-based publishing method. There are adjusting parameters in it accordingly, like MPEG-2, AVI, AVC, MOV, etc.
The device support had conventional devices like iPhones, Sony PlayStation devices, Xbox, etc. There is about 15 standard extension supported along with image sequence and audio output too.
You can even export the final video directly in online video format for YouTube, Vimeo, Box, etc. Overall, the export types were satisfactory.
However, we failed to see the option to publish or convert the project into a 3D video. Comparatively, top video editors provide the 3D conversion. Even lower-end video editors have incorporated it.
Hopefully, we get more comprehensive exporting options in later versions. Now, we end a comprehensive review of Pinnacle Studio. There are individual editing options like color grading, mask creation, disk menu creator, etc. too, which offer a broader scope to this video editor.
Conclusion
Moving towards the final piece of our Lego, we can confidently say that Pinnacle Studio deserves a place in the top 5 video editors. Not only is its UI optimized for carefree editing, but it also offers a significant scope for in-depth features.
There were only one or two areas where we were disappointed, but other than that, it was quite joyful to perform video editing with Pinnacle Studio.
We have regularly compared it to other top video editors and made sure to review it thoroughly. Based on the pricing and the support options too, they have done a marvelous job.
It doesn’t matter if you are a newbie or professional in the field of video editing, Pinnacle Studio can satisfy all your video editing needs.