Corel Video Studio Review
Corel Video Studio is a cost-effective, feature-rich video editing program. It is easy to use...
Detailed Reviews
Isn’t it amazing to see those videography and studio-level effects in your videos? Well, it is! In this era, multimedia is life, and any form of media, be it images, videos, games, etc. are needed for survival too. After all, we aren’t living in caves, are we?
The internet is flooded with by plethora of videos, edited and non-edited combined. There is hardly anyone on the internet who hasn’t uploaded a video online. The best part is that with the ease of editing videos, every crook in the corner can become a professional video editor.
To improve your videos, or to make them stupendous, we need the help of video editing tools called Video Editors.
These video editors incorporate every sophisticated feature, changing a dull and boring video into a thrilling experience. It all depends on the effects and type of work you do on each frame.
You just landed on the right place to get an assessment about one such video editor.
Pros
- The video editor is not only extensive but also simpler to use.
- The features for on-camera video editing are excellent. It even supports stop motion animation.
- This video editor has decent editing features for the templates used.
- The timeline panel supports complex video editing tools. It even supports motion tracking, 3D conversion, CC addition,
- The final rendering is very thorough. It supports most top file formats and 3D conversion
- Being a product of Corel, their customer support options are
Cons
- The UI only has dark skin, which looks dull and creates confusion while editing. They must include at least 4 skins in light and dark modes.
- Sometimes, there is a minute lag in the preview window when using special effects. The instance is random but worth noting.
- The templates are very inadequate. They need to increase their stashes and have an online template store for downloading user-generated effects.
- Limited support for keying in video editing effects.
Introduction
VideoStudio Ultimate, a comprehensive video editing product by Corel, peaks among the video editors. Launched in 2006 as Ulead VideoStudio 10+, this product had shaken the market just like Corel’s graphic software Corel Draw.
Being an advanced editor in those times, VideoStudio already had the edge over others. With time, they incorporated much more sophisticated functions and improvised the UI to have an efficient user experience.
In 2011, it included support for 3D videos, time-lapse photos, and stop-motion animations too. Later in 2013, it came up with a 4k UHD conversion tool.
And now, with Corel VideoStudio Ultimate 2019, it is among top 3 video editing products in the market alongside Adobe Premiere and Pinnacle Studio Ultimate.
From a trainee-level video editing to high-performance studio editing, we can carry out complicated video editing with dynamic split-screen, video stabilization, mask creator, motion paths, stop motion animation, chroma key, and many more.
It is pointless to list everything here. The best way is to explore each feature as we go deeper into the software interface.
Surveying the Interface and Preliminary Walkthrough
To test the product, we need the product in our hands first. Like most other video editors, VideoStudio comes in a standalone setup. This setup will download and install the necessary files.
However, what about the licensing then? Well, before you jump the wall and purchase it, it is natural to give it a try first. For that, VideoStudio comes with a cost-free and a sufficient 30-day trial license.
The trial license has only few restrictions but offers almost every feature of the video editor for free. There is a simple registration before the product installation.
Once installed, the video editor redirects to the prime dashboard. This panel is sleek and has selections like templates, user guides, etc. The license info is also shown in the same window.

VideoStudio is divided into three primary workspaces viz., Capture, Edit, and Share. It isn’t much of a task to figure out what these three tabs are for.
The Capture Tab is used for audio and video capture and also supports DV quick scan. We will elaborate on it later on.
Similarly, the Edit Workspace is equipped with classic video editing functions. The editor has both slide view as well as a timeline view to edit videos.
Just as you share videos with your friends, the Shared Workspace allows us to share or distribute the videos across various platforms like YouTube, Vimeo, DVD, 3D devices, and even on optical disk drives.
On the top menu bar, we can utilize some more tools and set up preferences for our editing. Of all, we found VideoStudio to have the most straightforward interface so far. It is far less crowded, and features are distinguishable too.
Record Live Screen and Camera Controls in VideoStudio
This is the first workspace in the VideoStudio interface. Capture, as its term implies, is employed to record videos from various sources and can be directly added to the current project for video editing.
So, what kind of sources are supported for capturing videos? Well, not much complex but popular ones like DV Tapes, Camcorders, and screen recorders.
The camcorders support varied formats like DVD videos, AVCHD, DSLR, DVB-T source, and so on. For screen recording, use the multi-cam scanner.
This capture also aids in recording digital/analog TV. The source button in the capture menu allows picking one of these sources. Keep in mind that you have to mention the source type like NTSC for USA/Canada, PAL, SECAM, etc.
In this interface, there isn’t much to play with when it comes to editing videos. For that, we need to go to the next workspace. The Capture Workspace is unique in VideoStudio Ultimate.
In the recorder videos, VideoStudio automatically identifies the locations where a capturing was split and then assigns it separately in the timeline. This is a useful feature and saves manual splitting and scanning of recorded videos.

Personally speaking, we enjoyed the feature to capture live TV footage. Just select the TV Tuner in the capture mode, pick the antenna or cable option, and then input the channel number.
This will capture the input channel. Make sure not to use it for piracy purposes. Regardless, this proves that an entire section is dedicated in Corel VideoStudio for direct capture and editing of videos.
This avoids trouble, and we can do some minute editing hands-on while recording. The only issue in our case was that the screen recording wasn’t as smooth as expected. In 4 GB RAM, it lagged a lot and hanged the entire screen making the recording futile.
Web-Cam recording was excellent too. But it lagged a bit casually. As of now, the Capture Workspace performs satisfactorily.
Now, there is one last thing left here. As mentioned, Stop Motion is an exclusive feature of CyberLink VideoStudio.
Assessment of Stop Motion Video Feature
Basically, stop motion videos are used to give an animation effect to captured videos. This feature uses multiple frames, settings, and other tweaks to generate a sequential image or say animation effect.
Let’s take an example by making a hello animation from a rag doll. To do that, you have to pick her hand from the lower body towards the head in a wavy fashion. How to do so?
Well, it is quite simple. Open the Stop Motion tool from the capture tab. In this panel, input the camera which you are using to record the video. Use the DSLR settings to modify any camera effects.

Once done, it is now time to start capturing the frames for the video. As per our example, we need to capture the motion of a hand. For that, capture the hand in a normal position, i.e., below waist.
After that, move the hand step by step to the top and capture each motion’s frame. Does it seem pretty tough? Well, it isn’t. If you are confused about how many frames to capture, use the grid option.
Let us say the hand motion is to be done in half a second. For that, you have to input 0.5 seconds in the Time Field. After that, pick the line option in the grid menu.
Select the video endpoints. It will divide the line into segments as per a set time interval. Now simply vary the hand motion across these segments and voila! You just created a waving animation of your rag doll.
There is also an auto-capture button, which works like a timer feature in cameras. Input the time interval before each capture and quickly change the posture of an object. You can remove any frames in which your hands or any body parts are captured.

Once done, the project is saved automatically and is readily presented in the edit interface.
With this, the features in Capture Workspace are concluded here. So far, it worked spotlessly. The screen recorder gave us some trouble, but other ones nailed it. The stop motion tool is exceptional.
However, most features here are standard in top products like Pinnacle Studio, Adobe Premiere, and so on. Lower end products do not support such advanced tweaks with capture function. This indeed reveals that Corel’s VideoStudio is among the best products.
Put on your Seat Belts! Time to hit the main road, i.e., Video Editor
So far, many of you might have waited so long for this feature to pop on. Even we were waiting to explore it.
The chief video editor is accessed in the middle tab, i.e., Edit Workspace. Switching to it reveals the entire setup of the video editor. The extensive UI itself means its business.
The workspace is split into multiple zones, as seen in other video editors. The top left has a preview pane. It has all the features of average media players like pause, play, seek, etc.

The top right covers a media manager. From here, we can browse local locations in the computer and add desired media files for editing.
Besides this media manager on the left, we see various editing functions like preset templates, transitions, visuals effects, text effects, filters, etc.
Below both of these zones is the main timeline pane. It can also be switched to a storyboard view. The timeline view contains many functions as in sound mixer, mask creator, title editor, motion tracker, etc.
We will inspect these functions in their relevant segments. From the looks of it, novice users won’t find much hassle using any feature in it.
Whether they can work with these features or not, it’s a different story. Now, let us understand these sections and their functions.
Media Player and Media Manager
The media player is on the top left corner of this interface. To make some minor changes to a video, pick a video from the library and add it to the timeline.
The media player has essential functions like play/pause, forward, volume, and so. The only editing possible here is video trimming. As complicated, it may sound, trimming videos here is simple.
There are two markers given on the player. One is a Scrubber, and the other is the Trim Marker. The scrubber can be used to add mark-in/out, whereas the trim marker is used to trim the video.
Basically, move these trim markers to the portion you want to cut. Use the scissor icon in the media menu and cut the video. Quite simple!

There is an aspect ratio button too, which can help to alter the resolution. Similarly, there is a scale model and crop mode too. The HD mode manages preview quality.
This was all you can see in the main video player settings. As seen here, minor adjustments to a video can be fashioned here.
In any case, there is one thing we noticed here. The system repeatedly lagged whenever we used the scrubber tool. Contrarily, there was no lag when we directly used the chapter and cue markers from the timeline.
It has to be adjusted by Corel VideoStudio. We didn’t experience much lag in other top products. For pro-users, they have given a manual time input field to seek at the exact timestamp.
Onto the media manager, it is used to locating the media files and import them into the system. You can use the import button here and navigate the files.
We can even add multiple folders to the media manager and add media files into them accordingly. There is a file manager in the video editor setup itself. Users can sort the files in formats like videos, images, and music.
Overall, both these section are necessities. They offer a wide range of functionalities directly.
The best part is that VideoStudio will show a small help text pop-up whenever you hover across any function. This makes sure users at least know the name of functions they are using and do not mess things up.
It’s now time to see individual editing features and how they affect a video and enhance it.
Using the Instant Project Tool
What can be better than using an itemized template while editing videos? Not only will it help in better editing, but it’ll also be quick. For that, go to the navigation bar beside the media manager.
From there, the first option is Instant Projects. This will open a new menu that will have an option to edit the video. There are several things we can do using these fixed templates.
The templates are plug-and-play type, and so users only need to insert their files. So, where are these preset locations?

Once you put them into the timeline panel, you can see the markers/placeholders there. For all these placeholders, there are preset effects assigned.
We can replace them with a video or photo. The music is automatically added too. With some use, you will soon realize that this is so elementary. Such a pick and place video editors are needed too.
Corel VideoStudio has made it for the novice users. These samples give us an idea of how to make a video with various effects, add music to it, learn the working of timeline pane, and so on.
These stockpile of the instant project was inadequate. There was no option to import more templates. The online store for additional templates is missing, which is a bummer.
Nonetheless, we now proceed to the subsequent video editing effects.
Adding Transition Animations
Most people reading this review are quite familiar with the transition features. A transition effect is a unique animation used between two video frames.
Unlike abrupt frame changes, we can use fancy animations. It makes your movie look much professional. It is akin to the slideshow transition effects.

Adding a transition is easy enough. Navigate to the Transition Menu. This drop-down menu lists out many transition profiles like 3D effect, clock effect, film, flashback, overlays, etc.
Pick a transition effect to add between two slides and just tow it into the transition space.
We can even customize as many transitions as necessary. Each transition type has its own personalization options. Some can have customized borders; some can have their animation interval edited.
Overall, such an in-depth transition feature is scarce. Another exciting transition feature we can see is the Morph Transition. With the morph transition, we can blend two slides, creating a metamorphosis effect.
To do that, search morph in the transition search menu. After that, you just need to pick the area between slides to add this transition.
This morphing is customizable too. Double click the morph transition from the timeline pane. After that, you can set the pointers in the transition editor. These pointers focus on the selected area while morphing.

With this, we have explored the transition feature. Time to compare some results! When it comes to the number of preset transition effects and their quality, VideoStudio is a bit average.
Given that tools like CyberLink PowerDirector have much more stock of templates along with 1000s of effects from their online store, Corel VideoStudio falls low.
But when it comes to implementation and personalization, it is much better. Even with limited transition effects, VideoStudio has managed to ramp up a vast user base with it.
Adding Titles and Subtitles to a Video
A movie with super video effects and without any title text into it will seem pretty dull. For that, we will use the title editor from VideoStudio.
Go to the sidebar in the media manager. Pick the icon with a big T on it. Now we can see the options to add text into the video.
From the drop-down menu above, you can pick from various types of text effects. There are simple text, animated text, and even 3D texts in this stock.
The first step is to pick a location where you want to add the text. To do so, use the slider in the timeline view and drag it to a desired location. After that, pick the text tab from the above menu.

Once done, select the type of text you want to add. In the drop-down menu, we can see that they offer to add text in the form of titles, subtitles, 3D titles, and custom.
To make sure we don’t place the text in a too awkward position, VideoStudio provides title safe area. You can see a yellow border in the preview window. It is expected to put the title text within this area.
Now, pick the text theme and then add your own text into it. You can further customize the text formatting. Save the project and preview it.
To save the current title theme, click the button add to favorites. Now you can use the same theme in the future too.
Now, how to add subtitles to a video? Once you have a video to add subtitles, use the Subtitle Editor from the timeline pane.
The subtitle editor has a simple UI with a preview pane, video player controls, and a text editor. Go to the location where subtitles are to be added, use the + sign in the right pane and add a subtitle marker there.

Now, add the text for the subtitle. In this method, we can manually add subtitles to an entire movie with ease. To help in this task, we can even use the voice detection feature of Corel VideoStudio.
This voice detection feature will automatically scan the entire audio in the video and put markers where the subtitles are needed. You can filter the audio further and then get better detection results. You can even edit the text formatting.
To save the trouble of adding things manually, especially if you just want to edit a preset subtitle file, import the file and then edit the font and other subtitles.
Overall, it isn’t much of trouble if you get a hand on it. Keep in mind that the voice detection will reset the entire subtitle track. Other than that, Corel VideoStudio has done a great job here.
Inserting Graphics and Objects in the Video
The graphics section can help us to add extra item into our video like clips, frames, objects, animations, etc. Most video editors are equipped with such items based on popular demand.
In Corel VideoStudio, we can add colors, objects, frames, patterns, backgrounds, and animations. Don’t get too confused by all this. This is similar to a simple photo editor.
From the Graphics menu, choose one of the items that you desire to add to the video, which can be reworked easily.
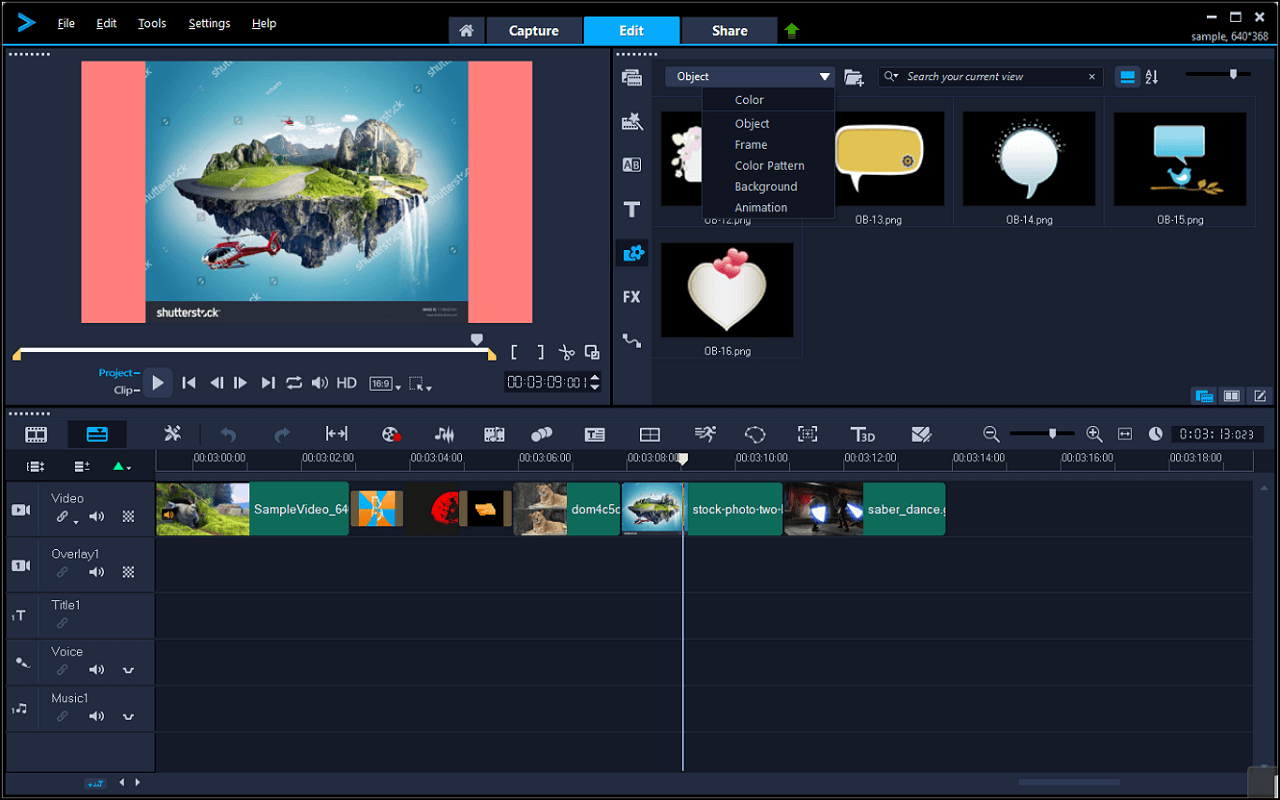
Use it to configure the elements added in the video. The entire UI here is effective, but there is only one issue we found.
Here too, the stock of preset templates is minimal. Due to this, some users may find it troublesome. Only in the paid packages, we can get more themes.
Corel VideoStudio needs inspiration from CyberLink PowerDirector and Filmora Pro. It creates an online store where free users can upload or download preset templates.
We feel that even the graphic addition is fundamental and can be learned in merely a week. Now that we are done with adding various objects in the video, how about some fancy filters!
Utilizing Video Filters to enhance our videos
Filters are used to add special effects in a media file, be it audio, video or images. These filters alter the output of the files and cover the entire video.
To use them, pick a Filter Tab in the feature menu. From the drop-down list, choose a filter type in the list like 2D, 3D, camera lens, darkroom, focus, nature, etc.
Simply drag these filters into each clip and preview it. We can apply up to 5 filters to a single clip in Corel VideoStudio. The order of the filters can be changed too.
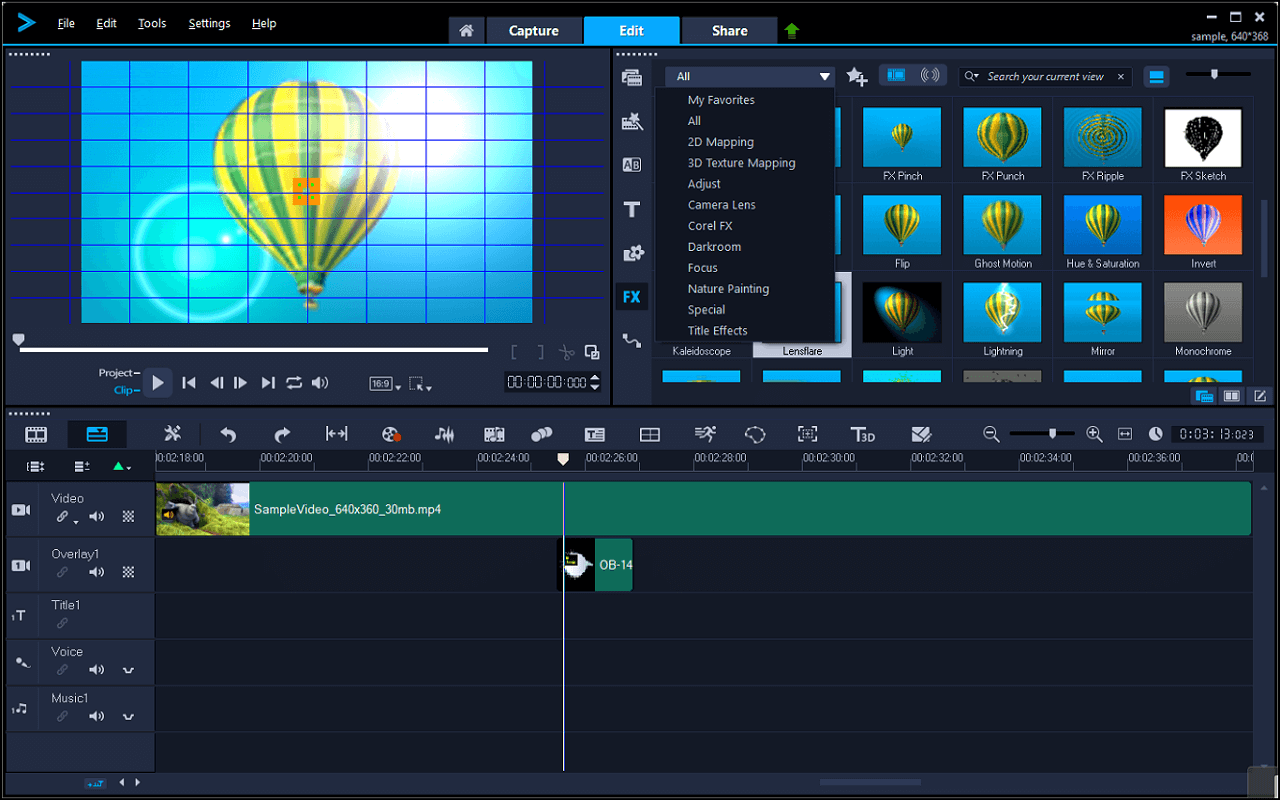
Now, for these filters, we can customize various attributes. One of them is keyframes. Adjusting these keyframes is used to manipulate the intensity and timing of these effects.
From the customize window, we can add multiple keyframes to a single video. At each key-point, it is possible to adjust the effect level, turning an impression variable.
Transitioning effects like fade in/out can be given too. Overall, this video filter customization is very comprehensive. Even a novice user will thoroughly enjoy toiling with it.
Assigning Tracking Paths in a Video
Motion Tracking also sells like a hot cake nowadays in the video editors. The motion effect of the video is done by tracking paths.
These motion trackers generate a path and make a video frame float across that path, generating a motion effect.
To do so, head to the last option in the Feature Bar. As you open it, you can view that it consists of preset motion paths. These motion paths are in various geometrical shapes like a parabola, curve, Z shape, circle, etc.
If needed, pick a path from one of these. If not, you can go to the custom section and then create your own custom tracking motion.

But first, we need to pick an Overlay Media. This is the media, be it a photo/video, is going to follow on the traced path. In the timeline section, use the overlay section. Right-click and import a required media file there.
The next step is to generate a path. In the custom path setup, you can again see the use of keyframes. These keyframes are used to assign pointers where the path is to be changed.
Now, on the preview pane, you can see the pointers as you add keyframes. From this pane, you can modify the orientation of the moving video easily.
The editing here is very responsive. The blue pointers on screen are the keyframes. Adjust them accordingly and their motion paths too. After that, you can use the pink pointers to modify the orientation.
The green pointers are used to give tilt effects to the moving video. This will give a 3D effect to it. Also, add borders and shadow to the video.

Once done with these settings, save them. VideoStudio allows us to save these custom paths with the Save To button. Save the project and run the preview once, checking the generated motion path.
Now, if we look into other products, we can clearly see that Corel VideoStudio has been quite productive. So far, this is the simplest way we add motion paths in any video editor.
One can add complexity to it without any prerequisite knowledge. This makes VideoStudio a unique gem. Users can even choose to alter color and lens correction here.
With this, VideoStudio’s motion path feature is concluded. The only thing left is to explore a few more functions in the timeline panel, and then we head to the video publishing options.
Working with Timeline Pane and its Tools
The timeline panel of video editing tools is the most critical section. Not only has it to be filled with complex functions, but it also has to user-friendly. It mustn’t be too crowded.
The Timeline Pane in Corel VideoStudio passes all the above criteria. Like any typical timeline panel of video editor, it has several rows to extend media elements like videos, images, sound, overlays, etc.

The items in any of these rows can be simply dragged and rearranged. We can switch to Storyboard Mode too. On the timeline pane, many crucial video editing features are embedded.
Some of these are motion tracker, sound mixer, camera editor, mask creator, time remapping, split screen, etc. We will quickly test them here.
The first one to check is the Motion Tracker. In the timeline menu, access this motion tracker via three bubble icons. In the motion tracker app, there are three items to monitor.
One is the pointer tracker; another is to match objects, and then lastly, pick a tracker type. For a single tracker, use this pointer and place it on an object/point to be traced.
Use the visibility button to see the path traced by the selected point. In a multi-point tracker, we can use the area tracker and multi-object tracker.

An overlay object can be added along this traced line. For example, we can put an arrow, homerun text, or clip art following an object in the video, or trace a pendulums’ swing.
Next, we check the Time Remapping tool. As it says, time remapping lets you manipulate individual frames inside a video with speed up, reverse frames, freeze frames, etc.
Pick a designated area using the scrubber and insert the above feature. To check how an effect will look, use the movie reel icon below, and preview the changes. Once done, save these adjustments.
Similarly, we can use the Mask Creator from this pane too. Like the mask creator in photo editing apps, this one too can be used to manipulate an object or entire frame. The mask creator also has an eraser button to remove certain areas from the videos.

The other effects, like record videos, split-screen, subtitles, etc. are previously discussed. Other than this, time-lapse videos can also be made using Corel VideoStudio.
With this, we finally move to see the publishing features in VideoStudio.
Publishing Final Edited Videos in Corel VideoStudio
After all this hassle, we finally have a chance to publish the video. The last workspace, i.e., Share, is used for this only. To share the videos, there are multiple options given by Corel VideoStudio.
In here, we can convert the final video in device-specific format, online video format, disc format, and 3D format. In the device-specific format, the video can be converted into a variety of formats like MP4, AVI, AVC/H.264, etc.
We can even create a video for unique devices like consoles, TVs, DV/HDV devices, etc. The online video sharing is supported on major platforms like Flickr, YouTube, and Vimeo.

Now for the disc video conversion, we can convert the video for DVD, AVCHD, Blu-ray, and SD cards. For each type, there are specific settings available.
Users can even include a customized DVD menu. The only con we saw here was a lack of proper DVD templates, and the editing window was too small.
In both these areas, CyberLink PowerDirector and Filmora surpass VideoStudio. Not only the work area for editing is relaxed, but there are tons of free DVD menu templates on their online store.
Last but not least, we can convert the videos into 3D format too. The 3D format supports customized anaglyph and side-by-side format. The file formats supported are MPEG-2, AVC/H.264, and WMV.
All in all, it took about 15 minutes to render the video in UHD quality in our below-average setup. Not a single program lagged during this process, which is truly excellent.

The conversion quality was fantastic. All changes were applied smoothly in the final video. Although the setup lagged while editing, the videos were very smooth.
Conclusion
In using Corel VideoStudio’s entire arrangement, we learned many things. The UI made it super easy to explore and experiment with stuff. The User guides and video tutorials are very thorough.
All it takes is keen observation, and you just became a good video editor. The features in each section were super detailed to include all the foremost editing parameters.
If we genuinely compare it to products like CyberLink PowerDirector, Pinnacle Studio, Adobe Premiere, etc., VideoStudio only lags with preset templates. Although these templates can be purchased, it is better to include a disparate stock in the software itself.
Rest assured, the pricing of the product is justified, given the features and trouble-free UI it presents. This, combined with a month of free trial, truly puts Corel VideoStudio amongst top 3 video editors in the market.