
Filmora Review
Filmora empowers creators with AI-driven editing tools that enhance productivity and creativity. Users can effortlessly...
Detailed Reviews
Viewing top trending videos and their amazing effects online can be quite amusing. All these videos are edited manually after they are recorded. To edit them, we need a pre/post-processing video editor.
In pre-processing, the concept of filter apps like Snapchat, Instagram, FaceApp, etc. is used. All these apps manipulate the live video with preset elements. But then, how to edit videos with post-processing?
For post-recording, we can utilize comprehensive programs known as Video Editors. These programs are mostly utilized for adding after-effects in a video. Still, many video editors also support pre-processing like stop motion, 360* view, etc.
It is now time to assess one such video editor.
Pros
- Fully customizable Each of the 6 workspaces can be rearranged and saved too.
- The UI of Filmora Pro has a lesser learning curve. It needs only a few weeks to master it.
- Filmora Pro has more than 300 quality templates, effects, transitions, etc.
- It has detailed control parameters while editing effects.
- Uses proxy workflow for faster previews. The UI is lag-free and consists of many single click editing tools.
- Comparatively cheaper and of better value than many other video editors.
Cons
- It needs some more depth to the keyframing Also, the transitions section can have more customization.
- Audio editing also needs to be enhanced. Most audio effects are average.
- It needs better stop motion, custom transitions, and morphing tools.
- The UI, although changeable, is very cluttered. No preview of selected effects, and has super dark skin, that hinders with specific editing.
- Further color gradings, text and title effects and 3D file format conversion is lacking in it.
Introduction
Filmora Pro, a video editor by Wondershare, was introduced in the year 2015. The trend for video editor was scorching in the market in those years, and Wondershare took this opportunity and made their way among the top video editors.
Similar to Filmora Pro, there is another video editor by Wondershare that can help users edit videos., but rather in a simplistic manner, simply called Filmora 9.
Unlike Filmora Pro, it doesn’t have very detailed editing and also inhibits advanced editing. In the current review, we’ll take on Filmora Pro instead, and assess it alongside other video editors.
Unlike previous products in the market, Wondershare’s Filmora Pro relies on quick editing features, which need lesser experience with video editing work.
Let us embark forward to see how expressive this video editor is.
Previewing the Functions of Filmora Pro
Filmora offers two core products, i.e., Filmora 9 and Filmora Pro.
Both these video editors can be used under a trial version. There are only a few restrictions in the demo version, and everyone can readily use most features.
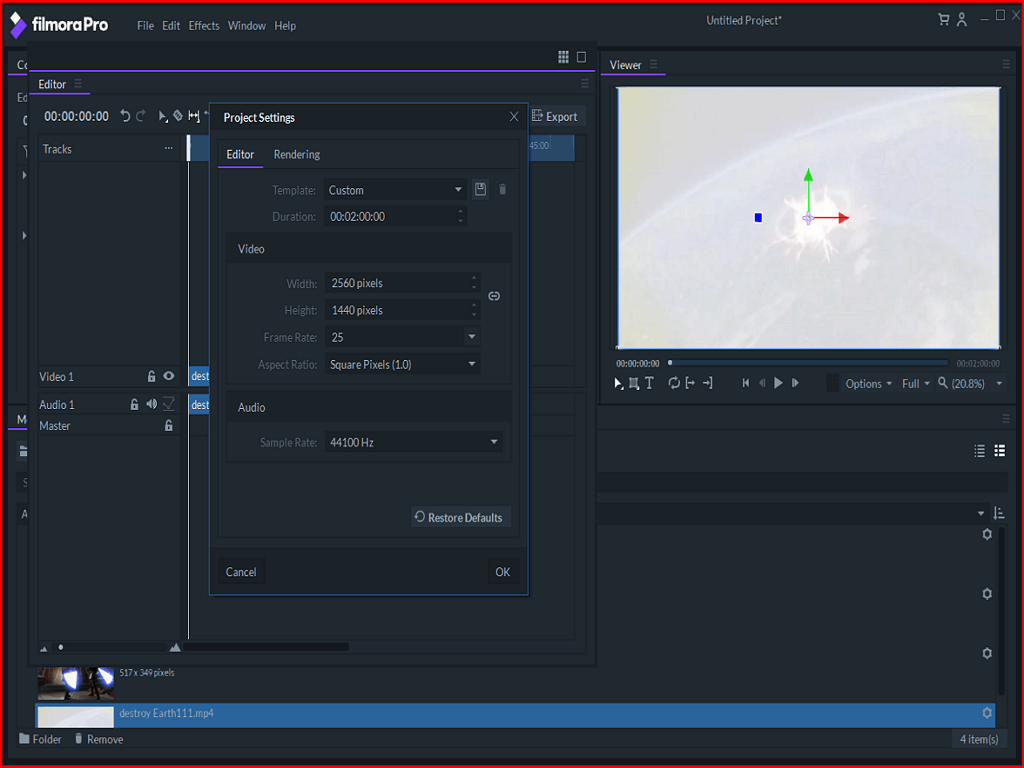
After updating to the latest version, open the Filmora Pro interface from the start menu. The recommendations of the program are quite lower, and so it won’t be an issue on low spec machines.

One of the things to consider is the formats supported by Filmora Pro for video editing. Looking from the list of formats they have given, it covers most media files.
There are fewer configurations given by Filmora Pro for video editing. But moving to the editor interface, we can see an efficient arrangement and UI setup by Wondershare.
Filmora Pro Interface
Filmora Pro is packed with mainly 5 UI spaces as an editor. Unlike other video editors, Filmora hasn’t divided the UI into separate media space, editor space, preview pane, and so.
The top three interfaces are for managing functions, preview, and original video pane. The lower two-pane consists of the media import zone and the timeline panel.
There is the only issue we feel like to be addressed here. The UI of the entire setup is too dark, which was really annoying to operate. There is no option to add a light skin for their setup as of now. We sincerely request developers to add a light color theme soon.

All the 5 workspaces mentioned above can be floated separately. Overall, it will take some time to learn the UI, which means the developers need to ease it up a little more.
Based on the positioning of these windows, users can save the workspace arrangement, which is a nice touch compared to preset UI.
Now, we need to jump into the video editing process of Filmora Pro. With going steps, we will be hard testing its many features.
Beginning with the Video Editing Process
The first step of any video editing process is to identify the primary media materials that will be needed for the process. The media manager is given for that only.
From the bottom left panel, navigate to the media manager. In this listing, you need to import files first. In the media manager, the videos are saved as direct links.
Due to this, we can create separate folders and add links to several media files. Once done, we can directly drag and drop these files into the timeline and begin the editing.
One thing to be noted here is that this media manager might need some changes in UI. Also, specific media files, i.e., like MP4 format, weren’t copied here. We collaborated with the support team and yet couldn’t import the file.
Nonetheless, the position of media manager is a bit odd, and so users can easily drag it on the top of the interface and save it there. Another distinct thing noticed by most users here will be the way many effects are accessed in Filmora Pro.
Filmora Pro hasn’t used the standard effect categorization like other video editors, and so it might be troublesome for novice users to remember the location of each effect. However, the best way is to scroll all the way through the effects tab.
To access more features, right-click the Media Manager and hit new. From here, we can even access the recording feature of Filmora Pro. We were searching for a stop motion animation creator, but it wasn’t there.

The stop motion capture feature is one of the crucial video editors’ features that many folks eye on. This is the first comparative point Filmora lacks, unlike products Corel VideoStudio, Pinnacle Studio, etc.
We hope in future updates they include it. Now, the standard recorder presents less complexity than other video converters. Regardless of this, the process is considerably smooth in Filmora Pro.
The upfront editing is different in each video editor. The most common things that are part of upfront editing are trimming, cropping, color shadings, corrections, markings, etc.
All of these are readily accessible in Filmora Pro. The first upfront editing we can access is the trim feature. Users simply need to mark the endpoints of a video and trim it.
In the Viewer Panel, there are same standard playback options like any other media player. Once the trimming is done, you can collapse that window to get a bigger preview panel.
Unlike former video editors, Filmora Pro allows a user to modify the preview quality. Users can change the preview quality for faster performance. Low-end users can really benefit from this.
All in all, things in the Filmora Pro setup are limited. As pointed out before, Wondershare has designed it for stress-free video editing, and that is what it provides.
Timeline Editing Features and Quick Video Modification Tools
Before jumping to explore dedicated video effects that alter graphics in a video, we need to explore the general items like video trimming, color balancing, overlapping, etc.
To do so, Filmora Pro has aided us with some useful tools in the timeline panel itself. For that, we begin by exploring the timeline panel itself.
Like every other video editor, the timeline in Filmora Pro is stacked at the bottom of its interface. From here, users can access the tracks and their parameters.
There are several types of tracks that are accessible in it. The common ones are video and audio track with an option for the master track too. The master track is used for audio editing.
In audio mixing, we can add multiple audios directly from the timeline panel. Just keep adding new audio tracks in the timeline panel and adjust them with the slider to manage their playtime.
The master track is used to monitor the audio finalized when mixing such tracks. In the timeline pane, audio tracks have a thin bar in between to manage the decibel level. Alter it to increase the decibel level or reduce it.
Instead of changing these levels in each audio section, you can choose to pick one for the entire audio in the video. This is how the audio editing works in the timeline panel. However, there is more you can do in it like videos, which we are going to elaborate in timeline tools
Using Timeline Tools for general Video Modifications
As we said, Filmora Pro has handed us some elementary video editing tools in the timeline panel. These tools do not add any extra graphical modification in the video.
They are merely used to manipulate video parameters like speed, time, overlay, etc. For these functions, Filmora Pro has come up with tools for video selection, slicing, slipping, rate stretch, and snapping.
The first one, Select Tool, is simply utilized for picking a video from the timeline mode. Use the control button to pick multiple video clips. Users can simply drag them to change their order, layers, and even use it to trim the video.
This is one of the easiest methods to trim a video from the endpoints. Moving to the next tool, i.e., Slice Tool, it is capable of splitting a single video into multiple parts, just like you slice a carrot into pieces. These video slices now act as independent clips.

Next is the Slip Tool. Just as you slip extra bucks under the Sheriff Counter, the slip tool works the same. It is used to alter the video’s play IN/OUT. This is indeed becoming very interesting to see quick upgrades in the video with mere mouse clicks.
The Slide Tool helps to change the video clip’s location on the timeline without altering the duration and IN/OUT points. A similar effect is provided by Ripple Tool too.
To trim two combined clips, we use the Roll Edit Tool. This tool allows us to alter the OUT point of the first clip and IN point of the second clip.
Another fascinating tool in this timeline section is the Rate Stretch Tool. Well, it stretches a video clip to make it shorter or longer, preserving all of its content.
If you shorten a video with stretch tool, the play speed will be increased accordingly, and if you lengthen it, it will be slower. This is especially useful to adjust slow-motion videos, where some moments might be too slow and others too fast.
Lastly, the Snapping Tool simply adjusts newly added clips adjacent to the previous one. Disable it if you want to drag the clips from the media panel to a specified timestamp after the previous clip.
After reviewing these tools, it is apparent that Filmora Pro is indeed among one of the best plug-n-play editors. There are some more UI perks like color labeling, clips differentiation in the timeline, play speed change, edit lock, quick export, and so.
All in all, Filmora Pro made sure that such necessary video editing steps are stress-free. There are more effects to be explored in later sections, but in our opinion, they have ranked relatively high.
Stirring The Video Editor’s Effects
The Effects Panel allows us to edit the video effects. Wondershare needs to do a better job in separating the effects in different categories instead.
In the current interface, the UI is distributed in 5 main effects section, viz., video effects, audio effects, presets, transitions, and audio transitions.
In each of these sections, we can access a variety of video effects. For this review, we will have to explore these sections one by one.
General Video Effects in Filmora Pro
When it comes to general video editing effects, you will be surprised to see a unique setup in Filmora. Under this section, we can use video editor effects like 360° view, animations, color corrections, particle style, etc.
Filmora Pro lacks effect previews, which is a negative point. Nonetheless, let us begin with the foremost Color Correction Effect.

As we know, photos will not always capture the best colors. To improve them, we use video editors to balance the colors or add different color effects to these videos.
From the list of video effects, pick the Color Correction Effect. Like most video creators, users need to pick and drag an effect into a video portion.
Instead of having a side by side preview window, Filmora Pro offers a live viewer panel. Any changes made to the video can be previewed here.
Now, any effect chosen will redirect to the Control Panel. This panel allows a user to control the intensity and other parameters of the chosen effect. In this case, we can see options like shadow balance, mid-tones, highlights, luminosity, etc. to modify the colors in the video.
In here, use a slider to alter the effects’ intensity. What if we can’t judge it correctly? Well, Filmora has given various preset modes to help with that.

Users can pick from a few templates in the drop-down list. Change these effects as per desire and then save them. It is quite a new method, indeed.
There are several breathtaking effects accessible in Filmora Pro, with top effects like cloud immersion, lightning, PiP objects, and many more. You can explore them as you like.
Now, we found it a bit disappointing to have no preview in the effects section. Users need to apply the effect directly to a video to see the effect clearly. Most video editors offer a quick preview of the selected video before applying it.
They certainly need to fulfill it. Nevertheless, when it comes to implementation, Filmora Pro has done a decent job. There is enough customization available in it, as per each type of effect.
Moving on, we have several more effect categories in the video editor, which we need to review now.
Adding Audio Effects in Filmora Pro
An excellent audio and quality sound are what is another requirement of a perfect video nowadays. To achieve it, the audio effects are crucial too. Filmora aids the users with usual audio effects as well as audio transition ones.
Use the drop-down menu from the effects menu and then pick Audio Effects. You can now view these effects. They are universal and seen across many audio mixer tools.
Some of these effects are reverse audio, balance, echo, equalizer, room effects, etc. To test them, we need to pick them and drag them in the tracks.
The audio tracks in the video can be separated easily from the timeline panel. After that, use the desired audio via import feature and replace the original ones. Still, there is no audio effect preview.

Regardless, these are simply the audio filters. There are many more things users can do in the audio mixers. For each effect here, minimal modifications are offered.
All of them offer only a change in audio gain. For further editing, you can use the timeline tools, as mentioned before. With them, we can converge, merge, overlap, fasten, or intermix audios.
Unlike many other video editors, a dedicated audio editing setup isn’t offered by Filmora Pro. We need to adjust the audio beforehand or do some sort of workaround with the ones given in the current setup.
As for the Audio Transitions, we will review them in the later sections when we check the video transition effects. Overall, the audio effects were decent at best. Filmora Pro needs to offer a much comprehensive interface for editing audio.
They lack in this area, and it needs to be patched. Detailed audio editing is also expected in a video editor. For now, you can try other audio editing tools and import the final copy in Filmora Pro to work with.
Preset Effects
In the Preset Effect section, Filmora Pro has equipped users with only two effects. These two are quite the same.
The effects, Green Screen Key and Blue Screen Key, are used to add cinematic effect into any video. From flying iron Man to a T-Rex gulping someone, these effects are achieved with the help of computer graphics and green screen effects.
Since green and blue are considered to be furthest from the human skin color spectrum, it is more comfortable to blend in extra stuff around humans, i.e., changing backgrounds.
To achieve these effects, you’ll need a recorded video on either green/blue screen, export this footage into the timeline section. After that, users merely need to add another video or graphics in the overlay below a green screen video.

Now using the green screen effects, you can replace the green screen with a Jurassic park poster and place yourself in the live movie frame.
Multiple parameters are available to be set in the green screen key. The key parameters that can be adjusted in the Green screen key in Filmora Pro are chroma UV blur, color difference, matte cleaner, and spill removal. These are all advanced effects and incorporate decent internal editing for making a perfect GS effect.
Overall, it is quite fascinating that Filmora Pro has such in-depth effects, and it is entirely leaner friendly.
Transition Effects
Sequential images can be used to create full videos by combining photos in a fast sequence and adding special effects in between each photo.
If not that, we can generate a video from photos employing transition effects. Filmora provides some of the essential transition effects too. To access the transition effects, move to the Effects Tab.
Here, there is a list of transitions you can add between the images and videos. There is also the audio transition effect for smoothening the transition between different audios.
In this menu, you can access many varieties of transition effects with ease. There is only one part of disappointment here.
The thing is that Filmora Pro has a minimal stock of transition effects in the video editor. To get more transition effects, you will need to access the online store. For free users too, more effects are accessible via online stores only.
Now, how can we edit these transitions in Filmora Pro? To be honest, the process is indeed simple. As many of us might have used MS PowerPoint, the process is somewhat similar here.

First, arrange the videos and images in order. After that, users need to pick a transition and drag it between the slides.
The position of transition can be changed to appear before, after, or along with the two slides. Instead of giving a separate pop-up to change the transition time, we can directly use the Select Tool to adjust the transition time.
With this, each transition gets its own share of dedicated parameters. Another thing we missed here was 3D Transition Effects, which many video editors provide in their interface.
Filmora Pro needs to do a bit better job in adding more such variety in the preset templates, be it for a free trial or paid versions.
Next up, we assess the audio transition effects. As we know, transitioning audio is also a crucial part of video editing. Sadly, there are only two methods of audio transitioning.
It has crossfading and simple fading only. There are no additional settings except increasing the time duration of the transition effect.
Adding Text or Titles in the Video
Adding titles, subtitles, or any text items in the video clips is a new fad. People have increased the use of simple text inputter for video clips. Filmora too has a text editor. However, there is no separate section divided for a text field.
From here, we can click the Import Title Button and see imported text in the video clip. Once you hit the import title button, simply explore tons of text titles and pick the one that suits you best.
After that, Filmora Pro allows users to change the font properties via the text panel. The text panel is equipped with basic options for formatting, like changing the font color, type, justification, outlines, alignment, etc.
Overall, it is very inclusive, and users can efficiently work over it. There is another method for adding standard text or description to the video at the desired timestamp.

To do that, use the T icon below the preview window. After that, click on an area of the screen, and now you may add text to it.
Both of these methods are ubiquitous. But wait, there is much more you can do instead of these simple text effects. We can even generate cinematic effects in these texts.
Well, select the text and switch to the control panel. In this panel, users can access multiple text effects and then use it to manipulate further parameters in it.
We can use the Transform Section to modify text positions, anchor points, opacity, etc. After that, use the Animation Tab to add cinematic style animation to the text.
Here, some widespread effects like drop-down, rollover, wavy, etc. are used. Overall, users can switch to multiple planes to add layers of effects to a video with texts.

However, there was only one thing missing from the entire setup. It was a dedicated subtitle editor. Well, as we know, subtitles, especially for the movie dialogues, are pretty crucial.
Currently, Filmora Pro only provides this by using the method above. Other top products have given a dedicated subtitle editor, where users can add text, time stamp, and alter the font properties from a single window.
The current method to add subtitles can turn out to be very lethargic for big movies. Adding these texts at each interval separately can be a nightmare.
We expect Filmora Pro to include such subtitle editor in future updates.
Concept of Keying in Filmora Pro
Keying might be a new term for many of the readers who are still learning about video editing. It is relatively common among many video creators, and so once you know the concept in one video editor, things are simple to grasp in others.
In laymen terms, keying works by removal of a specific color, graphic, or an element from a video or image. For example, you need to remove all the red color from a section of a video. For that, you can split that section and then use keying to eliminate red color.

The keying effect in Filmora Pro is available in the effects tab itself. They offer multiple methods for keying like matte enhancements, chroma-keying, changing hue and RGB key, etc.
The number of changes possible in each type of keying is impressive. This will require some video editing experience and a subtle understanding of color changes, which will only come up with experience.
All in all, Filmora Pro will work flawlessly in the entire keying procedure. The setup is truly among a unique class.
Using the Scopes to Access Color Values
One of the most common ways to access color values in Filmora Pro is using Scopes. Just like a sniper’s scope, this feature also gives detailed info on color data in the projects.
There are four assigned methods of monitoring scopes in Filmora Pro. These are Histogram, RGB Parade, Vector-scope, and Waveform.
If you have previous experience with any video editor, these terms will be familiar to you. If not, we will make you understand them, along with reviewing them.
The idea behind working with scopes is to manage the exposures and color balance between shots consistently. Some of the features indeed require some learning experience to understand their actual goal.
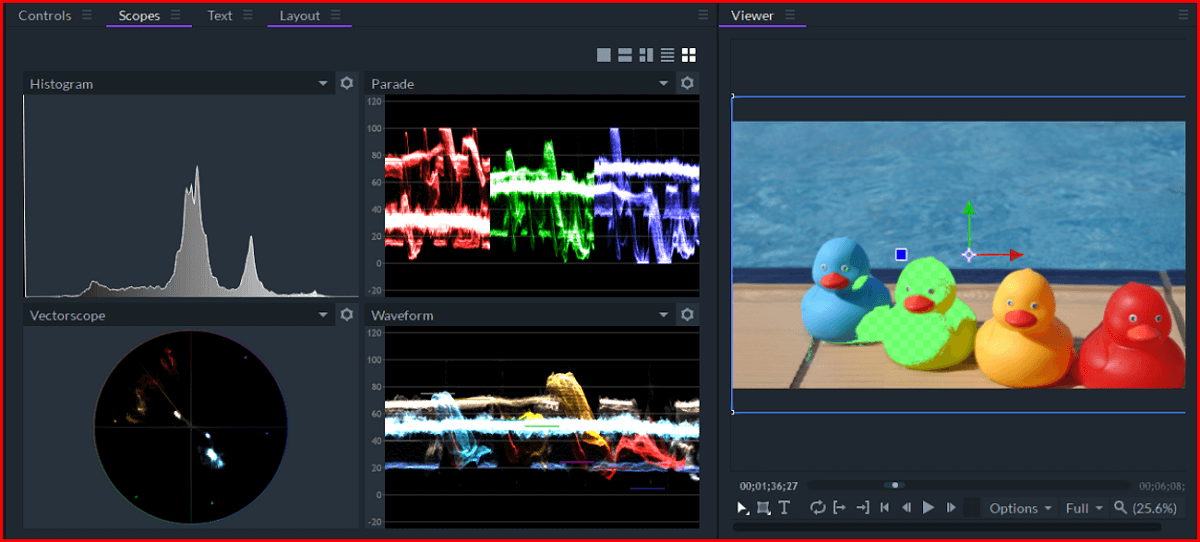
The Histogram aids with a graph to show the color spectrum in the video shot. There are multiple mods in it to separate colors like white, black, RGB, etc.
The RGB Parade displays only the RGB spectrum graph from left to right of the image. The intensities are shown as per the values of the graph.
Next, the Vector-Scope lets viewing the levels of hue and saturation in a current image. As you keep playing the video, this value will change with the frames.
Lastly, the Waveform Mode is simply used to measure a color’s intensity in the current video frame. Like above, the color waveforms are shown as frames from left to the right. With this, we’ve covered all the core editing tools in Filmora Pro.
Publishing Video Project in Filmora Pro
One of the most crucial and needful parts in video editing is being able to create proper finalized videos from a project. If the final output of a video has poor quality, the time spent on giving so many effects will be wasted.
The process in Filmora Pro for exporting the video projects into a finalized video/movie is also simple. To do that, users need to work on the type of format they need for the final video.
Usually speaking, most people use general video formats like MP4, AVI, HEVC, H-264, etc. These are much more common across every video editor.
Now, the thing to distinguish is that how many parameters we can alter in it. As usual, Filmora Pro hasn’t disappointed us in this area too.

For that, use the Export Button on the lower right in the timeline panel. This redirects you to the export panel. Now, users can either pick a selected part of the video using markers or can decide to print the entire video.
For video conversion, we must pick either a preset format, modify it, or create your own. This preset is nothing but a defined video conversion format. We can further modify the parameters in it.
The conversion time is smooth. Free users will get a watermark in the final video output. Otherwise, most of the features are accessible by them.
Sadly, Filmora Pro lacks a 3D conversion format. Even in the editing section, they have very limited stock of 3D effects. Overall, there is barely anything hard to learn. The section itself is pretty sleek.
Conclusion
With a good experience in the field of video editing, and by exploring Filmora Pro, we are somewhat satisfied with the performance it gave compared to many overpriced products.
So far, Filmora Pro has been giving us essential editing features. However, compared to other popular products like Corel Video Studio, Pinnacle Studio, etc., the level is still a bit low.
Especially in the 3D effects section, and also in the transition customization, Filmora Pro can amend some more advanced stuff like them.
Rest assured, Filmora Pro is truly among the topmost comprehensible video editor, and also with a minimal learning curve. This gives Filmora Pro an edge over other video editors.
It’s another version, i.e., Filmora 9 is more on the plug-n-play side. The pricing also is a bit affordable. It has better UI friendly perks, making it so light to work with.
We would surely recommend Filmora and Filmora Pro for users looking for good video editing with minimalistic setup and quick effects. All in all, they have done everything to make it one of the best video editors.