
WPForms Review
Detailed Reviews
You can get started with limited feauture WPForm lite which is available from WordPress extension repository. If you required full featured product then you must opt for one of their three user plans or an enterprise plan. So, it makes this review all the more important to familiarize yourself with what WPForms has to o ffer.
Once you purchase one of the WPForms plans by filling out the Registration form and making the initial payment, you will receive your user credentials for WPForms account. Just login to your account on the WPForms’ website and go to “license key and downloads” link to get your license key and download the ZIP file to install WPForms.
Pros
- A few basic templates with low-end plans, plus a Templates Add-on for higher plans with a variety of templates.
- An option to create custom templates.
- Conditional logic can be applied to form fields, notifications, and many other setting options.
- Captcha and honeypot options for spam protection.
- File upload fields to allow users to submit images, PDFs, and other files as entries.
- In-house Add-ons for features like user registration, surveys and polls, geolocation fields, Signatures, guest post submissions, signatures, and more.
- Partial entries and form protection/locking features with high-end plans.
- Several integrations including payment, email marketing, data analytics, and other applications.
- Zapier integration with zaps for over 1300 applications.
Cons
- No trial or demo versions are available for testing WPForms plugin.
- No payments or other advanced form fields like Captcha, Signature, Likert scale, and NPS with the first two tiers of plans.
- High-performance features like password protection, user registration, guest post creation, one-field at a time type conversational forms, and bonus templates as an Add-on are all available only with top two-tier plans.
- The user support is a dull affair with query ticket, and pre-sale questions’ form being the only options with low-end plans. Priority support is again a feature of the top-end plans.
Getting Started with WPForms
The procedure to install the WPForms plugin is the same as with any other third-party WordPress plugin. Choose the Upload option for plugins and upload the ZIP file for WordPress, and activate the plugin to add a WPForms tab to your WordPress backend admin’s sidebar.
All the WPForms options are available under its namesake tab in your WordPress admin back-end. The options here are All Forms, Add New, Entries, Settings, Tools, Add-ons, and About Us sections.
Upon installing the WPForms, you will be greeted with WPForms five-minute challenge, which is nothing but a guided tour explaining different sections to create and save a new form.
The five simple steps mentioned in the five-minute challenge for form creation are naming the form, selecting a template, adding fields, checking Notification Settings, and finally embedding your form to a page or post.
Let’s try to create a simple User contact information page to get an overview of the WPForms’ Form Builder.
Creating a New Form
Upon clicking Add new option under the WPForms sidebar tab in your WordPress back-end, you will see the Setup section of the WPForms’ Form Builder. Other sections of the Form Builder are Fields, Settings, Marketing, and Payments.

In the Setup section, there are options to name your form and choose from seven generic form templates, including a Blank Form template. Below the template is additional templates section with links namely “Form Templates Pack Add-On” and “Create your own” which redirect users to respective support sections of WPForms’ website.
The six basic templates apart from the blank form template which WPForms offer are Simple Contact, Request A Quote, Donation, Billing/Order, Newsletter Signup, and Suggestion forms.
Selecting a template loads its content with the Form name as title into the Fields section of the WPForms’ Form Builder. Here you can add, remove, or edit various form fields to your form from the side-panel of form fields options.
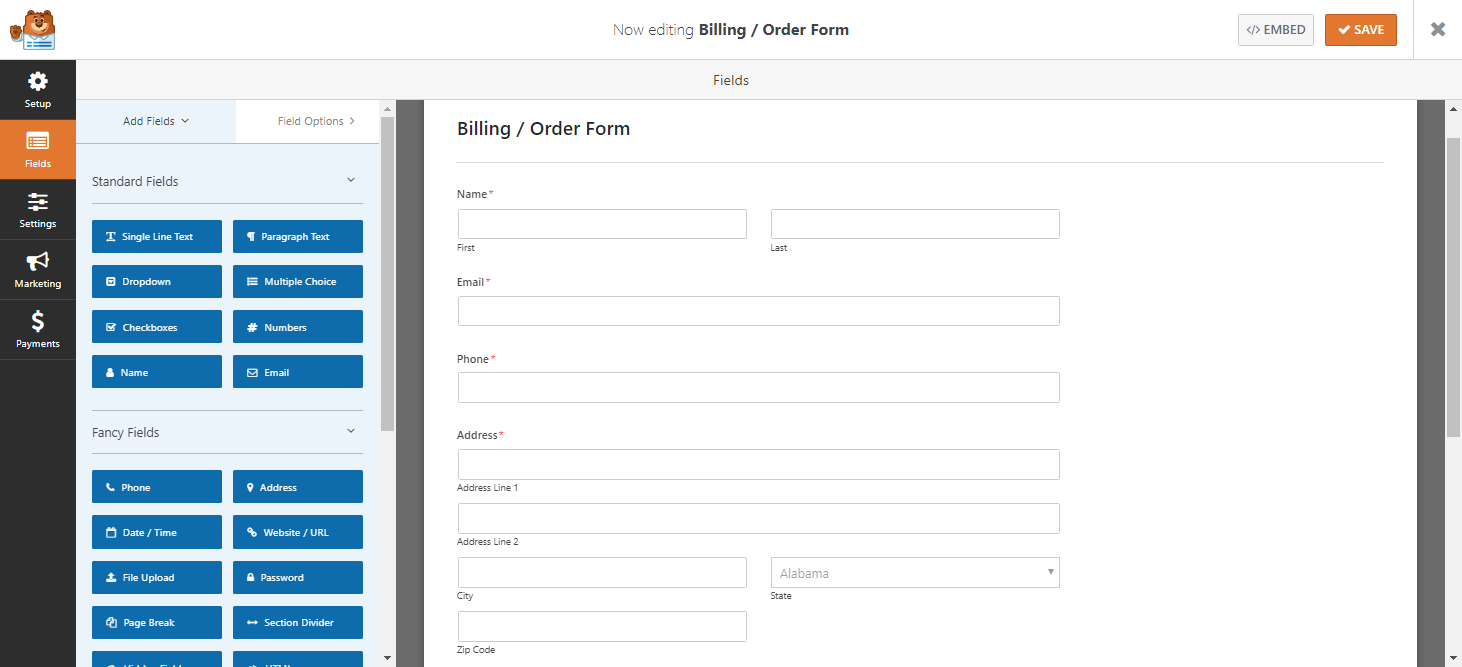
The Fields section of the Form Builder in WPForms has two toggle tabs for its side-panel options, namely Add Fields and Field Options. Under the former are listed various form fields like single line text, multiple choice, dropdown, paragraphs, email, date, Captcha, file upload, HTML, and more. These fields are classified as Standard, Fancy, and Payments fields, each with a set of relevant form fields.
As mentioned, WPForms provides a select and drag style of Form Builder. So, click to add any side-panel filed option as a form field to the end of your form, and drag the fields to re-order them. A point to note is that fields like Captcha, Likert, NPS are only accessible with high-end plans’ Add-ons.
Selecting any particular field changes the side-panel options tab from Add Fields to Field Options. Under here are the field configuration options like field label, description, marking required fields, and some filed specific options. Also are available, few Advanced field options like setting CSS Class, and Conditional Logic options.

The Form Builder interface of WPForms plugin is separated from the main WordPress backend interface, which avoids any confusion or redundancy as with Gravity Forms which blends in with the WordPress’ interface.
Form Builder’s Settings, Marketing, and Payments Options.
Most form apps – standalone and WordPress plugins provide a more or less familiar and similar form fields and editing options, except for a presence of few fields like Captcha, File upload, HTML, etc.
What makes a form app stand apart are its associated options and customization setting options. So, let’s check what level of after submission settings customization does WPForms has on offer.
To define and edit your default form settings go to the Settings section of the WPForms’ Form Builder. Under here, the setting options are categorized into three main divisions named General, Notifications, and Confirmation.
Other categories of settings like Conversational Forms, Form Locker, Form Pages, Surveys and Polls, Form abandonment and Post submissions are for specific features available as Add-ons with higher-end plans, which we, unfortunately, can’t access.

Under the General category of options are the settings to change form name and description, mention a form-wide CSS class, Submit button text and CSS class, and options to enable anti-spam honeypot, dynamic field population, and disabling the storage of entry information.
Next to General category is the settings for Notifications. The very first option here is to turn notifications On or Off. There is an Add Notification button on the top left to add any additional notifications other than default notification.

In Notification settings, user can edit options for default and added notifications by clicking the edit (pencil) icon. The editing options include defining Send To, From and Reply-To email IDs, including email ID form field; entering message text which can consist of any number or all of the form fields, and enabling conditional logic to define when to send the notification. Multiple conditions can be levied to a particular notification.
Under Confirmation settings in the option to choose confirmation type from a dropdown option of Message, Show Page, and Go To URL. The user may enter a message, choose to show one of the WordPress front-end pages, or redirect the viewer to a custom URL.

All these options apply to default as well as conditionally defined user added Confirmation messages which can be determined by clicking the Add Confirmation button on the top right and specifying confirmation type as for default confirmation. The additional optional here is the conditional logic setting to define when to show the alternative confirmations.
Under the Marketing and Payments options of the WPForms’ Form Builder side-panel are the options to connect your forms to one or more active Email marketing and Payments Add-ons.
For Payments, there are two options – Stripe and PayPal, while under Email Marketing, the list includes AWeber, MailChimp, Constant Contact, Zapier, and more.
As can be seen, a majority of setting options for features like Conversational Forms, Form Locker, Form Pages, Surveys and Polls, Form abandonment and Post submissions are only accessible with particular Add-ons which are available with higher-end plans.
One can guess from the setting options mentioned in this section that other sections would have similar relevant options.
As with Gravity Forms which we have reviewed earlier, the settings here are basic and functional and use conditional logic to its full advantage.
There is nothing markedly new with regards to the setting options for WPForms compared to the form apps we have reviewed so far. But whatever setting options are available are well thought over and executed, and the user can easily access and define the settings to his/her preferences.
Saving and Embedding Forms
To save your forms, click on the Save button at the top right. This will add your form to the All Forms section where it can be accessed to edit, redefine settings, or deleted.
Saving your form merely adds into the database, but you still need to embed it to your posts or pages. There are multiple ways to embed a form to WordPress frontend website. One of the most common methods is by using shortcodes.
To get the shortcode for your form, click on the Embed Button, right next to the Save button to get the shortcode for your form. Copy this shortcode and paste it as a shortcode block to a page or a post.
Another method is to directly add to your WordPress page a WPForms block and select the desired form the dropdown of saved forms. You can also choose to show or hide form name, description and under the advanced section, add CSS to the form from here.
There are also other embedding methods, like adding forms as widgets to your WordPress forms. To embed form as a widget, go to the Appearance tab of the WordPress side-panel, and select Widgets. Now scroll down to the WPForms option and choose to add it to sidebar or one of the footer columns.

Next, go to the right and locate your WPForms widget and click on the dropdown to select the form name, and define other options and click on save. Lastly, preview your form on the frontend WordPress site by clicking on the “Manage with Live Preview” button on top next to the Widgets title.
WPForms’ All Forms, Entries, Settings and Tools options
All of your forms can be accessed from the All Forms section under the WPForms tab in the WordPress admin sidebar. This tab opens up the WPForms’ Forms Overview window, which is the access point to preview, edit, delete, and manage all of your WPForms.
Under the Entries options tab in the sidebar, you can see the entries sheet for the selected form. There are options to filter based on a date range or conditional logic. On top beside the selection drop-down for form are options to Edit, Preview, Export entries (CSV), Mark All Read, and Delete All options.

There is also a drop-down option to star/unstar, mark as read/unread and delete the form entries in bulk. Click on the settings’ cogwheel icon beside the form entries columns to change the form field columns displayed in the Entries sheet.
The Actions column, which is the last column in the entries grid, has view and delete options to view details and delete single fields. Upon selecting view option, the detailed entry including all the form field responses by the user and a notes section for reference at the end loads into the browser window.

On the right pane in this Entry View Window are the metadata details like Entry ID, submission date and time, and User URL.
This section includes the Actions options to export, delete, print, and star the entry, and Resend Notification. Unlike Gravity Forms notification is resent to recipient emails defined in particular form settings, and there is no option to add recipients in this section.
The Tools tab of the WPForms’ plugin has options to import old WPForms’ forms or forms from other old form plugins.
It also has options to export multiple selected forms in JSON format and to export forms as templates by copying the generated PHP code and adding it to your website’s site files. There are articles in support with regards to creating user templates which mention this in some detail.
Tools tab also houses system info with details of WPForms plugin version and your WordPress settings, plus a button to test SSL connections capability of your host server.
Lastly, we will look at what setting options are available with WPForms’ generic settings which apply to all the forms.
Clicking the Settings option under WPForms tab in the WordPress admin sidebar opens up the settings window which by default shows options under General tab. Other tabs of setting options are Email, reCAPTCHA, Validation, Payments, Integrations, and Miscellaneous.
The options under General Tab pertain to validating your license key upon installation and refreshing in case of upgradation. Other options here are to choose which CSS files to load for the site – base and form theme styling, base styling only, or no styling.

By default, the first option is selected, and choosing the second would override your custom CSS class defined for the form and its field and apply the site’s base theme to your form. Also, among the General settings is the option to turn on GDPR enhancements to increase your forms’ GDPR compliance.
Email tab has settings options to choose HTML template or text as notification message format (by default it is HTML), upload header image, select the background color and enable Carbon Copy for your emails.

reCAPTCHA tab helps you choose default reCAPTCHA type for your forms – checkbox or invisible, enable No Conflict Mode.
Under Validation Tab, you can change error messages for required fields, invalid email, invalid date format, file size, etc.
Payments and Integrations tabs have the options to choose currency and setup third-party integrations, respectively.
Under Miscellaneous tab are options to hide upgrade notifications and delete the WPForms plugin.
Segregation of form-specific and form-wide settings as in the case of WPForms is very advantageous as it does not overload the user with defining a long list of settings within the Form Builder.
This feature is something that other form apps can learn from WPForms and adapt to reduce the user’s headache and streamline form creation.
Integrations/Add-ons
If you use form apps, you must be aware that integrations or add-ons play a crucial role. Not only do they empower your forms with extra features, but also provide channels to filter, analyze and put your form entries/responses to work by automatically updating your contact lists, user feeds, and sending customized marketing emails for lead conversion.
Let’s have a look at the add-ons that various plans of WPForms has to offer. To find, and install any of the WPForms’ add-on go to the Addons option in the WPForms’ sidebar tab. It opens up the Add-ons window which lists twenty in-house and third-party Addons as of now.
The applications in the Add-ons window are segregated as Available Addons featuring the apps available as a part of the current subscription, and Unlock More Features section with applications which need an upgrade to install.
You can check the status of available Add-ons and choose to install them by clicking on the Install button just below the icons.
A few of the in-built Add-ons like Form Templates Pack, Form Locker, etc., have already been mentioned in previous sections. Other than those other Addons are consist of Email marketing apps like MailChimp, AWeber, Campaign Monitor, Drip, GetResponse; Payment extensions like PayPal, and Stripe; and Zapiers Addon with the power of 1300+ apps.

The list is of integrations is not as impressive as some other form apps in terms of numbers, but with Zapiers integration, one can find an appropriate Zap to link one’s form and entries to over 1300 different kinds of apps.
WPForms only offers two Payment gateways, i.e., Stripe and PayPal; there are no other Payments Add-ons. Also, the payment add-ons are only available with the top two plans and not with the two lower-end plans. So, if you are planning to monetize your WordPress forms, you need to subscribe to a higher plan. With that too, the options of gateways for payment are limited to two.
Other plugins do provide other gateways like Authorize.Net, and others as add-ons and WPForms should add more payment gateway options to its arsenal of add-ons, and We are sure their dedicated development team might already be working on it.
And, although the WPForms development might not want to bloat their plugin, as is an issue with newer versions of popular apps, they should find a way to add more integrations and Add-ons.
Other updates could be moving some in-house features like Conversational Forms, Form Pages, and Surveys & Polls and third-party apps including at least one Payments add-on to the lower-end basic plans.
User Support and Help
As we have been mentioning in all our reviews, User Support and Help section can’t be neglected by any software application service – cloud-based, dedicated client, or plugins. It helps build loyalty among users and retain them, which considering today’s competitive market makes the Support part all the more important.
As with Gravity Forms – the other WordPress form plugin, whose demo we reviewed, the Support with WPForms is not pleasing.
There is no link for Support in the WPForms plugin sidebar tab of options in WordPress backend. Also, when you go to the Support section of your WPForms’ website, you’ll find two options – Support Ticket for a technical query, and A Question form for pre-sales.
Upon choosing the latter, you’ll first find options to go to various sections of Documentation before you decide to submit a ticket. To WPForms team’s credit, the support documentation on their website is well categorized and has relevant and useful articles.
A suggestion would be for WPForms to add a Support or Help tab to their WordPress sidebar panel of options with redirect links to their support documents.
As is the case with many WordPress plugins, and plugins for other software, priority support for WPForms is only available with higher-end plans. This might be attributed to the fact that such plugin tools are developed by independent developers or a small team with limited financial and human resources.
But, we sincerely hope for this scenario to change, and make the service providers realize that they can’t let the regular users with low-end plans high and dry when it comes to technical support.
A Conclusion with some honorable mentions
So, now it’s time to close our review of WPForms with a conclusion, but before that, we would like to mention some miscellaneous features, we might have missed out on.
The one that comes to mind is the submissions chart feature whereby, the WPForms plugin adds a chart/graph of recent form entries/submissions to user’s WordPress back-end’s dashboard as shown in the image below.

The user can choose to show the results based on form entries from past week or month, and also choose to show entries only for specific forms.
Another feature is to create custom templates, which we briefly discussed while describing Export as Template option in the Tools section.
So, basically what user can do is create a form from scratch or using one of the available templates, and choose that form to Export as Template, copy the PHP code that appears, and paste it to his/her WordPress site files, and the form will be added as template to the list of templates.
After all is done, the user can choose to delete the initially created form, and it will not affect the custom built template in any way whatsoever. Also, we recommend going through the support article on “how to create custom templates” by clicking on the link under the templates section in the Setup tab of WPForms Builder before embarking on the mission to create a custom template for your WPForms.
Now, in conclusion, we’ve only got praises for WPForms as it seems to have most of the pieces of the puzzle in place. We want to point out some improvements that can be made, some of which we have already mentioned before.
Adding more Payments and other integrations while still maintaining functionality without bloating the plugin is the standout recommendation for WPForms and even many other plugins – WordPress or otherwise.
The user support issue is already mentioned previously, but we will stress it again – at least Email support for low-end users is needed.
Also, some in-built tools like one field at a time Conversational Forms, Surveys&Polls, Post Submissions, Form Abandonment should be put out of the Add-ons section and assimilated as base features available with all subscriptions.
Adding features like Save and Resume, chained selection fields, and an upgrade to the Entries report section with user-customizable reports are some other mentionable areas to work on for WPForms.
The points mentioned above are only recommendation to improve WPForms already popular WordPress plugin and give all the needs edge over other form apps to stay on the top.
So, as most of the over two million users worldwide would say, we have no qualms recommending WPForms as your dedicated forms plugin for all your WordPress form, but you must try out the product for yourselves, as is the case with any service to see if it suits your needs and preferences.
We recommend using the WPForms Lite plugin which a limited free version of WPForms Pro plan to test the plugin. But, note if you decide to continue with WPForms, and subscription charges are a secondary issue, we recommend opting a higher plan with more features at your disposal.