
ConvertKit Review
Detailed Reviews
Modern marketing, like earlier days, requires constant engagement with the consumers. This can be achieved only if the companies keep a constant watch on consumers’ purchase habits. They also need to keep the customers engaged by giving them various offers.
In olden days, it was tough to keep up with customers that were far off. Retargeting and engagement were only possible for nearby ones. So what is the solution in modern times?
Well, with advent of the Internet, we are now able to pinpoint our customers and their habits, giving us correct hints on what product they need. For getting back to them and offer them discounts, we will be using Emails. This method of using Email for marketing, transactional, and lead generation purpose is commonly called Email Marketing.
Pros:
- Hassle-free Email marketing Contrary to traditional products, they have given separate mailing feature as separate sections.
- Novice-friendly contact list management. Also displays graph for contacts showing subscriptions, unsubs, and other status.
- Amazing mail deliverability. Rarely lands up in the spam folder.
- Can use multiple tags and segments to filter contacts
- Create new forms on webpage, like pop-ups or chat interface.
- Can make landing pages for your subscribers.
- Use broadcast to deliver one time emails.
- Has sequence feature to deliver a series of emails to the subscriber with scheduling.
- Comprehensive automation features to deal with automated Emails.
- RSS feeds to update customers with new posts from your blog via Emails.
- Can create custom automation rules.
- Tons of integrations with custom API to collaborate with any non-integrated products.
Cons:
- Mediocre web-form designer. Although the template stock is decent, internal editing features are middling.
- Not so good page designer in landing pages.
- Non-traditional names for each Email marketing feature may confuse new users.
- Very average HTML editor.
- Does not have a dedicated editing function like website builders, i.e., no drag & drop editor.
- Automation needs changes in visual representation to provide much better viewability.
- Restricted A/B testing. Cannot evaluate mails with different content.
- Reports of several data, be it for Emails or others is somewhat lacking. Needs to have a dedicated section for reports.
- Little bit overpriced given that they have restrictive editing features.
Overview
This term is not new to any business in modern times. Probably you might have come here reading about the features of one such product. Well, we will fulfill your wish and introduce to one such tool.

ConvertKit is one such tool, used for Email marketing that is amongst the top product in current market. Even though founded in 2013, in Idaho, USA, it has managed to get into top list.
With around 50 employees across 40 cities, they have provided their services to more than 250k customers online. The noteworthy features that are in ConvertKit’ package are sending regular mails, landing pages, forms, automated workflows, broadcasts, and sequences.
In this review, ConvertKit is to be evaluated, and only then we can pass a verdict if the application is worth our time, or it is just another random tool.
Working with ConvertKit
This is the common question many users ask if they start with something different first time. For pro-readers, just be a little patient since we can perceive how things work in ConvertKit.
The best thing that many readers will like here is that ConvertKit offers a 14-day cost-free trial. This does not require any conformation or credit card info to register. However, for anti-spam regulations, you may need to input complete address.
Once you are registered for this trial, you will be redirected to a new prompt page. It will ask to make a new form or landing page for your site. You can skip this step is you just want to start with adding contacts first.
The central panel of ConvertKit contains links for a list of subscribers, automation, forms & landing pages, sequences, and broadcasts. The entire setup may not give the feel of traditional email marketing tool to old users.
However, without looking profoundly, we cannot predict that they are wrong. The first step is to import contacts into the directory. For that, head to the subscriber section. Add the contacts here. You may import these contacts from CSV files too.
After the import is done, you can then go to create new forms and pages for customers. Making them in ConvertKit is hassle-free. After that, users need to select that form for adding contacts.
Then there are other functions too in it like automated workflow generation. We will discuss it in detail later on. For now, as you notice, there is no dedicated set up to make new emails. Users will need to customize them internally.
The email is designed in the sequence section, and so users need to learn it with use. They could have simply added create mails option to avoid confusion. Style the emails that will be replied to your new subscribers or under part of any workflow.
The procedure is seemingly mediocre and compared to products like CleverReach, Sendinblue, MailChimp, etc., it may need some learning curve to master the product. Let us move on to see how exactly these features work in ConvertKit.
Adding New Subscribers To The List
Before we begin exploring the Email feature in ConvertKit, we need to add a list of new subscribers to the database. What is the traditional method of adding new users to the list of subscribers?
Typically, if you have an online or offline pickup store, you can ask for surveys online and add them to the list. For offline users, you can add them manually in the list. This same method is utilized by most Email marketing tools. The general method to get a new subscriber is by creating signup forms on your website.

This is typically used by all. We will discuss web-form building features later on. For now, we used a form we made earlier to get raw users in our sub list. ConvertKit has other means too for hoarding the subscriber lists.
To add them, go to the Subscribers Tab over top bar. On the main panel of subscribers, you can see a list of total subscribers and their details. They have given a graph on this page too. What does this graph display?
Well, the graph has date on X-axis and number-counts on the Y-axis. As you can deduce, this shows a list of subs added on a particular date and eventually generates slope for that. It will also illustrate how many subs were added/lost and generate a slope. Isn’t it a pretty exciting way to show subscriber status?
You can sort the graph details based on week, month, or day basis. Just below it, they have involved general details for lifetime total like net subscribers, average open rate, average click rate, emails sent, and new subs today.
Below this, there is a list of confirmed subscribers. Using bulk actions, users can add/remove tags, sequences, export, or delete them. If the list is too big, you can directly use search to filter out a particular subscriber.

There is no separate filter button here. Instead, there is a drop-down menu above contact list. From this list, you can pick one of the options like all subscribers, confirmed/unconfirmed, canceled, bounced and cold subscribers.
On the side panel, you can pick segments too. From these segments, the users can attach a contact to the list and to directly add them while making sequences. You can make a new segment and then select the subscribers that you want to add in it.
Tag Button is just below it. Use it to add tags for your subscribers like new sub, clients, purchase, order, etc. They can be helpful while creating Emails and sorting out contacts accordingly. The last one has a product category. This tag displays a list of products bought by the customers.
This was all in the subscriber’s section. This section was average compared to other top products like CleverReach, Sendinblue, etc. This section does not show the geographical graph for different signup locations.

It does show the location of individual contacts on their individual page, but combined data is also needed. After that, there was no sign of rating tags for the contacts. Rating tags based on subscriptions, purchase, cancel, etc. can help to sort the contacts and avoid the hassle of finding their full info and decide their priority level.
These were the only changes we think that need to be added in ConvertKit. Other than that, ConvertKit contact list feature is working well and as intended.
Time to Create New Forms!
Anyone making a new Ecommerce site needs a user base for their stores. For that reason, they need their list of subscribers. This is achievable only if the admins have a method to collect information about the users.
This can be done by use of web-form feature. This technique is most common in the new eCommerce sites. The forms come in diverse types for such sites. The most popular ones are new users’ signups, unsubscribe forms, feedback forms, consent forms, and so on.
All these forms can be used to collect data from customers, and then we can use the automation to send them emails. To access the forms in ConvertKit, you can do it by selection of Forms & Landing Pages Tab on top.

On this web-forms panel, they will show a graph, similar as on the contact screen. It will show the data for number of forms submitted on a particular date. On the top of this part, you can view forms submitted today, in last 7 days, 30 days and complete forms submitted till date.
Below this graph, all the forms that are made by you are shown. The data on form shows number of visitors, subscribers, and net conversion rates. Like contacts too, sort these forms based on date, visitors, net subscribers, and conversion rates.
Use the button New Form to make new forms. Pick the new form. Choose from three options viz., Inline, Modal, and Slide-In look.
The inline model is placed on the page itself, between the content. The modal theme is the pop-up based form, and slide-in model appears like the chat button on the bottom right of page.
The templates are almost similar in all three of them. This is quite disappointing to be honest. This is because many other services like CleverReach, Sendinblue, Privy, etc., have a much better and vast choice for form templates.
They must include many form templates and arrange them differently as in new user signup, feedback form, etc. Nevertheless, we chose one of the web-form templates and proceeded further.

This new panel is the form editor page. If you see carefully, there are very minimal personalization options here. Unlike form editors in CleverReach, Sendinblue, MailChimp, etc., they have very minimal setup.
To edit an element, you can click on it, and if editing is allowed for it, you can see the editing options there. Generally, you can edit all the text items in the form. You can add form fields on it too. There is an option to add either checkboxes or drop-down menus in it too.
There is right-side pane to adjust some usual settings of the page. From here, the first tab allows choosing the success message after form submission. You can add a success message or add the redirect link to your site.
In the display options, you can choose to adjust the location of pop-up form. You need to input the display option in it like show the form after X% of page-scroll, or after visitor stays on the page for X seconds. This is useful to time the pop-up form based on customer interest.
There is a trigger code below it too. This trigger code will display the form only when you click a link on that page. It is similar to redirect pop-up we get on other sites, except that this link will redirect to fill the form instead.
Another useful item in form settings is the device and frequency selection. Users can choose to display their forms either on mobile devices, or desktops or both. Then select frequency of appearance of the form to the visitors. It will automatically detect it based on cookies.

In the next form setup, you can set up the Incentive Mails. This mail is like new user discount coupon. It will be sent to the new user once, from this form. There is an attachment button too for the forms. You can attach your site link or a file, that can be accessed after successful submission.
They have given the setup to edit incentive mails here itself. The customization is skimpy. You can only change the sender mail, subject, and text content of the message. There are no options to customize it further with company logos and color schemes.
The consequent setup in form is Style Selection. Sadly, there is no provision to add custom CSS or HTML here. This is available in even smaller products like Privy.
In this section, you can customize things, like the background image of the form, its backgrounds color, border-radius and add custom CSS to it. This custom CSS is not to add new form but only for editing the existing ones.
There are specific codes given by ConvertKit to engage in it. These CSS codes are used to change the header, description, image, checkboxes, and other such things on the form. On their help section, they have the list of codes to be used for making changes to the current form.
In the last section, you can choose a thank you page for returning visitors. Instead of that, you can add your own content here in HTML format too, which will be shown to existing subscribers.
On the top section, you can access the Preview, Embed code, and Reports. The preview button shows how the form looks. Use the embed codes to input either JavaScript, HTML code, WordPress plugin, or Unbounce integration. Use any of the suitable methods to integrate these forms on your site.
Other than this, there is no option to change the height and width of the form using drag & drop method, which every product delivers. This lack of customization makes it a bit inferior in form building than CleverReach, MailChimp, Sendinblue, etc. They need to have more features in here to make it more competitive.
How to Use Landing Pages for Email Marketing
The next part after form creation is to design some landing pages. So, what exactly can I do with a landing page? Will it help me grow my business?
However, for many reasons like single products, test products, less budget for a full website, one may not be able to create a new site from scratch. For that reason, we need something similar to a website but one that needs very fewer resources.
In online marketing, to fix from these issues, we use landing pages. These pages are perfect for testing your imaginations and grandiose ideas. These pages are also popular as lead generation pages, static pages, etc. These pages are made for the purpose of online marketing, promotions, advertisings, and so on.
They are designed to capture the reader’s attention. Not only that, but they also capture the visitor’s data, messages, generate leads, can be integrated with automation, and other digital marketing stuff. These pages are very novice-friendly, and so any user with least experience can also make new landing pages from scratch.

In here, landing pages can be accessed from the same section as the forms , i.e., top bar. From there, you need to pick the option to select landing pages.
This takes you to the template section of the landing pages. There are many useful templates in this section. This list has some fantastic themes like eBook, Event, Newsletters, Podcast, Products, Profile, Video, Waitlist, and Webinars.
With so many customized pages, you can hopefully get one for your page. But, what if none of them fits my purpose and I need to make a new one from scratch?
For that, we need a blank landing page template. Sadly, there is no such provision in ConvertKit. They must act now and add blank templates for the landing pages. There are more things that need to be added in the landing pages which we will discuss later.
Regardless, you can directly choose or preview one of these templates. Then comes the part where you can edit these templates. The template editor for landing pages is similar to the one we saw in the form builder.
The setup is same except that they have changed the working of some of the functions. We were expecting a traditional website builder type look here, but we got this modern minimal setup.

Like in the forms section before, you can edit the elements directly by clicking on them. There is not much space for personalization here. Both font and color editing are limited.
You can drag and rearrange the items in it. This designing requires replacing only preset elements with your ideas. You can alter the theme of page. Compared to the products like MailChimp, Sendinblue, Benchmark Email, etc., they should have given a versatile page editor here for better customizations.
But then, we got to adjust in with whatever we have. In the side pane of right, you have to adjust some settings.
In this pane, the first step is for adjusting domain settings of the page. In here, you select a domain for the page. By default, ConvertKit will allow their domain to be used for the page. Users can also set their custom domain.
There is a section in which you need to put the page URL. This may be filled by an appropriate name like purchase summary, feedback form, etc. Just below it, you can add either a thank you message or send them to your site.
The second one is the same incentive mail settings. You can also add a file at the end of it for download. This can be used in instances like eBooks, thereafter the user adds the email details; the book downloads start automatically. This process is seen in many websites.
The following one is the style modifier tab. There is almost nil customization here. This was very disappointing. ConvertKit needs to up their efforts in this section too. The classic fixed mode of editing is suitable for forms, but for page builders, they need a website builder type interface.
You cannot even change the background image in many templates. In case there are no images and dull colors in back, you can change colors but cannot add an image in there.
The advanced settings following this section is mediocre. In the final settings, you can input the title of the page and its description for SEO. They also have given few integrations with Google Analytics, Facebook Business, and Segment.

These were all the options in general section. The elements have same editing choices as in forms. Overall, the landing page design section was a big-time bummer for us. Having used many top products for a long time, more personalization is what we look for. This was missing in it.
For simple editing and businesses, this fixed page design is good, but for advanced users, we need a full website builder type interface.
Once you are done with the design of the page, use the save button on the top. In here too, there is no provision for saving different versions of the page, which CleverReach had provided.
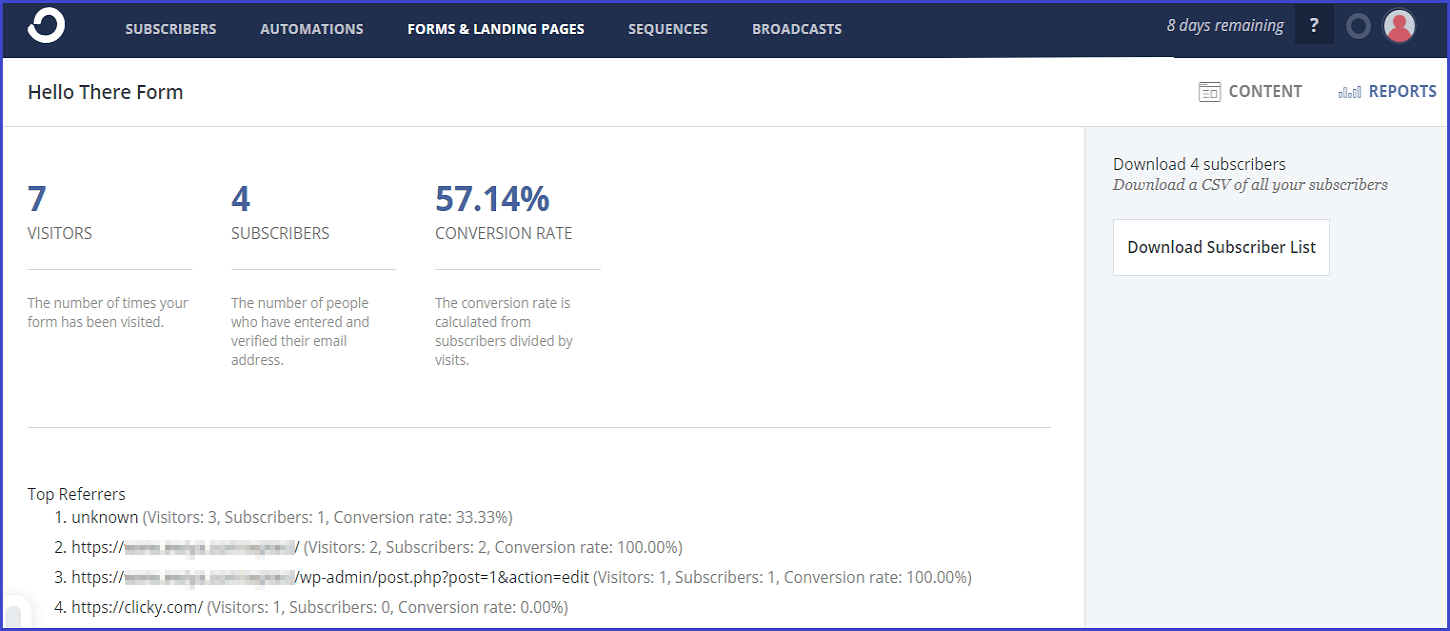
Once done, you can integrate these pages into your emails or automation. Adjust the forms accordingly in page and use the reports section to generate data for those pages. The generated report is also very minimal.
It only shows the details of number of visitors, subscribers, and the conversion rate. There is no further data on the location of viewers, their visitor status based on their cookies, and many such useful data.
We can only ponder that ConvertKit has tried to keep things here as simple as possible, but for advanced users, it can be a terrible experience to have very little control and access to data.
This was all in the landing pages section. Now that we have made conventional forms and landing pages for our flocks, we can now proceed to design the mails that they’ll be receiving.
Creating Sequences with ConvertKit
Many of the readers, including the pro readers, might be wondering what is this sequence thing? Things are a bit tricky here. As per their terms, a sequence is used to send a series of emails to the contacts based on preset automation.
This can be anything based on the automation created. You can send a chain of sequences for new users like confirmation mail, conversion successful mail, first user promo-code, etc. Other types of sequences based on cart info like cart items alert, checkout alert, available product alert, etc. can be integrated by these sequences.

The only thing you need to take care of here, is to validate strategy for the automation you will make. Regardless of that, if you are indeed serious about the business, you will include all the mail sequences like new user signup, discount mails, checkout mails, delivery updates, etc.
Want to learn to make a sequence? Let’s go then. Now that you have got the idea behind it, things will be easier to decide. Sequence Section can be accessed from the top bar. In this panel, use the New Sequence button.
Input the sequence name first. After that, it’ll open design section for your sequence. The top section is to input general details of the sequence. This includes name, status, time to send, and preview.
In the design section, this method has prefixed editing. There are no web elements in it as in traditional website builders. Many email services have reserved that website designer interface as their default. ConvertKit is stuck to the old school method.

It will be similar to composing mails. Input mail title, subject, and then email content. In the content, users can add texts, images, files like videos, documents, etc. The customization is limited. There is no option to change font style of the texts.
However, some other filters like bold, italics, underline, justify, font color, etc. are also given. There is a link attachment button too. Overall, this was a common thing to begin with. In modern email marketing, most providers have resolved to use advanced editing features to make it look like another webpage.
This must be noted by ConvertKit. Simple mails are no-go in modern times. We use buttons, redirects, etc., to make emails more user-friendly and look better. We can hope that they improve their UI to integrate this.
You can add multiple emails in a sequence and then use the schedule button to time then accordingly. In the general settings for sequence mails, you can customize the timing of mail, select the template type of the mail, exclude any subscribers, or delete it. There is also a report button for us to check the status of the sequence.

This report has general terms like a list of confirmed, unconfirmed, new subscribers, their open rates, click rates, etc. There is graph generated here, and so manual reading of data may annoy some readers.
You can also add tags into the mail with Personalize Button. This can add items related to the subscribers like their names, emails, tags, GDPR links, and roles assigned.
So, the setup is very much elementary and offers only a regular editing feature without any advanced mails. The sequence mails are like chains of mails. While in automation, you can directly add one such sequence, and it will start chain mails as assigned in the sequence.
It would be perfect if they allowed styling new HTML type mails in it. Regardless, the features are still good enough to generate a beautiful sequence for the customers. Combined with proper automation script, it can be beneficial.
How to Broadcast Emails in ConvertKit?
Contrary to the usual action of sending emails and automating them, this is something different given in Broadcast Emails. In terms of ConvertKit, broadcast emails are under the category of one-time emails.

So what are these one-time emails? What is the use of such one-time emails? There are only a couple of differences between the sequences and broadcast emails. One of the primaries is that they are one-time campaign mails, while broadcasts can be sent over and over again.
You cannot select broadcasts in the automation more than once due to the nature of its type. The procedure for broadcasts is very much similar to a scheduled mail function.
Using the New Broadcast Button, first you need to input the receivers who will get the broadcast. Use the filter option to choose myriad items for contacts like subscription status, region filter, name filter, etc.
You can also put a filter based on forms, sequences, tags, and products here. This allows to hand-pick correct subscriber and allows a refined choice.

After this comes the email editor. There is a bit a surprise for you here. They have used an advanced version of HTML email editor here as we suggested earlier. This editor is still under development, and so there may be many changes after the last version is released. We hope they’d add it to other sections like sequences, forms, and landing pages.
HTML Editor
Finally, we get to see the HTML editor for our emails here. This is a very unique editor we have seen until now. Unlike other mail providers, it has no visible pane where all the elements are listed aka a drag and drop type interface.
The editor has given the place for A/B test here itself. This test is minimal here. That is because unlike CleverReach, they have not given the option to alter both content and the subject. You have only choice to add single or two subjects. After you have picked two different subjects to be written, fill the subject field above.
To access the editor items, click the + icon appearing on content field. This makes it a bit confusing to newcomers and so we’d say they must add this icon to always appear on the content field.
Clicking on the + icon will show multiple options to you. These include regular webpage items like texts, images, files, buttons, dividers, html blocks, personalization, heading, and tag lists. Click on any written content to alter it.
The only issue we found here is that there is no change in the font options while editing texts. You can alter their color and even size but not the font type. You cannot even copy-paste another font format here. This slight change needs to be added by ConvertKit.
Since it is still in development phase, we can expect more items in here. For now, we can add all the conventional email marketing related elements with this editor. Once you are done with editing the mail, you can preview it using the browser button on top right or send a test email.
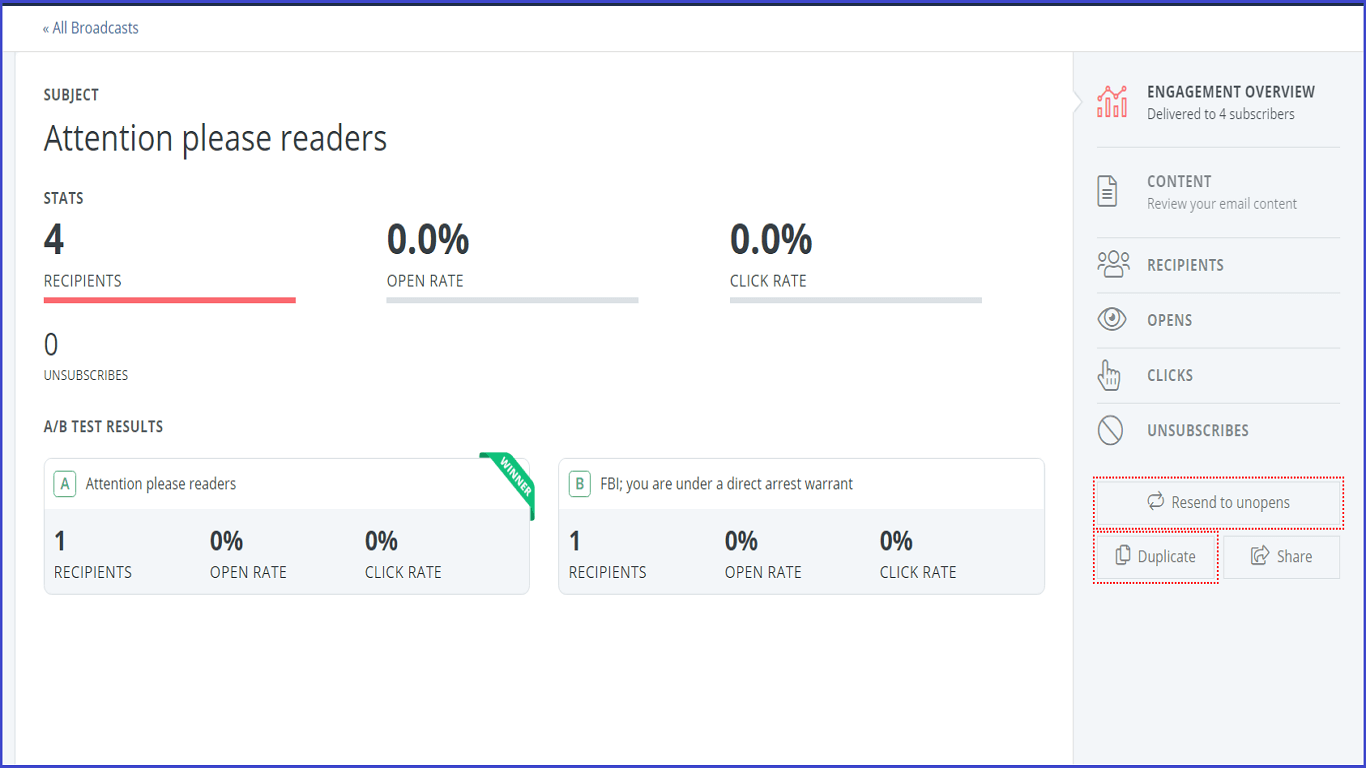
Heading on the next step, use the proceed button, and add a scheduled message. Remember that this is a one-time message, you can only view the report or duplicate it, and not edit it midway. After this, users can view the report on the main panel of broadcast tab.
For A/B tests, they use internal mechanism. Based on the number of contacts to which mails will be sent, they divide it accordingly. Use the view report button on the given mails. You can also resend the mails to ones that have not received any mails.

In this way, you can benefit from the quick mail service of broadcast messages. Only thing we feel which can be improved was that they must add the advanced mail editor to all the mail design board. Alternatively, the best way would be to separate mail designer entirely and allow to add tags on them based on their use like for broadcasts, sequences, etc.
Overall, we were satisfied with the features in it. They can further improve it in later updates. Compared to other similar services like CleverReach, Sendinblue, Benchmark Email, MailChimp, etc., they still need to up their game so that they can compete toe to toe with them.
Creating Automation To Personalize Mail Delivery
Going through all the process of making diverse types of emails, adding tons of delivery contacts, making lists, etc. is much easier than it sounds. Really, ehhh! Try doing these steps one by one to thousands of customers manually. Even with separate lists of contacts, how fast can you send a purchase confirmation message to one and cart notification to others, especially if site traffic is more than 100 visitors per minute.
For such things, do companies employ tons of staff members? Absolute bonkers, isn’t it? Almost 90% mails you receive online are automated, and except emails directly from the support team, they are all automated.
Talking of automation in mails, how to do it? Especially, how does ConvertKit help to maintain the schedule, delivery, or perform any user based mail triggers?

To access it, use the Automation Button. In the automation panel, you will have a list of all the automation done till now. To begin with a new automation, create a plan on how you want to use the automation.
One example we can give you is a new user discount coupon. Say, some new user signed up for first time. You can send them this discount message via mail. If the user has filled his cart and makes a successful purchase, you can send him another cashback or discount offer. In this way, you can make many such processes automated.
In the new automation process, they have given option to make it from scratch or use preset templates. In the preset templates, you can choose from newsletters, product pitch, webinar, launch, non-participating customers, and survey-based delivery.
All these are the exotic choices for automation. You can choose from any of these and try them out. We will try out the survey based template here. This is one unique template we have found so far amongst all the automation features.
Once you pick the template, you are directed to automation design panel. Similar to other products, we have two main blocks given by ConvertKit, they are Trigger Block, Condition & Action Block.
They are represented accordingly here. The top section in the survey automation is for the trigger blocks. Let us say a subscriber has chosen to unsub from your site. In that case, we can add a survey after the unsub button, and based on the choices; we can offer him something better.
For us, we have used the tagging system as our trigger. In this setup, we are going to add tags to contacts based on forms they fill. While filling a form on the website, we can use a drop-down list to choose a tag for them, like newcomer, pro users, etc. Using these tags, we will assign our tasks further.

Now comes the part where we need to choose actions of the condition button. There is a + sign on this panel between two links which can be used to add or remove any of three mentioned blocks. Now, we can use the tags to play along with the conditions.
There are two condition fields. One is the IF condition, and the other is Custom Fields. As usual, IF condition is used to prompt yes/no based triggers. For now, we choose IF condition. If any subscribers of a particular tag is also a part of another tag, like a contact with new user tag and also with no purchase tag, we can send them emails with better offers.
For others, we can send them thank you emails for successfully using the coupon. In this way, we can design the automation based on any condition we want. The setup is quite simple to make. The setup is in a waterfall scheme, means the tree of automation is from top to bottom.
This looks wobbly while making complex and lengthy automation. For that, they can allow us to drag these blocks and rearrange them like given in CleverReach. Also, the color code for all three blocks is different, making it easier to understand the blocks.
However, compared to other products like Sendinblue, they have limited number of triggers and actions. Some of these actions are adding visitors for retargeting, using a webhook, A/B split, adding delay, etc. Overall, the features are quite good enough to give us the best out of automation in ConvertKit.
It can become very complex given to fact that we cannot unlink an item in it. CleverReach has a drag interface where we can unlink an item only by dragging its anchor points. Something similar must be given by ConvertKit too. To unlink, you have to delete that block entirely which may be otherwise needed to link to other blocks.
Besides the usual automation steps, they have given some extra set up in this section too. These are automation rules, RSS feeds, and Integrations. All these are used along with automation to generate a better experience for the visitors.
Automation Rules
The sub-section here is automation rules. As we have elaborated before, these rules are used to generate conditions and triggers in the automated emails. By default, these rules are only based on the subscribers’ action.

They also have given various guides for automation blueprints. Using the New Rule Button, in the setup panel; there are two main things to choose from, one is triggers, and another one is actions.
The triggers, as usual, are based on specific activities the subscribers do. For example, subscription to a sequence, form, or finishing a sequence, add/remove tags, and clicking a link.
The side panel includes a list of actions like subscribe/unsubscribe to a sequence, form, or add/remove tags. There is also a custom field button in the action menu. So, how does this rule setup works?
The first step is to choose an action that the subscribers may do. In general marketing emails, we assign them certain links like confirmation links, discount links, etc. We can set up the triggers based on these links, or we can just base it on subscription or tags.
We used the link trigger for now. Add the homepage of your site or product page or whatever link you need to forward. In the next step, we need to assign an action to this. Out of these, all are quite popular, and we have explained them all except custom fields.
The custom field is nothing but merely a tag feature. Once the users click given link, they can be added to the custom field. You can input the value you want that user to have via that custom field. Other than this, there is no further customization for now.

Overall, these features are more than enough. Just save the rule after this. In this way, you have created a new automation rule, based on subscriber’s actions.
There is no trigger for automatic purchase in this section. It could have made this feature complete. Regardless, this is a unique feature in ConvertKit. It can be used to create shorter automation for a smaller task than making them in the automation panel.
Following it, they have given provision to add RSS feeds too. Users can automatically send these feeds to customers for any RSS or Atom feeds. This is a useful feature to let the customers be connected to your blogs, especially for new announcements, feature updates, or any other critical activity related to the product.
Using the Add Feed Button, we can connect contacts to these feeds. As explained above, these feeds will help to keep customers updated about any updates. The process to set it up is novice-friendly. All you need is have your RSS feed link from your website.
Once you do that, they will check feed validity. There are two options given to send the feed info to subscribers. One is Single Broadcast, and other is Digest based Broadcast. As the setup hints, one of them is used to make new drafts every time a new post is submitted; while the other one compiles the feeds, and then sends them in a bundle.
In the second method, you can choose the day of sending bundles, time, and time-zone of delivery. Below it, the selection of intended contacts is to be done. After that, you can choose to broadcast after 30 minutes of their publication. This method is also popular among Email marketing services, and ConvertKit performed decently in it.

The last section is the Integrations Section. There are tons of useful integration given in ConvertKit for external collaboration. Many of them are online shop platforms. The top ones among them are Shopify, SamCart, Gumroad, etc. They have given API to integrate their product with others.
They also have some more web-based integrations like LeadPages, Stripe, Recurly, WordPress, Woo Commerce, Zapier, Zippy Courses, Gravity form, and BookLaunch. All these are useful in their own ways, and many more can be added. They need to add a few more online shopping platform integrations.
Other than this, using accountings tools that they have, users can manage their financial stuff easily. We could get some more in this department like QuickBooks, FreshBooks, etc. When it comes to integrations in this product category, MailChimp surpasses all. Regardless, ConvertKit has more than enough integrations for now.
Finally, we conclude the features given in ConvertKit. As we see from the list of titles above, all these are standard go-to function needed in every email marketing service. There is no dedicated reports section in ConvertKit like other products.

They use graphs in the main subscriber dashboard and then in form sections to list the number of contacts added, removed and so on. The report misses the bounced mail option, and there is no way to list these bounced emails like in Sendinblue and CleverReach.
Other than that, they also have a team manager, using which we can assign different team members to our account. These two are admin and design editor. Both are enough for these jobs.
Most vital thing we felt needs to be improvised by ConvertKit, is their email design section. Currently, the templates are minimal, and you can only add new ones via a custom HTML code in account settings. ConvertKit really needs to have an advanced mail and form designer, like a website builder, to grab the market.
The UI of ConvertKit was super easy to follow and learn. We didn’t come across any bugs or functionality issues while using it. They have given guides for migration too in their help section.
However, customer support needs to be improved with the addition of live chat and direct ticket submission. You can only send them direct Emails for now.
Conclusion
ConvertKit has managed to surprise us on some instances, with a twist to standard mailing features. As we said earlier, we questioned this setup for emails, but with use, we found it quite helpful. They have used some unique methods for the division for various Email methods.

Also, from adding new subscribers to automating emails for them based on triggers, they have done splendid work. Some things like ad retargeting, Facebook ads are not given as linear feature. Instead, you can use integration for them. In this way, they have covered many important email marketing features using integrations.
Now, shall we recommend it to you? The answer to this tricky question is, definitely! ConvertKit in the hands of an advanced marketer can work wonders. Except for a few things in the design section, the service is exceedingly useful to make a complete set for your one stop solution to Email marketing. If you feel otherwise, let us know what else they need to improve!