
HD Video Converter Factory Review
Detailed Reviews
Have you ever felt that the videos you just downloaded from web are not supported on your devices? Or maybe, the resolution is damn too high for it! In such situations, we cannot afford to download entire video again or keep buying new devices that support every format.
For that reason, we are equipped with video converters. Video Converters, as their name demonstrates, are used to convert videos from one format to another. Not only that, but they are also used to convert the resolution of videos in case they are too raw for your devices.
Pros:
- Top edge video converter with simple to use functions.
- Lossless and VBR mode to further enhance the conversion format.
- More than 300 formats for your video conversion.
- Direct support for many top end devices like phones, TVs, tablets, etc. All of them have preset settings embed.
- Decent conversion speed and good quality
- Has many interesting sub-features in tool-box
- GIF maker to make gif from video files.
- Inbuilt video downloader to grab videos from streaming sites.
Cons:
- May take higher conversion time for 2k or 4k
- Contrary to their claim, quality remains almost same for SD to HD/2k
- The video downloader may give some jolts sometimes.
- The toolbox section has half-baked products. They need to up-scale their quality.
- The UI although plain, is very dull. It can be updated for modern looks.
- Limited customer support
- Pricing is bit far-fetched given that features apart from video converter are mediocre.
Overview
Amongst such video converter tools, we have one of the popular tool known as Video Converter Factory. Being an offspring of WonderFox Soft Inc., they have achieved an amazing market base since they were established in 2009. There are many comparable products under their umbrella-like watermark tools, video converters for various devices, DVD rip converters, and so on.
They claim to have 3 million clients across the world. Their main goal is to supports conversion for 4k and HD videos for lower strata devices. There are many features in it, and in this review, testing each of them is our goal.
When we conclude our review, you will get a clear picture of the software and you yourself can decide its value. So, let’s go and test the software.
Starting with the Video Converter
Before we begin with Video Converter Factory, our first goal is to collect some high-quality videos. This will allow us to evaluate true capabilities of the software. For that purpose, we used some low-quality 360p videos and few 4k videos.
Most converter can easily downgrade the video quality to give a playable version for lower strata devices. However, the main task is to generate a quality from low to high, which we will be valuable in this test.
For our review, we used a premium version of Video Converter Factory. This is to make sure we are not hindered while testing it. After downloading it and setting up the licenses, the central panel of the software pops.
On the main setup, there are some elementary features viz., Converter, Downloader, Recorder, GIF maker, and Toolbox. Of these, we can test them all one by one.
The first option is your standard video converter, which can be used to convert videos. All you need to do is to show the file path and then select file type for conversion and proceed to get your desired file.
The next setup is the video downloader, just like download manager software IDM or EagleGet. These are some popular grabber tools. Similar to them, we can use it to input the URL and then grab and download the videos.
Recorder and GIF maker are ones we have used very frequently. Toolbox has some exciting features, which we will elaborate later on.
One of the most crucial criteria while we convert the videos, is to see that the devices we use the tools on have capabilities to handle conversion. There are times when the software is not designed for low-grade systems, and that often leads to buyer’s remorse.
For the same reason, we will test it on your average desktop product. Let us see if Video Convertor Factory has support for all type of systems and doesn’t overload the heck out of them.
Let’s Try to Convert Our Videos
As we mentioned before, we already had our stock ready to unleash on Video Converter Factory. For plain video conversion, use the button Video Converter.
After you click it, you will see a new window with full converter setup. On this screen, hit add files button. Head to the location of files you want to convert. Select them, and then you can see your file on the converter setup.

On the top portion, the UI of the converter has some usual options like add more files, add folder, clear lists, and merge. Just below it, they have shown video preview window. Hover on it to see the play button.
The video player is decent. They have displayed some info besides this player related to the video file. This file info includes file name, file type, time duration, file size, and resolution. On the right side pane, you can see output file type with same options.
For inspecting entire info for the files, hit the exclamatory icon just below it. In the new pop-up, you will be able to see the information about video in much details like video codec info, aspect ratio, FPS, bit rate, and also audio output.
These are more than enough to give you details on type of video so that you can convert it easily. You can copy it or export it in text format. We will test both conversions as well as merging of two videos. The first test for video conversion begins with selection of the video resolution.
For us, we had a sample file with 640*480 resolution, which we wanted to convert into 2k format, i.e., 2560*1440. Sounds absurd, isn’t it?

Let us check out this claim first. We are not hoping that they’ll adjust the pixels magically into it to generate the 2k format, but we got to test it anyways.
The test took around 30 minutes for converting the mentioned low-quality resolution to 2k resolution. The results were mediocre, and that was what we expected. Without using a dedicated engine to enhance the pixels in the low-quality video, the clarity will remain same no matter what.
Only thing that happened was that the play resolution changed to 2k. However, on the 2k display, quality remained same. As we said earlier, they cannot magically add remaining pixels into it if the original video is such a slag.
Nevertheless, this was the necessary conversion for high-quality videos. Let’s check how the conversion from higher to lower quality works. We had a video with both 2k and 4k quality. We tried to convert it to standard HD resolution that most people use.

The process took a significant toll on our average system. We used hardware acceleration mode to enhance conversion rate. Took around 8 minutes for a minute-long 4k video. This time we tried using lossless compression for the video conversion. Many of you readers may not know about lossless compression, unless you have played with it before.
We won’t go into high technical details, and so on layman’s level, lossless compression is aimed to preserve the quality of video along with reduction in the size. This is done by a designed pixel replacement in images and videos. After the conversion to lower format, the quality was quite good.
The audio and video were totally preserved, and we got file size reduced from 400 MB to 40 MB. This shows the converter did its job correctly. On second hand, we tried to check the conversion for 2k quality too. This time the process was quite at ease.

The size came down to 100 MB this time. The video and audio were almost same. And so, Video Converter Factory has passed in this department. This is the most basic function people look for in the converter tools, and they nailed it.
However, the claim to overhaul low-quality SD videos to HD or say 2k was far-fetched. Without pixel engine, such task is nigh impossible. Next on, we are going to review some more function in the video converter itself.
These are all secondary functions for your video. These include function like cut, rotate, crop, magic enhance, watermark, etc. for these videos. There is also a section below it to change audio output and add subtitles to it.
Like usual, the trim function helps to cut the selected part of videos. Just select time stamp for your video. You cannot select multiple time-stamps in one go and so, use the function again. You can see the preview of all cuts just below it.

Select ok & run conversion. Similar to this, the rotate function can flip videos horizontally or vertically. It can also rotate the videos 360°. Crop function can crop these videos manually for you. Magic enhance can input some color filters on like sepia, negative, etc. It is also used to change the brightness, contrast, and saturation of videos.
The last button, watermark is used to add imprint to the video. You can either type custom texts, select font type, size, color, etc. In this way, entire video will be added with that watermark. Use the custom image button to add your preset watermark.
Advanced Editing Features
These are amazing short editing functions. After this, there is one more advanced settings option in the converter. These advanced setting include options to alter video properties.
In Video Converter Factory, there are number of video conversion settings for advanced users. These settings are video encoders, resolution, bit-rate, frame-rate, aspect ratio, deinterlace, norm, and for audio in the file, audio encoder, bit rate, volume, channels, and sample rate.
In this, first choice Encoders, is used to select encoders for the video conversion. By default, it is auto. Other options are MPEG4, H264, and H265. So, what differences it will make?

Well, all these are encoders. Their primary use is to compress videos. Whenever we take videos using our DSLR or high-quality cams, they have very raw and rich quality. You can rarely make photos clearer than that. But, the main issue is that they are nightmare to carry with.
For regular usage, these videos are of considerable size, and the format may not be playable on many devices. For that reason, encoders are used to make them feasible for regular devices. These encoders control the compression, quality, bitrate, frames, etc.
Among these, MPEG4 is used to control mp4 videos. It works charms when we use it for mp4 videos. Then comes the H264 encoder, they are most popular in last couple of years. Even YouTube videos use it. H264 offers better compression, quality, speed, bitrate, etc.
Contrary to all above for H264, H265 offers much higher compression. It is known as HEVC nowadays, one of the most preferred format for pirated content due to a deadly combo of small file size and high quality.

The resolution tab can work for as low as 240*160 resolution to highest 4k quality. Then they have the setup to select frame rate of videos. The range goes from as low as 12 FPS to standard 60 FPS. Then there are some settings for the Bit Rate of video.
Some popular setting standards in video editing are frame rate, aspect ratio, deinterlace, and Norm. The last option Norm manages standard of the video as per TV standards viz., PAL and NTSC. There is a VBR Mode too to alter bit-rate variably so as to maintain the quality of video. Along with that, Lossless conversion is also given by them.
Lossless conversion helps to maintain video quality but usually takes more time while converting. All these settings are robust, but only thing we want added in to give help text on each of these settings, like given for VBR and lossless mode. This text must give users an estimate of what they are changing.

These were all the advanced editing features. Other than this, there are no settings given in it. For average usage, we’d say that such options are more than enough. The hardware acceleration affects the video conversion rate and sometimes the quality. And for that reason, if possible use hardware acceleration for the conversion.
Video Conversion Formats
One of the most crucial things your head might be rolling for till now is this, isn’t it? What are the formats in which you can convert the files into? How to check if they are supported by my current file system? All these are typically first set of question in our minds.
For the conversion formats, Video Converter Factory has given a big format tab on the right pane. Click on it to reveal the list of all such formats. The UI is very impressive here.
There are number of colorful tabs with names of various devices and video types. Picking any of them further reveals the format in that section. This makes it easier to decide quickly how the video must be converted.

Of these top tabs, we can see options like Video, Audio, 4K/HD, Web, and device-specific like Apple, Samsung, Microsoft, LG, Sony, One Plus, Lenovo, etc. While picking any of these devices, it will list out all the possible support formats for them.
For example, selecting Microsoft in device tab has multiple choices viz., Xbox, Surface Pro, Lumia, Tablets, etc. With Apple, you get device list like iPhones, iPads, iPods, Apple TVs, etc. Same is with every option above. The list may differ based on the device, and if you may not find your device in it, you can always find the one closest to your device.
There is a History Tab here which remembers at least 15 of your previous converted format for quick access. Most of them are under the regular usage umbrella, and so we’d say that these are enough for now. They can monitor and add other formats too here.
One more thing needed is a suggestion button to request any format not given here. The settings are auto changed based on the device type, and so you need not to adjust things again. This may sometimes increase the size of converted files. To manage that, use lossless mode as we mentioned formerly.

This was all in the format settings. Contrary to other products, Video Converter Factory has kept things pretty plain. This makes it novice-friendly. The formats mentioned are daily use type.
Finally, we conclude typical video conversion section in Video Converter Factory. They have scored suitable in this part. Apart from minor UI changes, we did not feel anything was lacking in it. Conversion rate was also decent even for 4k file types. Similar to the video conversion, audio conversion also follows same pattern.
Testing the Video Downloader
This is an exciting feature given by Video Converter Factory. Usually, we just download videos from internet, and then we convert them as per our sake of convenience. However, there’s an issue with that. The thing is if these videos are already in available format, why download them and then go with the hassle of converting them?
For such purpose, we can use the Video Converter Factory’s video downloader. In this downloader, all you need to do is paste the URL of video and it will auto-sort given formats and quality.
First of all, copy the URL to be downloaded. Then paste it the in the field of video downloader. From there, you can directly use paste and analyze to clear the current fields and start scanning URL again.

Once the scan is finished, it will show net time of video along with many other stats. There are two tabs in here. One of them is the videos tabs, where all the available video formats are given and below it is the audio tab. There is also a subtitle button with it.
The big problem with this subtitle button is that, the language that it detects has many short codes. Instead of full language names, they have used codes which confuse many users. They must change this soon.
Nevertheless, one more issue we found while testing was that YouTube videos had limited reach. The thing was that for some YouTube videos, be it regular uploads or copyrighted ones; we couldn’t get the quality above 640*480 pixels. This was a huge drag.
For other sites like Vimeo, Dailymotion, etc., we could see the HD version in the downloader. The bug was gone next day. Since, YouTube is currently top video sharing platform, they must check this.
We used the download button to download files from the site. For sites other than YouTube, there was no size indicator in the video sniffer. One good thing was that the tool auto configures the audio for the desired quality. Some YouTube downloaders have this issue where they give option to download audio only or video only files. Due to that, higher quality videos are audio-less many times. This doesn’t happen in Video Converter Factory.
Sites without YouTube had some trouble with subtitles. Sometimes, it will load, and sometimes it won’t. This may give new users a bad impression for this service. Both of these issues need to be patched soon. This shows there are some prevalent issues in the video downloader which we hope are addressed soon.

Regardless, we weren’t able to fetch videos from cloud sites like Openload, Zippyshare, Mega.co, etc. Thus, we can assume it is limited to top video sites or direct links only. Similar to this, there’s a Screen Recorder too.
It is fundamental and has limited controls viz., capture screen size, play/record button, stop button/shortcut key, and so on. You can also adjust the quality of recording by using the quality slider. It has low, medium, and high graphics settings.
The recording quality was decent enough. Not ultra HD we’d say but at least HD quality. Like video grabber, this was also sort of complementary feature and lacked many functions compared to a dedicated screen recorder.
GIF Maker in Video Converter Factory
A surprise to be sure, but a welcome one, isn’t it? Seeing a GIF maker is a dream come true for online meme armies. With the new meme generator, ahem, we mean GIF maker, let us see how we can use and benefit from it.
To use it, you will need a video file first. Add a video to the screen and then select a frame which you want the GIF from. After that, there are some settings to be filled in the side pane.

In this pane, there are settings to adjust the resolution of GIF. Then, you can input the frame rate in it. Typically, this number here shows images per second. So, if you increase the number, the video GIF will be a bit smoother to watch. There is also a time delay button to select delay for each frame. It defaults to 0.01 seconds.
For lesser values, like below 20, the GIF will be much faster. Just below it, select the GIF quality. With that, hit the Create GIF button and begin the conversion. The saved files will be opened after it. Test the GIF and see if things are ok.
In this way, you can make amazing GIFs with it. Like always the size is an issue here. For higher frame rates, the size will be high. And so, be careful while converting them and also Video Converter Factory must suggest some size estimates before converting. And so, you can continue to make some amazing and funny GIFs with it.
Toolbox Feature
To give some more exciting features along with a package of simple video converter, they have given a toolbox to make sure we keep ourselves busy with it.

There are four main sub-features given by Video Converter Factory in this toolbox. These are Photo to Video maker, Split-Screen maker, Ringtone Studio, and Subtitle Extractor.
Let us gauge such features one by one. Starting with Photo to Video Maker, as name speaks, group of photos are converted to video format with it. With full usage, you will learn that it is like a slideshow maker.
There are no advanced video editing features here. It’s just basic. You need to add photos in the panel to be made together in a video. After that, set a screen resolution for the video.
Select the quality of video and then time span for displaying each picture. Use play button in preview pane to see the flash rate of video. Hit create video and then your photos are compiled into a video slideshow. Pretty neat, ehhh!

Larger pics are compressed to assigned format. We did encounter a strange bug once in our testing. Some of the videos were corrupted to the end of the conversion, and we weren’t able to play them.
Another was the inability of this feature to incorporate the GIF into the video. The GIF appears only in single pic form and does not play. This must be fixed and they must allow something similar to GIF binder here.
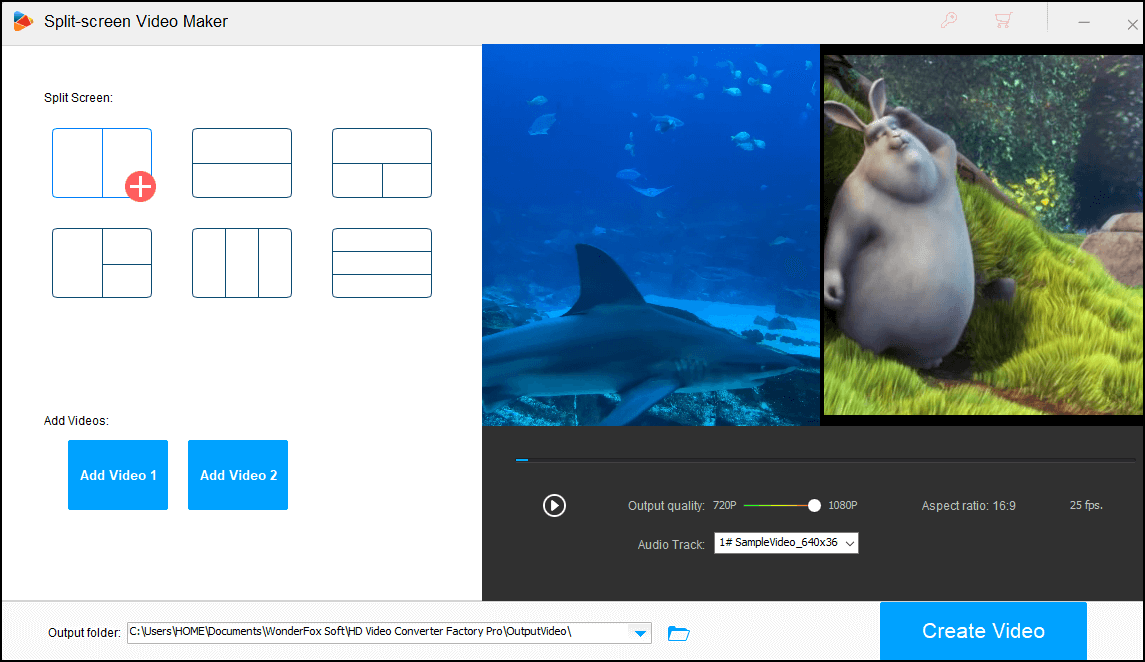
Next comes the Split-Screen Video Maker. In this, the users can join two videos in a split-screen format. This split-screen can be either vertically or horizontally placed with two or three videos. There is no way to adjust the resolution manually.
You cannot drag the video screens to adjust what portion of videos to be focused. This makes it a lackluster feature, and so it is better to use other spilt screen tools with much better UI and features.
The Ringtone Studio is the burger wrap version of the audio cutter. You just add audio, select the cut portion and save it. That’s it.
The Subtitle Extractor was also mediocre. Add the video file from which you want the subtitles, select a subtitle to be extracted, and then the format of subtitle. The supported formats for subtitles are SRT, TXT, ASS, and SSA. All of them are standard and are playable on most devices.
With this, we end the list of features in Video Converter Factory. Apart from the main video converter feature, rest of the sub-feature, especially in the toolbox mode felt like run-of-the-mill.
Due to this, we suggest they must add a subscription specific to the video converter only or make these features advanced. With some UI changes, the video converter can become top-notch. For sub-functions, they need to up their task and work on them as a mainstream feature. Without that, we won’t suggest using these sub-features.
Conclusion
With the end of all the feature list in Video Converter Factory, we would say that they earned their place, at least in the video converter section. With such a plain and basic UI, even a 3rd grader can convert high-quality videos with it.
However, for the sub-features except video converter, rest all were very average. Most of them needed a heavy workout by developers to make them really useful compared to other free counterparts in the market. Honestly, it would be easier to use a separate tool for these sub-features than the one given in Video Converter Factory.
No offense, but if they are adding the value of these sub-features in their pricing, they need to think them as main product too, instead of just some carry weight. Nevertheless, it was quite a fun with the product.
Should we recommend it or not? The answer to that lies in the hands of Video Converter Factory. If they allow us only to pick video converter, the product is worth it. For full package, we’d say wait for them to revamp these sub-features and then surely you can try them out.