
DeskTime Review
Detailed Reviews
Tired of checking your employees’ desk again and again? Or your employees just fool you by switching screens once they see you coming?
Maybe you are a boss who wants an automated tracking system to monitor the work shift of your employees! For all these, imagine the trouble we must go through if we had to do all these tasks manually.
To save your time and efforts, here comes for rescue, a unique software called Time Tracking Tools. Now you may be wondering what exactly are these time tracking tools, isn’t it?
Well, worry not! We will not only help you understand how they work but also help you review the software that you came looking for on our website.
Pros:
- Novice-friendly UI with full automation.
- Free of charge trial for 14 days.
- Automatic time tracking without any manual inputs.
- Can track the used apps and URL and registers them in report.
- Categorizes used apps and URLs based on productive/non-productive, making it easier to distinguish.
- Great employee monitoring feature with screenshots and usage tracking.
- Many integrations like Google Sheets, Outlook, Asana, etc. to aid in tracking and report making.
- Generates data for productivity and efficiency and shows them on a bar graph.
- Also has leave of absence tracking, with description tabs to input reasons of leave.
Cons:
- No keyboard monitoring. Cannot track number of words written.
- No mouse movement monitoring, which can be essential to track the employees in content writing industry.
- Does not have automatic alerting process to inform admins for extra breaks or high usage of unproductive apps.
- The final report is very limited and needs more detailed information.
- No automated billing and invoice generation for employees.
- No automatic salary checkouts for employees.
Overview
Let us now start with the thing that you came to see here. DeskTime is one of such tools that is used to track the work time and office shifts, alongside employee monitoring and many more features.

Started in 2011 as an internal monitoring tool for Draugiem Group, it quickly came out as a dedicated tool to do time tracking. With so much experience at their hands, they claim that they have tracked 7228 years in total and have their tools used across 170+ countries.
DeskTime has also published several research papers concerning employee performance and productivity hours. In one of their study, more than 250k employees participated in a study across 150 nations and among 768 private companies.
This shows how much they have grown over years. Regardless of this, as reviewers, our main task is not to get distracted by these flashes. And so, we will strictly review the features of DeskTime and compare and see if the tool is worthy or not!
Using The Tool
Now, before you jump on the train, it is important to know in brief about working of time tracking tools and their use, for a company head and for employees.
One cheerful thing is that DeskTime offers its new customers a free of charge trial for 14 days. This trial version comes with full features of the pro version, and so users can satisfy their trust in the product before purchasing it.
After you have successfully registered the product, you can just go to their website and download the setup for desktop. Initially, you will be prompted to input details of team members, company name, etc.
Once you are in the tracking zone, there will be a small tray icon in your taskbar. Login into desktop version too, and now it will start the tracking procedure.
There are different criteria to check the working of tool. This tracking tool will look for many activities besides simple time tracking. We will review them all in the features section.
Users can see the generated report on their dashboard. You can switch to one of your employee’s dashboard too. Overall, the entire process is very user-friendly, and you just need to click here and there to get different reports.
Let us now dive into what features this tracking tool has to offer.
Let’s Explore its Features
When it comes to going through a product review, one of the important tasks is to squeeze whatever features, or functions it is equipped with. This allows us not only to give you details about some unique perks of the product but also find out if any of them were working or were mediocre.
In this section, we will review and test these features and let you know if they are adequately designed. Although DeskTime has a lot to progress relatively on this market, we would love to see how they differ from top products like Time Doctor, Tahometer, Hubstaff, etc.
Time Tracking
One of the most basic or core feature of a time tracking tool is tracking time. Obviously, duhh!
Well, the main task is to see how this time is recorded, monitored, how they do conversion for salary and other such functions.
Just like any traditional stopwatch, time tracking in DeskTime is done by counting out of total office hours, how much you worked for in a day. For this, we have DeskTime monitoring tool in your desktop tray.

This tool not only records the time of work but also records other things along with it, like websites visited, current sessions, break times, screenshots, etc.
In the time tracking, the entire work session is divided into different types. The main terminologies are DeskTime, productive time, idle time, offline time, private time, deleted time, calendar time, and tracked time.
Woah! So many times? Am I in some sci-fi world? Do not get bamboozled by this as we will make it simpler for you to understand.
First of all, a simple time tracking would do no good. Just starting a stopwatch while you start working won’t help you much. We need to keep track of not only hours you were an indoor office, but also see your idle time, lunch breaks, and casual breaks too.
The DeskTime refers to total time spent on the system. It will probably be calculated as long as you keep moving your mouse or do typing. Now, to avoid making you type continuously to keep your hours going, they have given an idle time too.
This Idle Time is 3 minutes. This means that if you stop writing for 3 minutes, it will be counted as idle time and not desk time. This time is preset and cannot be changed.
Similarly, Productive Time is calculated as the time spent by you on productive apps. These productive apps are generally predefined like MS Office, OpenOffice, Windows/Mac explorer, DeskTime itself, Google searches, Calculator, etc.
Admins can add other apps in this section as per their company policy. DeskTime has this amazing feature where it auto captures the apps used, URLs visited, and based on that generates the productivity report.
What about lunch breaks then, or snack times? Well, there is also provision for that. There are actually two time-points for that. They are called Offline Time and Private Time.
Offline time means user has remained offline for that stipulated period. This period is not counted in work hours. This is the time we usually take those lunch breaks and tea parties.

The other one, i.e., Private Time, is used to set time for self. This time is different than above one. Under this time setting, when you click on the private time button, DeskTime stops tracking any activity on your system. Users can do any other personal activity here like personal browsing, online purchases, etc.
This means that it will not be counted either as offline time or nor it will be used under any work shift calculations. Other than this, users can also export time from other apps like Outlook calendar, Google Calendar, etc., when you use it for meetings, conferences, etc. This time is called Calendar Time.
Similar to the private time, they have also given Deleted Time. This feature is used in cases where we do not want to count a certain time in a work shift. Let us say you kept DeskTime ON while you were having small tea break or say were in a debate with your colleague.
Now DeskTime will count that under nonproductive hours. There is no provision to change the time type once it is saved. To avoid this, they have introduced a feature to delete time. So now, you can delete certain time period that you do not want under any category.

Lastly, there is Work Time and Tracked Time. Work time, as the name advocates, is time from log-in till you log-off from your system, i.e., office opening and closing time. So, it includes other times like desk time, offline time, and private time. The entire time in this section is used for time-work data sheet.
The last one, i.e., tracked time, as usual, is used to track the total time spent by a user on their current system using DeskTime app.
Now, as you can see from various time tracking terminologies above, you likely have got an idea of how the time tracking works in DeskTime. This data is then used to calculate work shift and later on for salary calculations.
There are much more things that can be done using these data which we will see in the below section. The time tracking feature worked fine, and the division was also good. But there are some missing features here too.
The issue is more related to UI of time tracking. Unlike other apps like Tahometer or Hubstaff, there is no visible counter on your desktop to keep the count. To check for the tracked data, users need to go to the website only.
Also, while long breaks like lunch breaks are there, there must be a pop-up window showing the elapsed time count on it. Give a resume work button too on it. This way, employing more things on the desktop interface itself, including the statistics table, will reduce the need to open browsers again and again.
Other than this, the time tracking was quite smooth and did not bother with normal work.
Employee Monitoring
As a boss, are you tired of walking along the desk of some notorious employee when you see them not working properly? Alternatively, is it that they fool you using tab switchers, or you are unable to see if they work or play solitaire on their PC?
All these things may sound funny but are very critical as per company perspective. Not tracking your employees can result in some guys to slack and devalue or ruin entire projects. They can also lower others’ productivity.
For many such reasons, we need an employee monitoring tool too. DeskTime also gives such a tool in the team member section.

Just as a team management system works, DeskTime also has same system where it assigns different roles to employees and then uses track function to create their work report.
Unlike traditional team management, this tool is mainly used to monitor employees and their work shift and salary calculations. As we have already seen how time tracking works in DeskTime, it is now time to see how it can help you snoop on your employees.
The first step is to make the team and then add members in it. The members are your employees with you being the admin/boss. Now send everyone an invitation over their email ID.
The invitation mail has a username and a random password to login into the team portal. Then the employees need to download DeskTime and login into the app. After this, the tracking process will start.
Now, the question in many minds will be, how as an admin, you can track their activities. To do that, you will see Team Members tab on your main dashboard.
In this tab, admins can see the list of all employees, their designation, project info, and other such details. DeskTime has aided by giving various positions like admins, designers, HR, management, and sales team, for easier management.
You can assign an employee any of these tags or create new ones. After that, you just add any tasks or project for that employee. It will inform them on their dashboard.
While checking, you can also assign certain commonly used apps in office work as productive apps, while apps not used in office work as unproductive. DeskTime will show a list of all such apps, web URLs, alongside the work shift of employees.
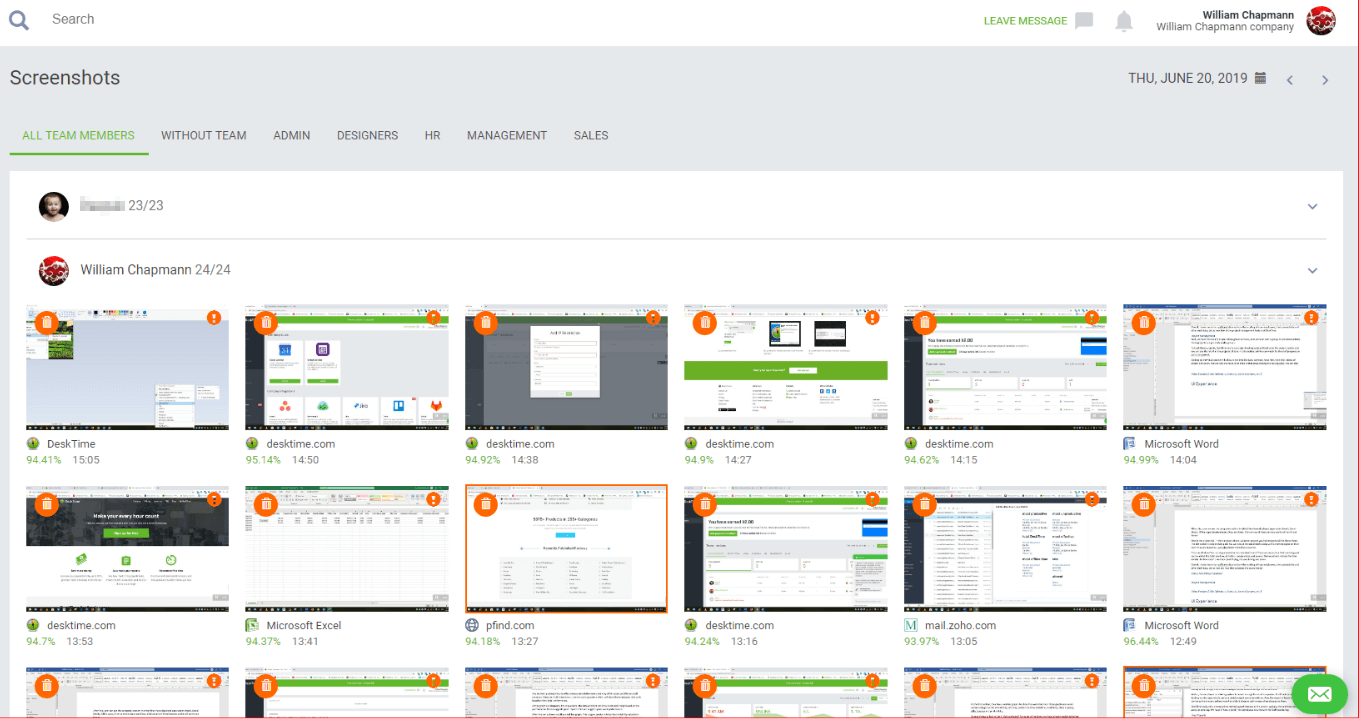
You can also see the project data on dashboard screen. One more thing that is given by DeskTime is a facility to take screenshots. Like other monitoring apps, the screenshots can be configured to be taken at certain intervals like 10, 15, and 45 minutes.
It can take random screenshots too. But admins cannot manually take screenshots. This is a slight flaw lacking some manual input.
Now comes the part where you can customize time differently for various employees. In the team member section, click on the settings button. From here, you will be asked to select a staff member.
In the settings menu of that staff member, admins can input/change details of that staff. They can add a name, full name, phone, photo, and password of that person.
In other options, they can add the shift time of these employees. They can add office time for that person, hourly rates, working days, tracking time range, time zone, and time format.

Other than this, some things can be restricted by admins like private time, absence calendar, colleague info, and their own screenshots. The screen capture resolution can also be set alongside the time between each screenshot.
Finally, on the rightmost bar, you can change the role of staff as admin of company, users, or as an employee. The selected group has an individual category where you can assign them. After setting all the things, click on save changes and all selected things will be in effect.
And so, the employee monitoring system is decent enough for small companies. It still lacks a remote desktop control app, which can be a double-edged sword sometimes. Also, reports of team members can be put in a more aesthetic way like a block diagram with names of employees on them.
DeskTime really did a decent job to maintain good features in this version, and the real-time data access is amazing. We hope in future, DeskTime introduces new features for staff monitoring.
Final Reports
Let us now see one more crucial feature of DeskTime. As we all know that no matter how much data you keep collecting, it is of no use if you are unable to show that data in form of reports.
These reports necessarily not be in long detailed form but can be constricted to forms like bar graphs, pie charts, and other such representations. Company bosses and CEOs have no time to go through lengthy reports and so they need a brief summary of happenings in the workplace.

In DeskTime, all reports can be viewed from My Dashboard section of the app. Admins can not only see their own work shift but also of every other staff member added into the team. There are a number of terms used in report generation.
In the report dashboard, users can see the option to sort a report as per date, week, or month. By default, it will show the users data of current day only.
In the first section, they have used bar graphs to show the work statistics. These graphs are under several categories like arrival time, left time, productive time, desk time, work time, place in group, effectiveness, and productivity.
So many things to look at, isn’t it a bit confusing? For some of the terms, we have already explained before, and so we will only review leftover terms.
Productivity graph is one of the crucial charts in work report. So, as we have already seen the productive time before, productivity is simply its division by total desk time, and then it is shown as percentage form.
By using productivity graph, one can see how much productive an employee is. Similarly, there is another performance check term called effectiveness graph. The effectiveness is calculated by ratio of productive time and workday length.
This allows the admins to view how effective employees were during their work hours. However, this term does not monitor a particular task, and many good employees can complete some work in half a time, which can sometimes make this feature redundant.

Moreover, both productivity and effectiveness are relative terms and may differ based on different staff members. Based on both these terms, there is a ranking system which will show the employees their rank based on their total performance.
All the graph are designed a bit unique here. The data on them will show crest and trough based on the performance. Green suggests good report while red suggests poor work performance.
After this bar, there is another small bar graph, which is again productivity bar, but has %productivity on Y-axis along with time on X-axis. The time on the abscissa is divided on an hourly basis. This allows admins to take a note of work time based on individual hours.
In the same graph, they have given an amazing feature too. You can see productive as well as unproductive time, and apps used. The interval used to capture this is generally 5 minutes. When you click on the hour bar on abscissa, you will get a pop up to delete that time.
For an idle time, users can click on the blank space itself and add details like absence reason, input project name, and put them under either used/unused category.
Now there is another hourly based time tracker below labeled as Project bar. In this bar click on any time block and you will get the same pop up as above to add project details in it.
This is very useful to track your personal work as well as employee’s work; you can know reasons for delay and also know if a staff member took longer than expected to complete a task.
Next on the reports tab, is a list of productive and unproductive apps along with time spent on those apps. Many times, in unproductive section, native processes like rundll32, shell processes, and many software not added in useful work list show up, and count negative in report.
They must update the algorithm to include more office and company apps and remove native windows apps like above, from their blacklist.
After this, user can see the categories section in which they have displayed apps under Emails, Social Media, Office apps, Entertainment, New, and Extra. Click on any of these buttons, and it will sort it out firmly.
Next is the project tab. In the bar graph above, whatever project you had assigned will be shown here. The last section is screenshot part. You will see all the screenshots along with a warning signal on their top, if they are suspicious or not, and also delete them if you want to.

This was all about the reports generated in main dashboard. Some data is missing and can be added later, like total word count, letters, mouse clicks, and so one. They must also include the report on how much time they spent typing, mouse clicking, and so on.
The reports section also allows users to compare the reports with other employees, count extra hours, project overview. The export function allows you to export the data of a specific user in XLS format.
The excel report contains all data, as mentioned above. Later on, users can add their own elements to it. One thing that is missing is automatic calculation of salary based on hour rates.
They only display hourly and project rates in sheets but do not give final cost. It is also a bit lethargic to convert the time format into a full hour and then add a column to multiply them accordingly.
Other tools like Hubstaff, Time Doctor, TimeCamp have inbuilt invoice calculation, which DeskTime too can employ. They also provide automatic salary crediting for employees based on their work schedule. DeskTime still lacks many advanced features compared to other tools.
Overall, it was more than enough data to deduce work shift of your employees, their productivity, and other such data. Let us now look at the project management feature of DeskTime.

Project Management
Well, we have done many projects throughout our lives, be it alone or with a group. In professional field, these projects are generally under groups.
To track these projects, DeskTime too has a project tracking system. Head on to the project section, and you can see the list of all the projects to date. In this section, admins can watch for the staff progress on a particular project.
Clicking on an individual project will allow seeing info like date, currency, hour rate, time limit, status of project, and so on. You can add the tasks to be done in that project using the task button. You can also archive a project if it is finished.

Using the tray icon, you can also select a project, start its timer, and can also stop it. This will help in precise time tracking for a project rather than adding it manually on the dashboard screen.
This was all about project management in DeskTime. As we can see, it has only basic functionalities. Moreover, external integrations are provided, which we will see later on.
Other Features
There is a colleague section given too. This section has nothing notable except that it displays the total staff members, their names and email ids.
The team member section is same as explained in employee monitoring part. You can see different groups and teams for each individual.

There is also an Absence Calendar, which is used to add stay away time. Admins can organize the reasons from the given list, like a conference, parental leave, business trip, vacation, unpaid leave, sick, rest day, and out of office.
This will reflect in the final report too for the invoice purposes. Then there is a separate section for screenshots. The screenshots section is basic and will display the images taken on staff devices.
Integrations: For integrations, they have given personal as well as project-based integrations. From personal integrations like Google Calendar and Outlook Calendar, the list goes on to company integrations like Asana, Basecamp 3, GitLab, Zapier, etc.

These are very basic to configure and can be used efficiently, along with time tracking and project management.
These were some of the extra features in DeskTime other than simple time tracking.
UI Experience
Talking of the UI, DeskTime only comes for desktop devices. Although they come with a version for all three main OS like Windows, MacOS, and Linux.
There is a small setup for the native app on desktops. The app can be viewed in the tray in the taskbar. If you click on that icon, you see some basic tweaks like start or stop a project, pause the timer for private time, break reminder, etc.

The web browser interface is same as discussed above. Whatever detailed setup we have reviewed above was for the web version of the tool. Mobile version is very similar, only difference being that it has limited customization than the web UI.
Other than this, in the settings section, users can edit their profile settings. Add or remove team members, edit their work shift settings, their groups, etc.
The apps productivity tab can be accessed to add, remove, or modify apps underproductive, nonproductive, and neutral category.
In the categories tab, you can modify apps as per categories mentioned before, like social media, entertainment, news, etc. and see total time spent on them.

There is also an IP block feature given to restrict access of certain employees on a project.
Overall, the UI is quite smart and simple. There are certain things still to be added when compared with top products like Hubstaff, Time Doctor, TimeCamp, etc.
Still, it does its core work, and we hope in future we get to see more advanced features in it.
Conclusion
In our conclusion, after using this tool, we would say that DeskTime, even though relatively new, has included some great features in it to provide a seamless time tracking and monitoring.
Although, it still needs to add more advanced features like top products in this market and increase its features to justify fair pricing. At present, they charge $6/user, which is a bit balanced comparatively. They can add more features if they want to increase the pricing of the plans.
Finally, there is zero cost trial version for two weeks, which users can dig into and test the pro features of DeskTime. Now, have you already tried this application? If not, try it and then let us know what you feel about it, via comments below?