
Movavi Video Converter Review
Detailed Reviews
Are you up for an outing outdoors? Are you planning to take those newly bought DVDs to watch mid-flight? Wait! How are you going to play those DVDs on your phone? Wait, even if I copy them via my desktop, will they be supported in my phone?
All these questions are pretty obvious when you are looking to convert media files from one format to another. For that reason, we have tools called Media Converters. Among these media converters, the ones widely used are Video Converters.
Pros:
- It has one of the fastest and easy to use Video Converter.
- Top video editing Can use device-specific or entirely manual video settings.
- Tons of formats and individual device types for video conversion and easier to access.
- Video stabilization to improve shaky videos.
- It can do batch conversion
- Free trial for a week with all features unlocked.
- Users can merge multiple files with separate effects in each of them.
- Upright customer support options from tickets to live chats, FAQs, tutorials, etc.
Cons:
- The free trial is restricted by watermark in it.
- The features are too ordinary available in many other freeware tools.
- No online video downloader
- No support for DVD burning in it.
- Lacks multiple trimming User can only trim single section at a time.
- The features in video effects editor are mediocre. Needs much better updates in them.
- No screen recorder tool in it.
- No split-screen video maker.
- Needs a separate video to GIF maker. In the current version, it is difficult to make one. Also, very less GIF editing features in it.
Overview
Video Converters became a lifeline in this age with so many devices, and each one having their own file format. It becomes stress-free if we just use its functions to convert video and audio files easily to other formats.
Among such video converters, we have Movavi Video Converter to accomplish our tasks. Being finished in 2004, this company has excelled slowly by a variable range of their products. They have their company based in Novosibirsk, Russia. They have other offices in USA and Cyprus too.

Among its other products like video suite, converters, editors, screen captures, online video converters, etc., they claim to have grown their services to millions of customers across 150+ countries. This shows that they are no joke in this department.
Now, for this review, we are testing their video converter only. You can try their other products too. In our review, going through the core features is our priority. For secondary features, we won’t be much critical. Let’s check the video converter then.
Roughing Up the Initial Setup
We know that you are quite eager to see its features, but we have go step by step to evaluate the software properly. For that, go to their website and go to their products page.
From there, select video converter and then choose the trial version first. There is no mention of supposed restriction for the trial version, but we got to test it, there are any pseudo brakes in the trial version.
After the installation, Movavi will ask for the graphics card setup. Choose your card and proceed. If you do not have a card, they will install the OpenGL drivers to give better functionalities.
The central panel includes list of almost everything you want on its front setup; from usual video converter options, to video formats, preview pane, output format, merge button, general settings, and some extra tools in it.

We have extensively gone through these features, and we will slowly reveal their real properties in it. The UI is dark themed which some users may enjoy.
The secondary features in Movavi Video Converter are effect based, i.e., it can crop videos, apply watermarks, and other such effects with it. Unlike other software as in Video Converter Factory, AVC, etc., they have not given features like screen recorder, split-screen maker, DVD burner, etc. This means that Movavi has focused this product on one product only.
The process for converting the videos to different formats is too dull. Most of the settings are on front row of panel, and so there is no running around searching for specific features. In next section, let us evaluate its video converting functions one by one.
Converting Videos with Movavi
The chief features or say functionality of Movavi Video Converter, is to convert video files from one video format to another. This can be either in another video format or to audio format.
There are many criteria utilized to assess Movavi Video Converter. These criteria include checking types of formats and devices available for conversion, quality of the converted media, performance of the product while ongoing conversion, and looking for other editing features before converting the file.

For now, looking at the primary video converter, you have to access the main setup of Movavi Video Converter. From there, select button Add Media. Options to import either audio, video, images, or DVD files are given. You can directly add entire folders too for auto-scanning all media files from it.
To begin, we imported some files from our test folder to the interface. These were different types of files for the tests. Out of these, some were of low 3GP quality, some SD, and then 4k quality too. The main goal is to check the quality from output files.
On general notes, you cannot add quality to a low resolution file without external engine. That is why any claims from any type of video converter, that they can magically convert blur quality videos to HD are typically hoaxes.
Movavi doesn’t make such claims at least. We used a file of 640*360 resolution for testing low-quality conversion. Testing it to be converted to HD file was our aim. The quality was rich enough to be reflected in the movie.
Just add a file you want to convert into the interface. After that, it is time to select the settings for video conversion. We can look at them in below section.
Regulating the Output file Properties with Movavi
Once you import the media files in the setup, your next step is to adjust output settings as per your desired quality standards. Typically, everyone wants a higher quality output file.
However, the higher its quality becomes; the size of files will also increase. Due to this, you have to look at the size after conversion to make sure it’s not too big. Since we are to see varied options in Movavi Video Converter for changing properties in output files, we need to move on to that section.
While converting, there are two main panels in the interface. The top panel with video preview has some custom options while bottom one has fixed setup.

The top pane shows details of given file viz., its name, size, resolution, current format, and codec used. For the output stats, users can alter name, quality, resolution, subtitles, audio bitrate, and video editing options.
On the output side, just click on an item you want to change. On the quality button, you can choose output size, quality, bitrate, and sample format. The slider for the given file can be dragged to highest as well as lowest quality. To be honest, the size increase was very much.
Our 30 MB file had the option to either shrink to 12 MB or 1.40 GB for highest quality. There is no explicit mention of the process used to transfer such low quality videos to high. The bitrate can be selected to either constant or variable.
This part is also crucial since it will decode the quality of the video itself. VBR or variable bit rate is used to smartly allow bitrate to be adjusted accordingly. This helps in maintaining decent quality throughout. There is rest button below to retract all the changes.
For the bottom panel, users can directly choose a device. We will discuss these devices and formats in later part. For now, this panel requires fewer settings. Users just need to look for their devices and then convert it from here.
There is also an option in it for scanning connected devices directly. There is a small gear icon in bottom panel. This menu has an option to do advanced editing for output videos.

You can edit preset qualities from here. There is an option to select various changes for the video like codec, frame size, resolution, quality, conversion method, bitrate, tuning, speed, and frame rate.
Users must check for each of these terms before randomly changing them. To be honest, Movavi Video Converter must have given some help text hovering over these buttons. Video Converter Factory has used same thing in their advanced settings.
Some similar settings are given in audio tab too. Compared to other tools like AVC, Video Converter Factory, etc., we can say that options here for advanced editing are more robust and more upfront.
However, some of the settings are not available. One of them is codecs for video are limited. There’s no x265 codec version, which is widely used nowadays for smaller size and higher quality. Other than that, things are pretty great in here.
After that, users just need to hit convert button. This may take time depending on the quality set by users. For regular usage, the conversion rate is quite fast. It’s a bit faster than similar tools AVC, Video Converter Factory, etc.
For a free trial version, you will see a watermark of Movavi in the video embedded by default. There is a power button just on the top of the conversion progress bar. This allows us to choose after completion action like idle, shutdown, hibernate, sleep, etc.
You can pause or stop the conversion from this bar. Regardless, the process for conversion from SD to 4k quality took around 30 minutes without GPU processor. This time is excellent compared to other tools we have used so far. This lower conversion time adds to Movavi’s advantage.
Formats and Devices Supported
From time to time, this is a thing that is checked for most before using any conversion tool. This is because we want our software to be able to convert from any device format. Also, it must support as much device as possible.
For that, there is no separate section in Movavi Video Converter. For now, users can only access it via main menu. These formats are given in the bottom panel.

They have divided these into categories viz., Popular, Videos, Audios, Images, Devices, and Custom. All of them have been designed aesthetically to include proper representations of the formats. This makes identifying them easy.
In the first tab, for accessible formats, we have some nice ones like M4A, MKV, FLV, MP4, JPG, GIF, IPHONE FORMATS, MP3, AVI and MOV. All of them are quite frequent in daily usage, and modern devices support each of these file formats. So, for quick conversion, they are alright.
The next part is to pick video formats. In video formats, users can view categories for MP4, AVI, WMV, MOV, HD/4k/2k, Flash, MKV, and Webcam and DVD formats too.
This part is designed a bit tricky. When you click on above main formats, a small pop-up with more options will appear. This pop-up asks for different resolutions like SD, HD, 2k, 4k, etc. For each of them, settings are preset and cannot be altered unless you choose manual mode.
Similarly, the audio section has supported popular formats like MP3, AAC, WAV, WMA, F4A, etc. They also have a slot for Apple audio devices. Like the video resolutions, users can pick audio bitrate. This shows how simply you can just choose a format and quality in one click from here.
For converting files into image format, you can use multiple formats from JPG, GIF, PNG, BMP, TIFF, and social networking formats too. There are not many choices here. There is one issue we found in it though.
The issue was with GIF converter. The GIF converter was average, without better filtering option. Users can only convert entire file into GIF or use the trim button to do so. This mustn’t be the case.

In another tool, Video Converter Factory, they have given much better UI for GIF conversion. Users cannot directly trim portion for GIF in it. Here, the portion needs to be trimmed beforehand. You cannot set a custom resolution of output file.
No option to change frame rates, and frame delays too. These advanced options must be given by them for GIF conversion. The file size also seemed to be a bit higher than other comparative products. They must separate GIF tool since it is hot favorite for modern internet.
Now for Devices Section, Movavi has given support for 20+ individual company products. Under each of these products, users can choose any of them, and they get lists of individual devices of that product. This makes it easier to navigate to your own device.
In case you still are in a hurry, use search button given on this tab. For example, search Apple in the box, and you will see some pop-ups for it. Quite handy, isn’t it? The number of devices available range from ordinary mobile devices like iPhones, Androids, etc. to bigger setups like HD TVs, PlayStation, Xbox, and even old feature phones.
This shows that they have prepared a hefty stock of different video conversion formats. In case your device is connected to your desktop, you can directly use device detection button next to search button.
Lastly, the custom section is there for you to save your preset formats. This means whenever you assign new settings for conversion, Movavi will save those configurations here. You can later access them directly instead of setting them up again.
It is evident that they have supplied users with vast formats and device support. The UI made it a hassle-free hunt. Only issue we saw was with GIF converter. We have mentioned our issue above regarding that and wish that they entirely separate the GIF maker.
Additional Video Editing Features
When it comes to playing with a video converter, one of the additional features we all look for always is editing functions. If we can edit the video in converter itself, it becomes so much better.

To access them from main setup, use edit button given on the video file added. The main video editing effects given in it are Stabilization, Audio, Adjustments, Effects, Subtitles, Watermark, Crop, Rotate, and Trim.
As we see, these are quite common in video converters. We need to use our skills to test them properly. Starting with Video Stabilization, its function is to stabilize the videos.
Video Stabilization
So, how does video stabilization works? So how does Movavi Video Converter organize it? Well, as humans our hands are often shaky when holding things. People like surgeons train themselves to eliminate it.
For same reason, when we record videos, no matter how much we control, our video does get shaky from time to time. Because of that our videos get shaky. Also, while we record some sports like cycling, bike races, etc., the problem increases too much.

For that purpose, we need a video stabilizer to reduce this issue from videos. In this stabilization feature, there are many settings given by Movavi viz., accuracy, shaking, radius, smoothing, and edge cropping.
Among these, accuracy is used to set the quality of analysis. Higher values yield more precision while processing the video and takes longer time. The next one, Shaking, is an option to set the amount of trembling your video has. A higher value means the video is very shaky.
After that, the Radius Button allows us to decide pixel correction. The pixels adjusted in the video are borrowed from surrounding area. Due to this, lower the radius, lesser will be the mixing of pixels, giving a more uniform correction.
Then comes Smoothing Button. With this, users can limit camera acceleration. For too much camera movement like moving cars, ball games like cricket, basketball, etc., it can reduce that. Once again, you need to look for some optimum settings based on how fast the camera follows.
Now, to avoid edge distortion, there is also Edge Cropping. With this, users can crop a video accordingly. Once these settings are covered, users can now apply them and then convert the video. For our test, we had a video of moving train minute shaky hands.
For that, we used some optimal settings to stabilize the video. The results were bit satisfactory. However, as we said, there were some significant distortions on edges of the converted video. To avoid that, they have given edge cropping, but that was not enough.
Nevertheless, the video was still playable, but the work done by it was definitely mediocre. If you are serious about this issue, instead use a dedicated video editor with these functions. Movavi Video Converter has limited workability for that.
Audio and Video Adjustments
Another setting we see in the video editor is for audio and video graphics adjustments. With that, we can look for all of them in the effects tab. First, for the audio effects, they have given options to edit it via managing volume percentage, normalizing volume and reducing background noises.

All these are worth a try. For volume percentage, it will ensure to increase the volume levels for that file. This can help in making the sound bit more clearer. In the noise level options, users can reach the decibel level of how loud the surrounding sounds are. To avoid significant distortions in sound levels, use normalize sound button. Other audio effects that are lacking are sound effects like echo, bass, treble, etc.
For the next one, we have Video adjustments. The adjustments here are for general graphics settings like brightness, contrast, hue, saturation, magic enhance, and noise removal. Out of them, the unusual ones are magic enhance and noise removal. Magic enhance is used to automatically adjust, brightness, contrast, a saturation of the video file.
On the other end, Noise removal is used to removal jarred edges, and grain effect from a video. Based on the quality of video, you can set noise-level meter to a higher value and adjust the video. Further, the next tab here is for adjusting the minor effects in video.

These are similar to ones we apply to our photos like sepia, negative, etc. Currently, Movavi Video Converter has limited stock for effects, with only 7 such effects here. For further effects, they have advertised to use their dedicated video editor instead. Since that one is entirely a different product, we won’t be reviewing that.
So, for now, we’d say the journey was not that high in this section. The effects were indeed mediocre. Compared to other tools like AVC, Video Converter Factory, these were not good enough to beat them. You can use both of them for standard C grade video editing. For sophisticated and better functions, we would suggest other tools.
Add Subtitles and Watermarks
Another sample to check for is the subtitles and watermark section. With videos in so many languages and accents, we may need subtitles to understand some words from the speaker in videos.
For that, we can also add subtitles into a video with Movavi Video Converter. All you need to do is have an SRT or TXT file with timestamps. After this, users can check encoding of their subtitles.

Select the position of subtitles and then the audio synchronization value. Once all this is completed, use apply button. Then use the Watermark Section to add text for copyright contents. In the watermark tab, you can add either text watermark or image watermarks.
The text watermark has tons of formatting options for texts like bold, italics, font size, shapes, colors, etc. For the image part, use company given logo for watermarking the videos. We found same setup in most other equivalent products.
Crop, Rotate, and Trim
The last functions for editing effects are crop, trim, and rotate functions. All of them are pretty elementary.

For the crop section, users just need to select the area of video to be cropped. Users can manually input the area of crop tool. Other than that, they can drag the crop region too. The video will auto-zoom removing the region external to shape. Same old thing here.
For the trimming part, users need to adjust slider over play-button. Once you set the slider on beginning and endpoint of the video, click apply to save the changes. This will trim the selected time-span of video.
However, unlike some other products as is Video Converter Factory and many more, you cannot just select multiple trims in a single go. This is one of the cons here.
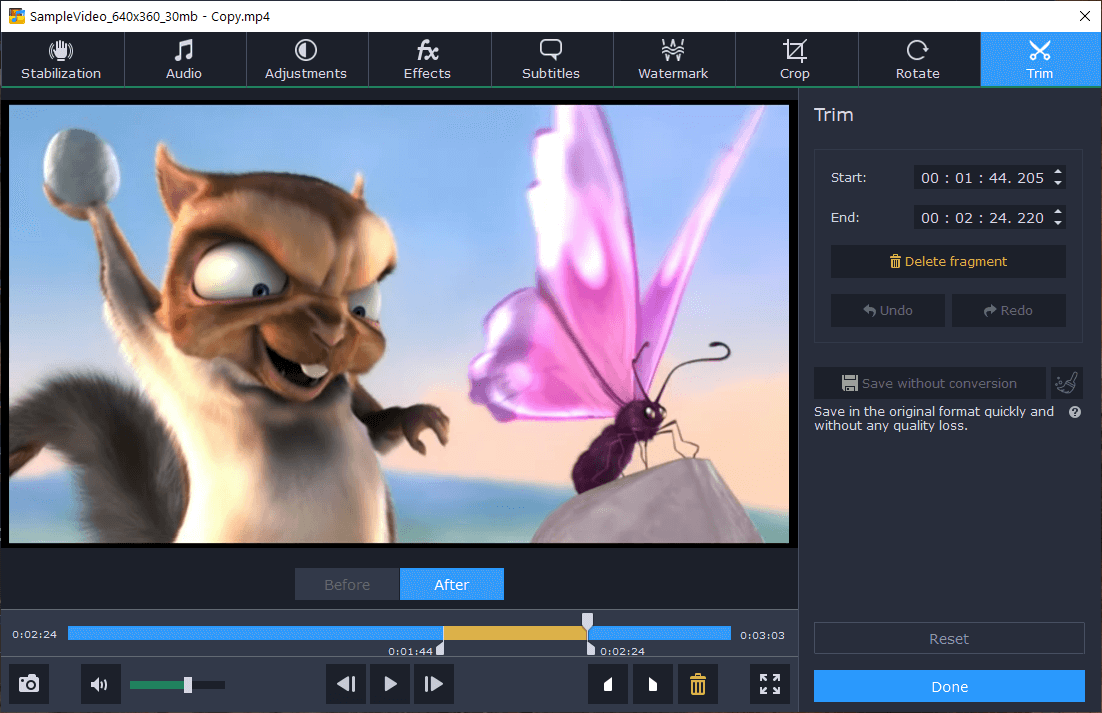
The rotate function had same issues. Nothing extra was in it. Like any typical video converters, users can only rotate video clockwise or anti-clockwise. Users cannot input the rotation degree manually in it, which we hope they add in it.
This ends the list of video editing things you can do in Movavi Video Converter. All of them are decent enough, and neither is too good. There are some more UI features to be added in each of them to make them more relevant to their sections.

It lacked some of the advanced features of video effects like split-screen, photo to video converter, video recorder for screen recording, etc. Currently, they have another product for video editing, which you might want to check for advanced features.
Conclusion
Now, for conclusion, we have to give a verdict if we enjoyed using the software or not? For that, we would say that the software was not that good when it came to secondary features.
Not that it had tons of them, but the video editing features were quite mediocre. Comparing the pricing plans, it was cheaper than Any Video Converter and Video Converter Factory. Also, the UI was tad smoother than them.
Also, the conversion quality and conversion time were much better in Movavi Video Converter. At least the main video converter is worth it. For better video editing features, they have their Movavi video editor which you can try.
So, concluding to this review, we say that Movavi Video Converter is worth a purchase. The license is lifetime so it can benefit for long-term usage. For other video editing features, we hope Movavi improves them further and then it can grab the top spot quickly.